I finally took the plunge and bought myself my very own laser cutter! It’s a cute little Flux Beamo!
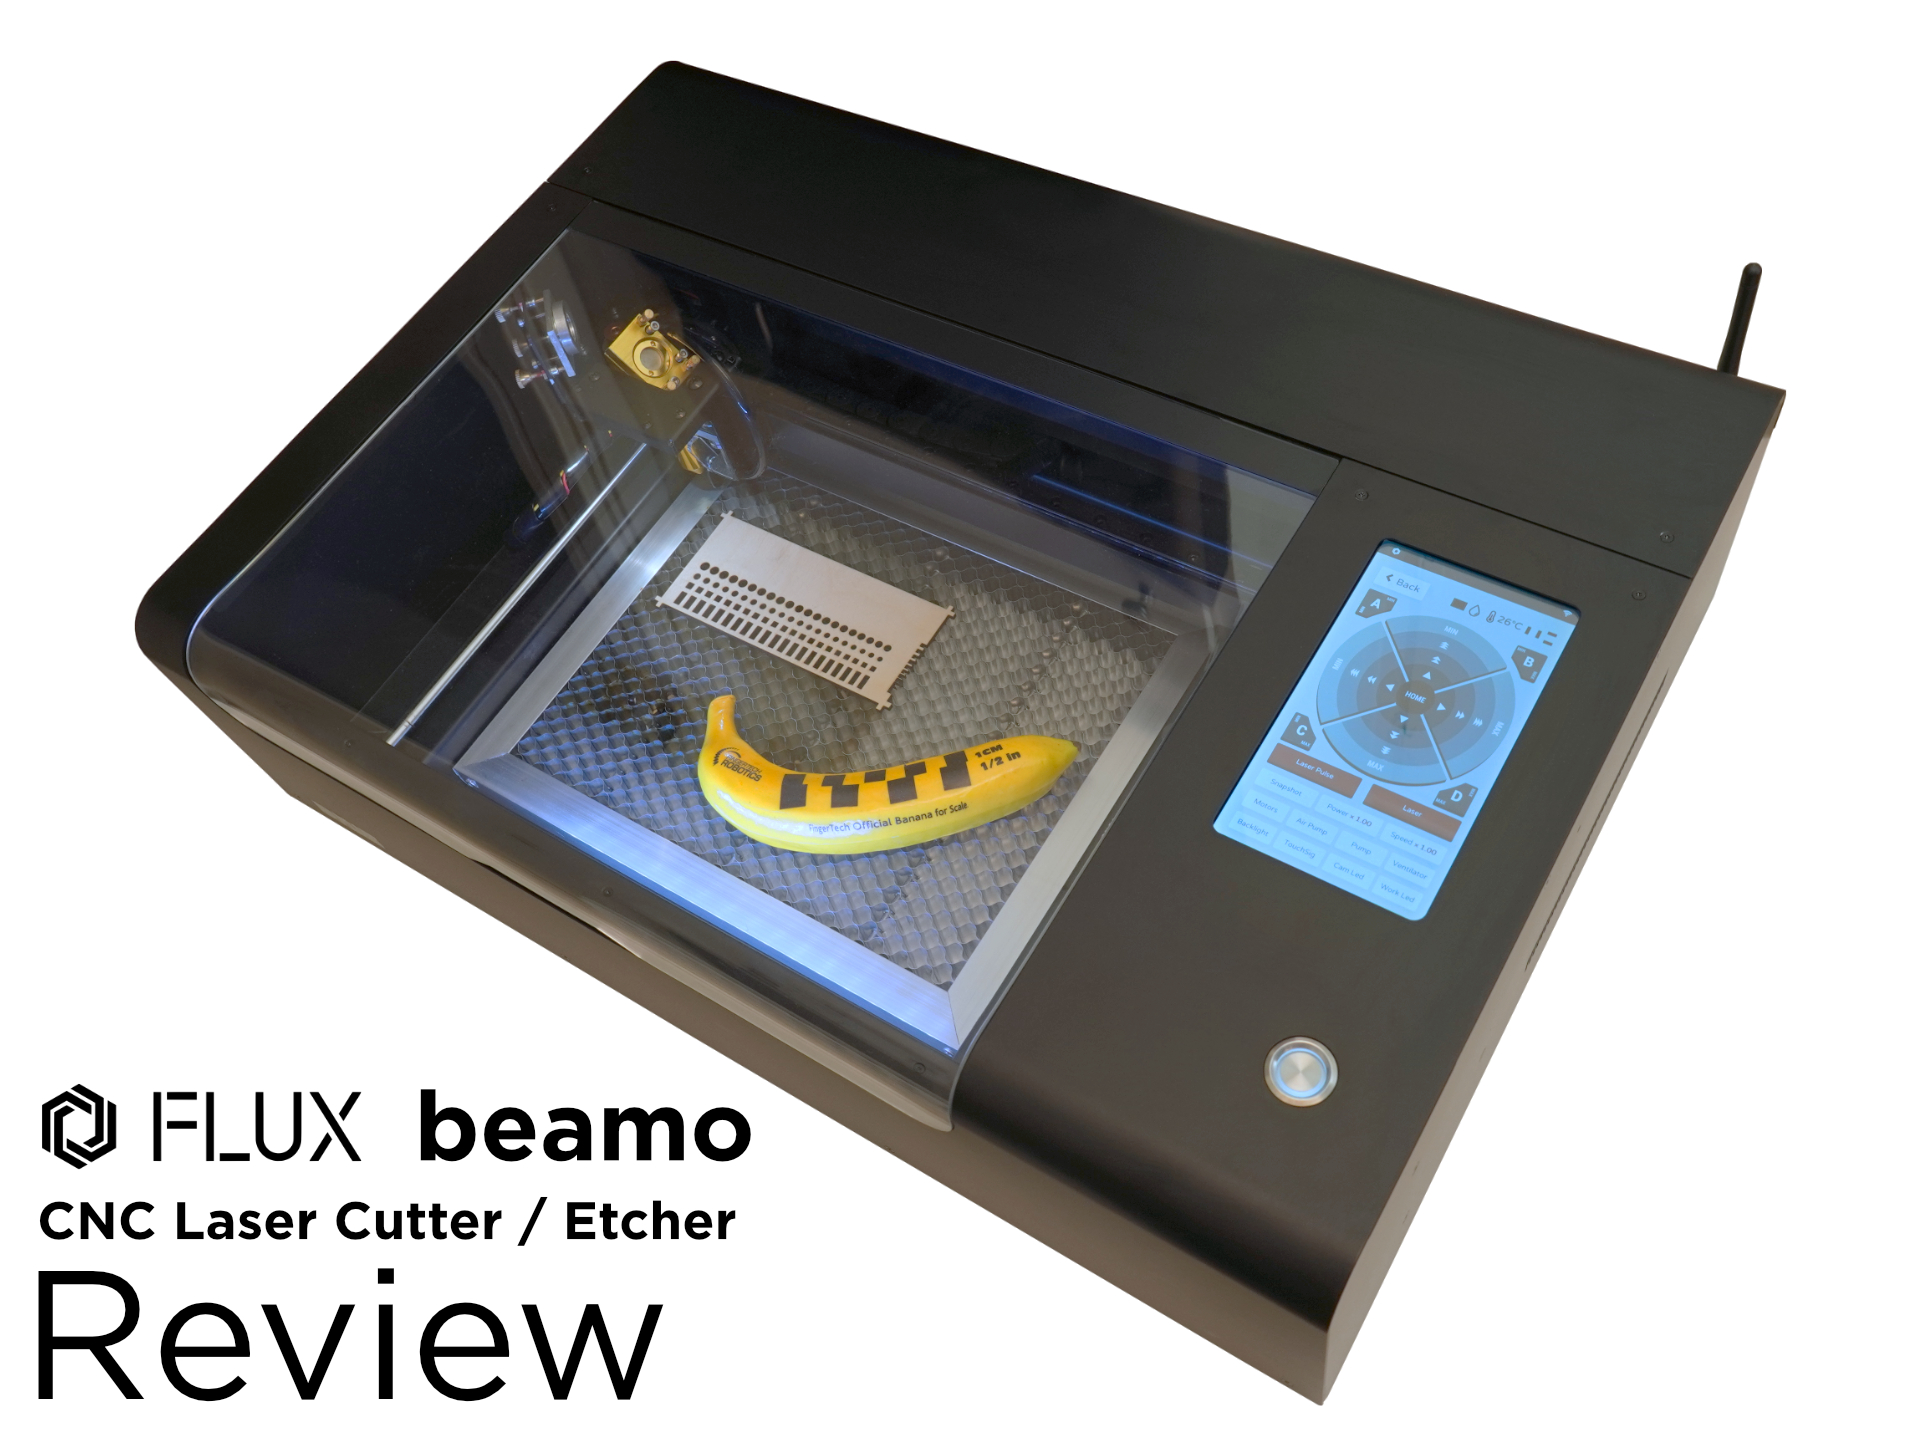
A small but modern 30W CO2 CNC laser cutter/engraver. Here’s what I think of it…
The Flux Beamo claims to output 30W of optical power at 10.6um wave length. The workspace area is about the size of a sheet of paper, 300mm x 210mm. It has modern features such as a touch screen, camera preview, and WiFi. It can also be upgraded with a “autofocus” attachment, and a rotary attachment.
It also advertises to be capable of 1000 DPI of resolution, meaning each pixel is 0.02mm, which is half bull****, the stepper motors are capable of that sort of resolution but the laser beam itself is larger (depends on focus and settings and the area of material being melted), all CO2 lasers are like this.
The capabilities of the laser is supposed to be enough to cut and etch clear acrylic. Other “easy” materials like wood and leather it’ll have no problems with. It also claims to be able to etch glass, and even stainless steel if you coat the steel with a special coating first. 30W is still on the weaker end of the market, it means the cut depth isn’t very thick and the speed will be slower, but these are problems that can be mitigated or ignored.
Out of the box, it worked, I didn’t even read the manual. Connect it to WiFi, send over a file, and it did its thing. The laser was already pre-aligned from factory, and the cooling water tank was already filled. My first cut was done on 3 mm thick wood, with default preset settings, and it did a fantastic job. Clean consistent cuts with straight and thin lines.
Here are some pictures of example cuts and etches I did.
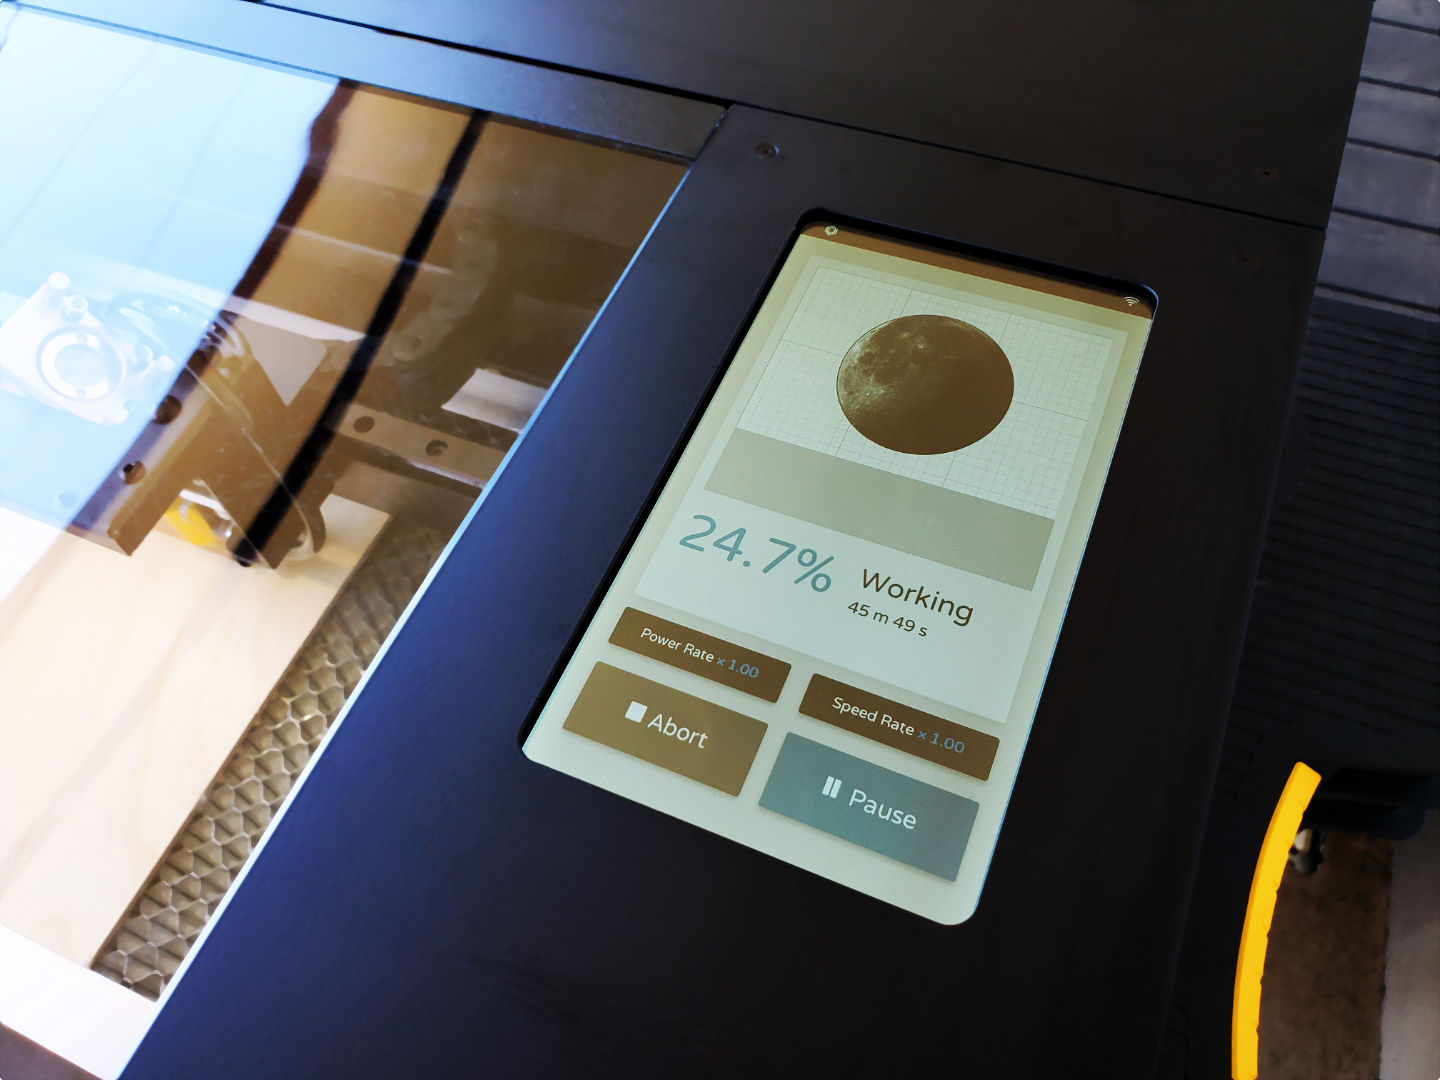
EDIT: June 27 2020, first MAJOR project!
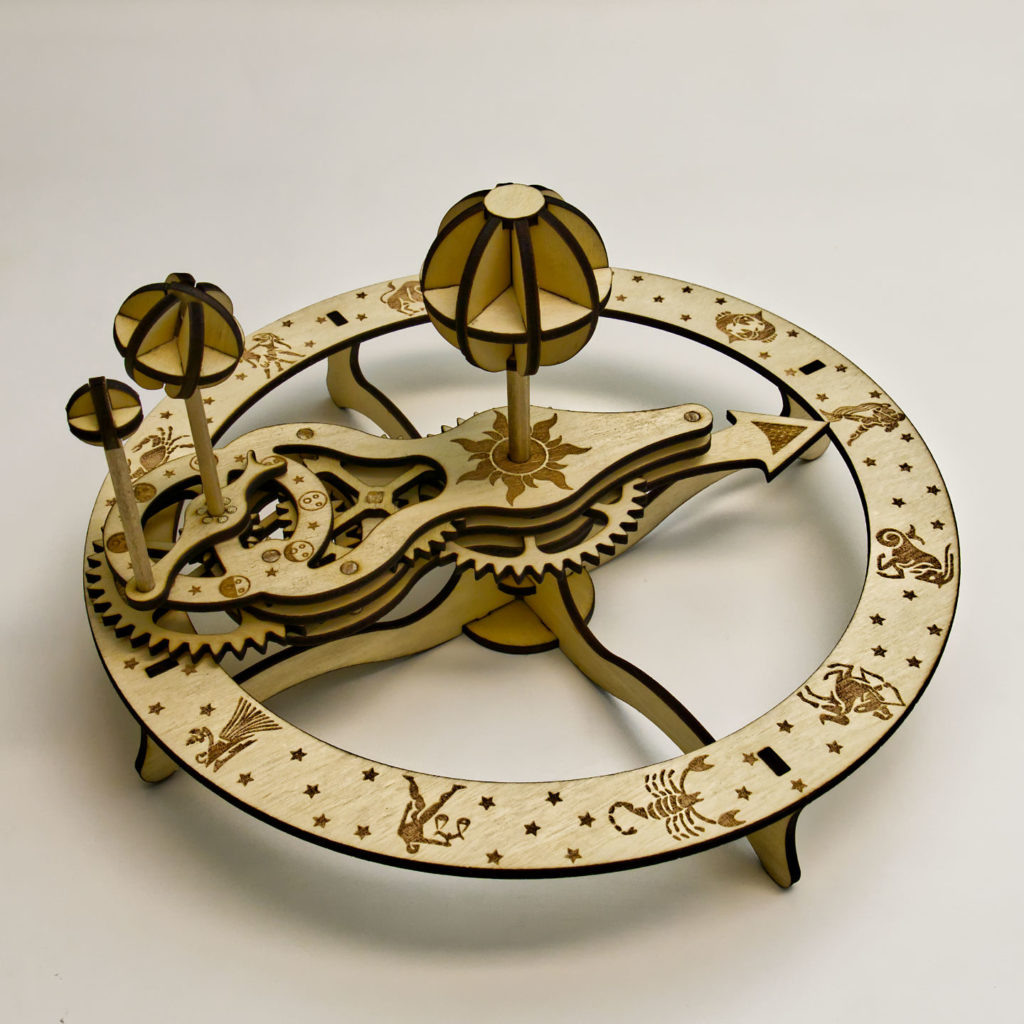
It’s an Orrery, a mechanical toy that depicts the position of the Earth and Moon as they orbit each other and the Sun, with artwork showing the moon phases and Zodiac. This project demonstrates many cuts and engraving operations done in one go on the Beamo. Once you establish a workflow and figure out all the gotchas, a somewhat complex project like this is totally possible.
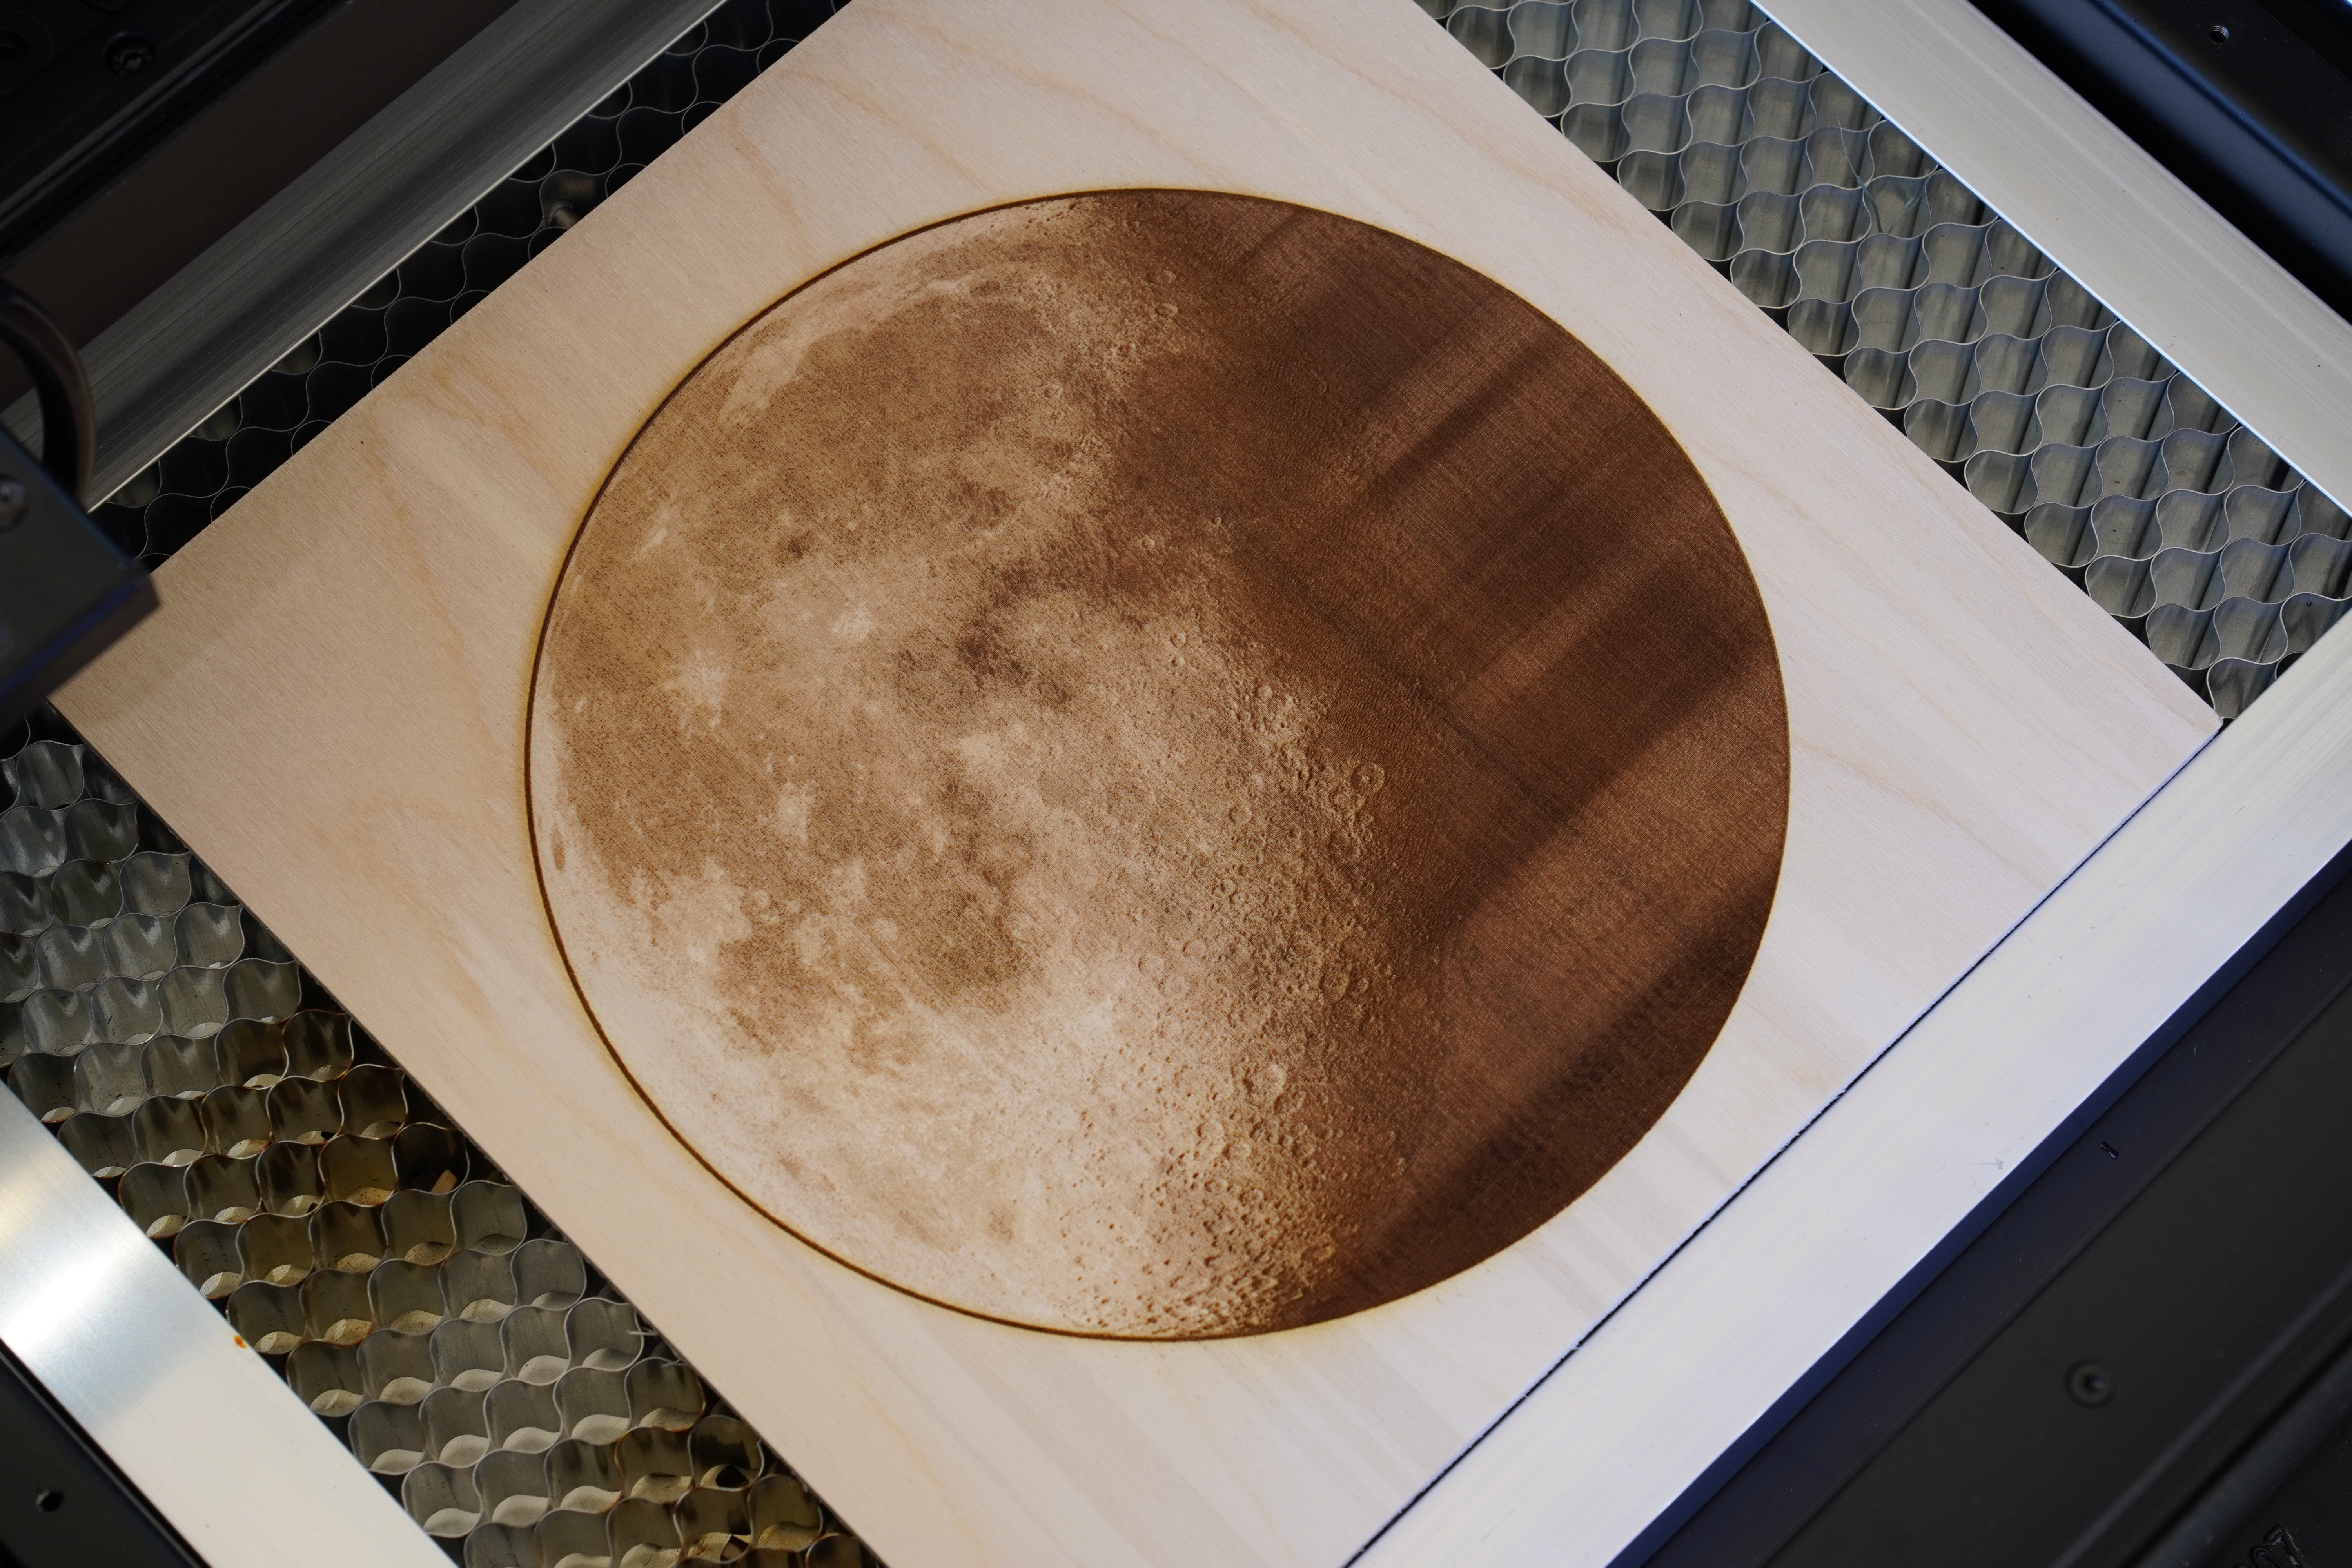
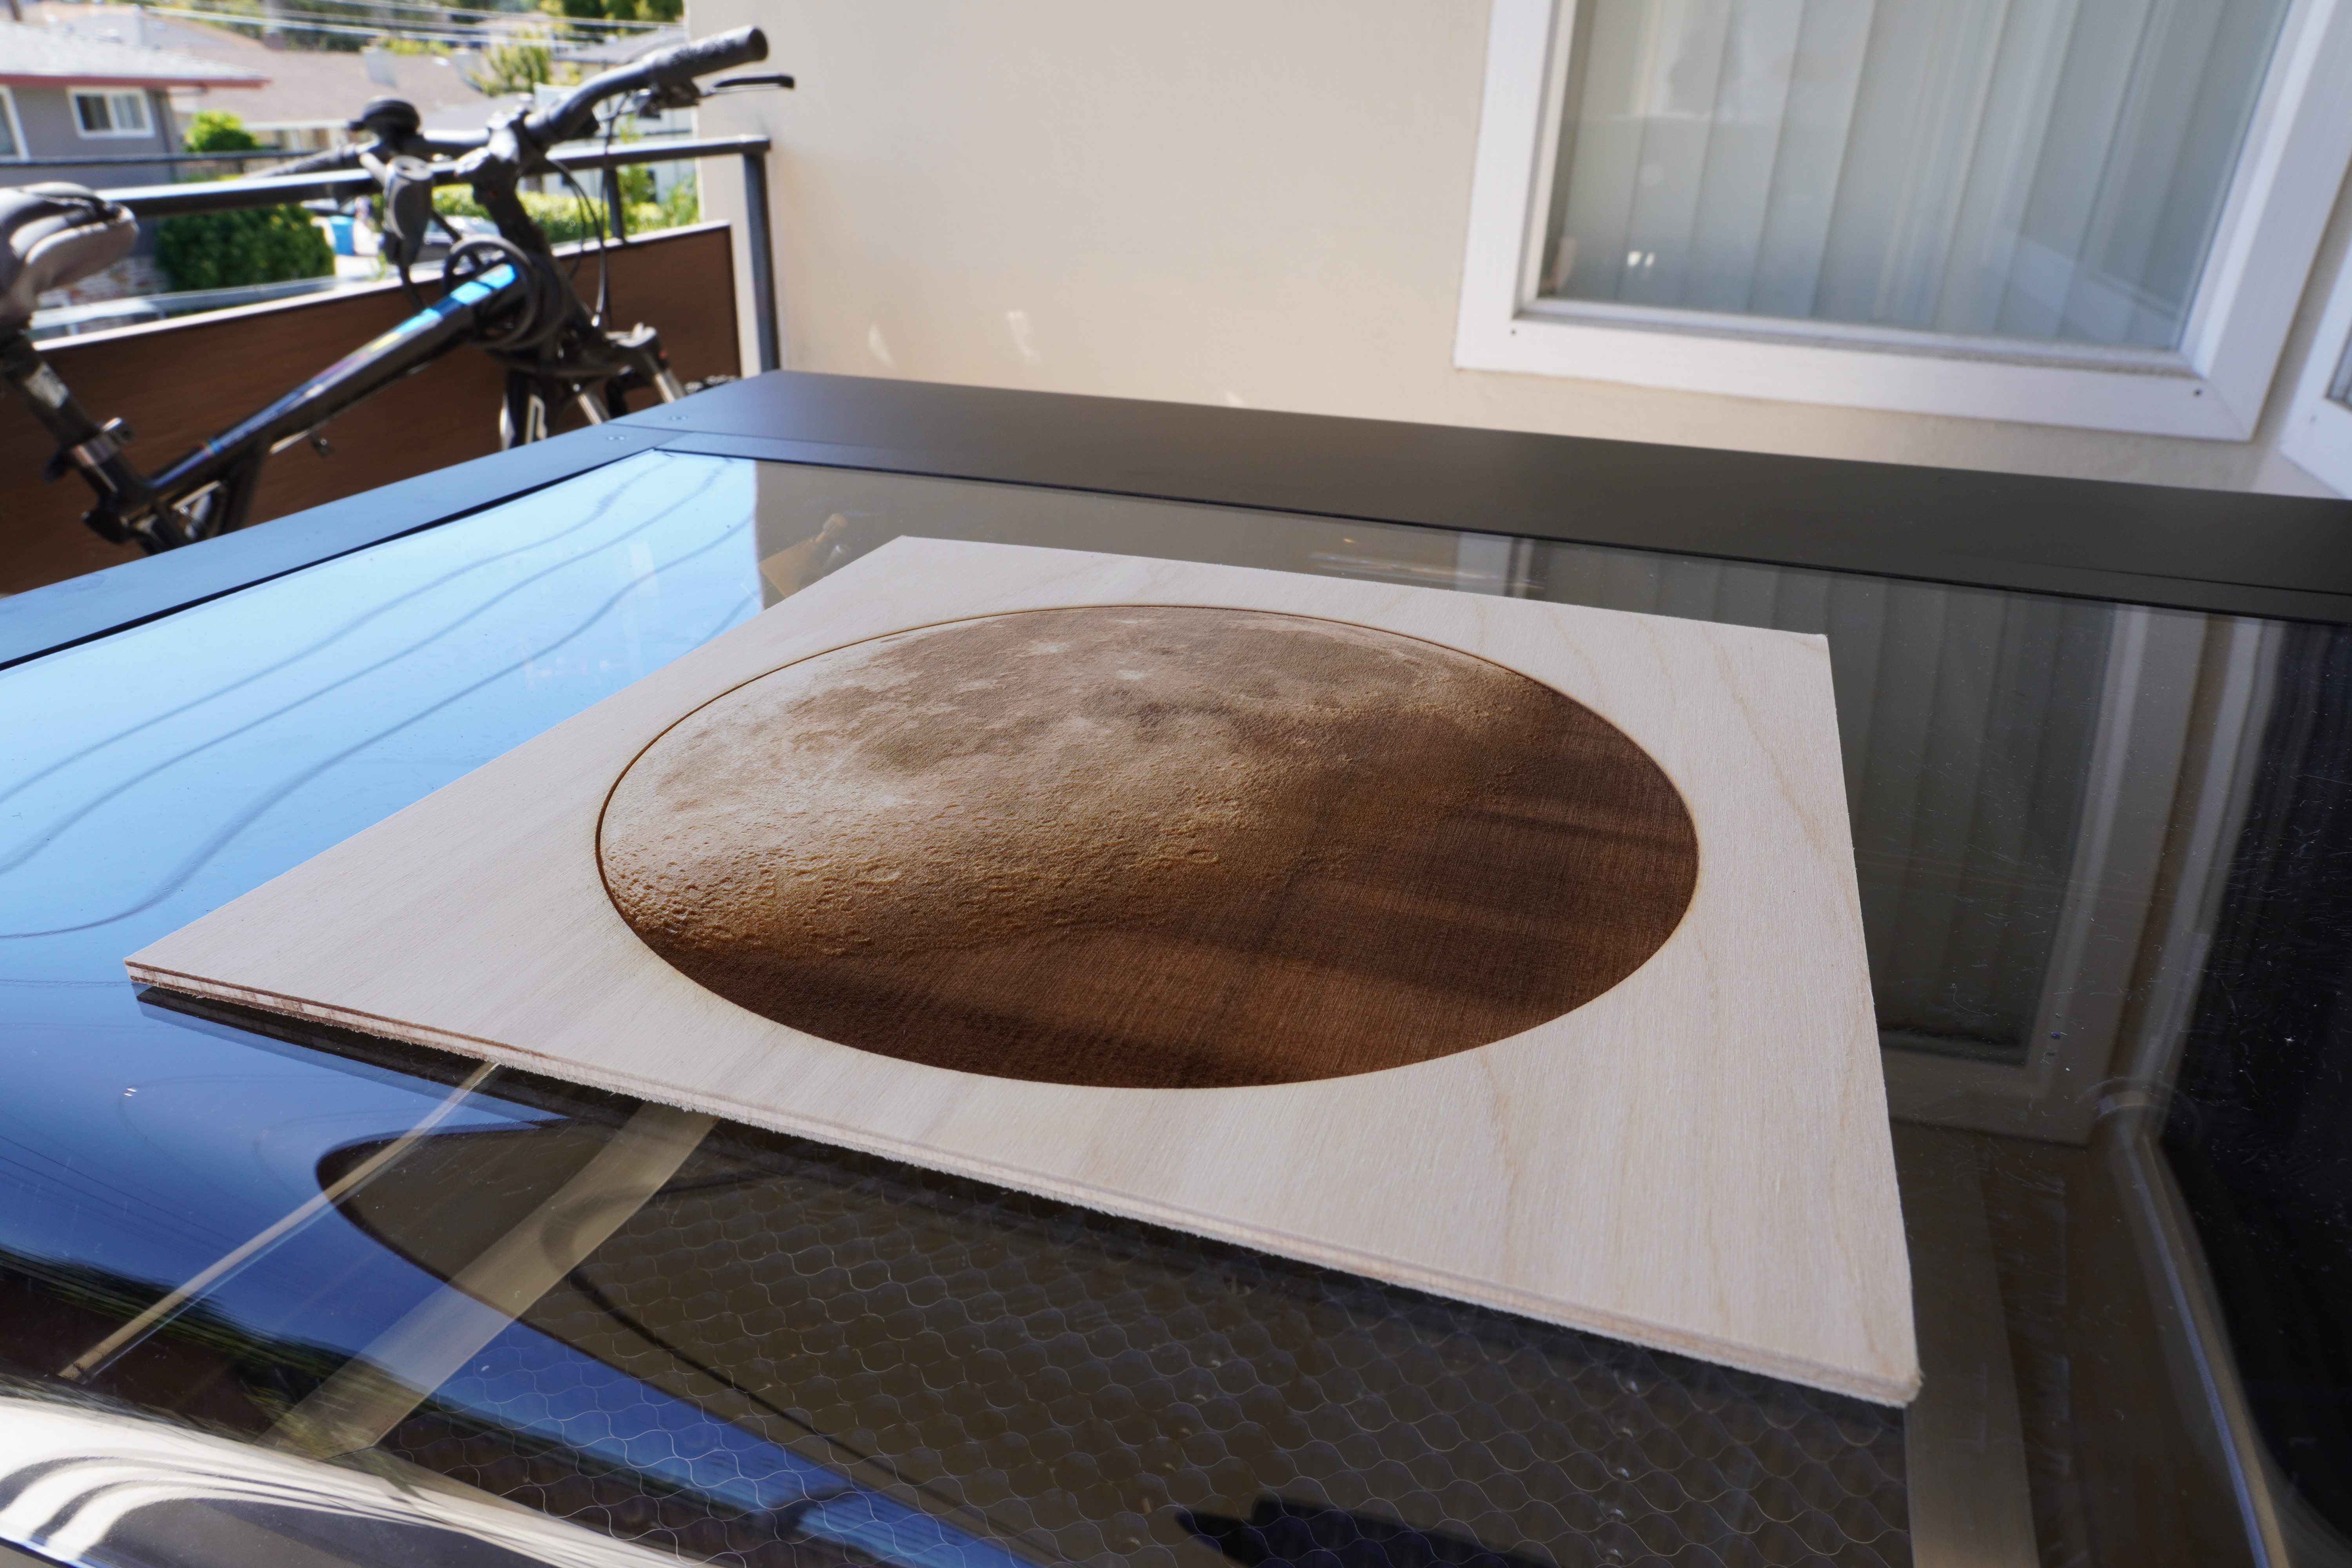
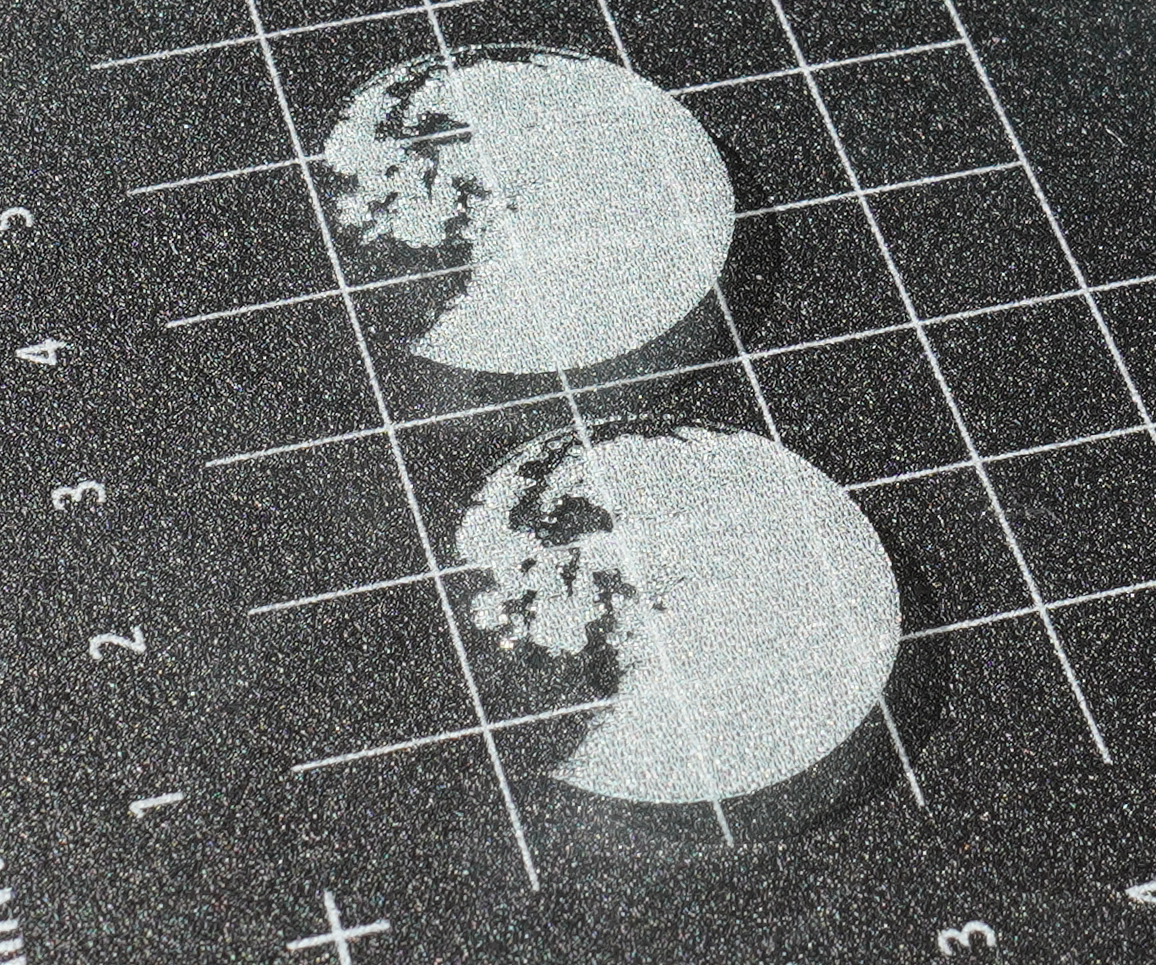
Very Large and Detailed Etching on Wood
Starting with a giant etched image of the moon. This is a very high resolution image, and at the “medium resolution” setting and default preset speed, took 1 hour.
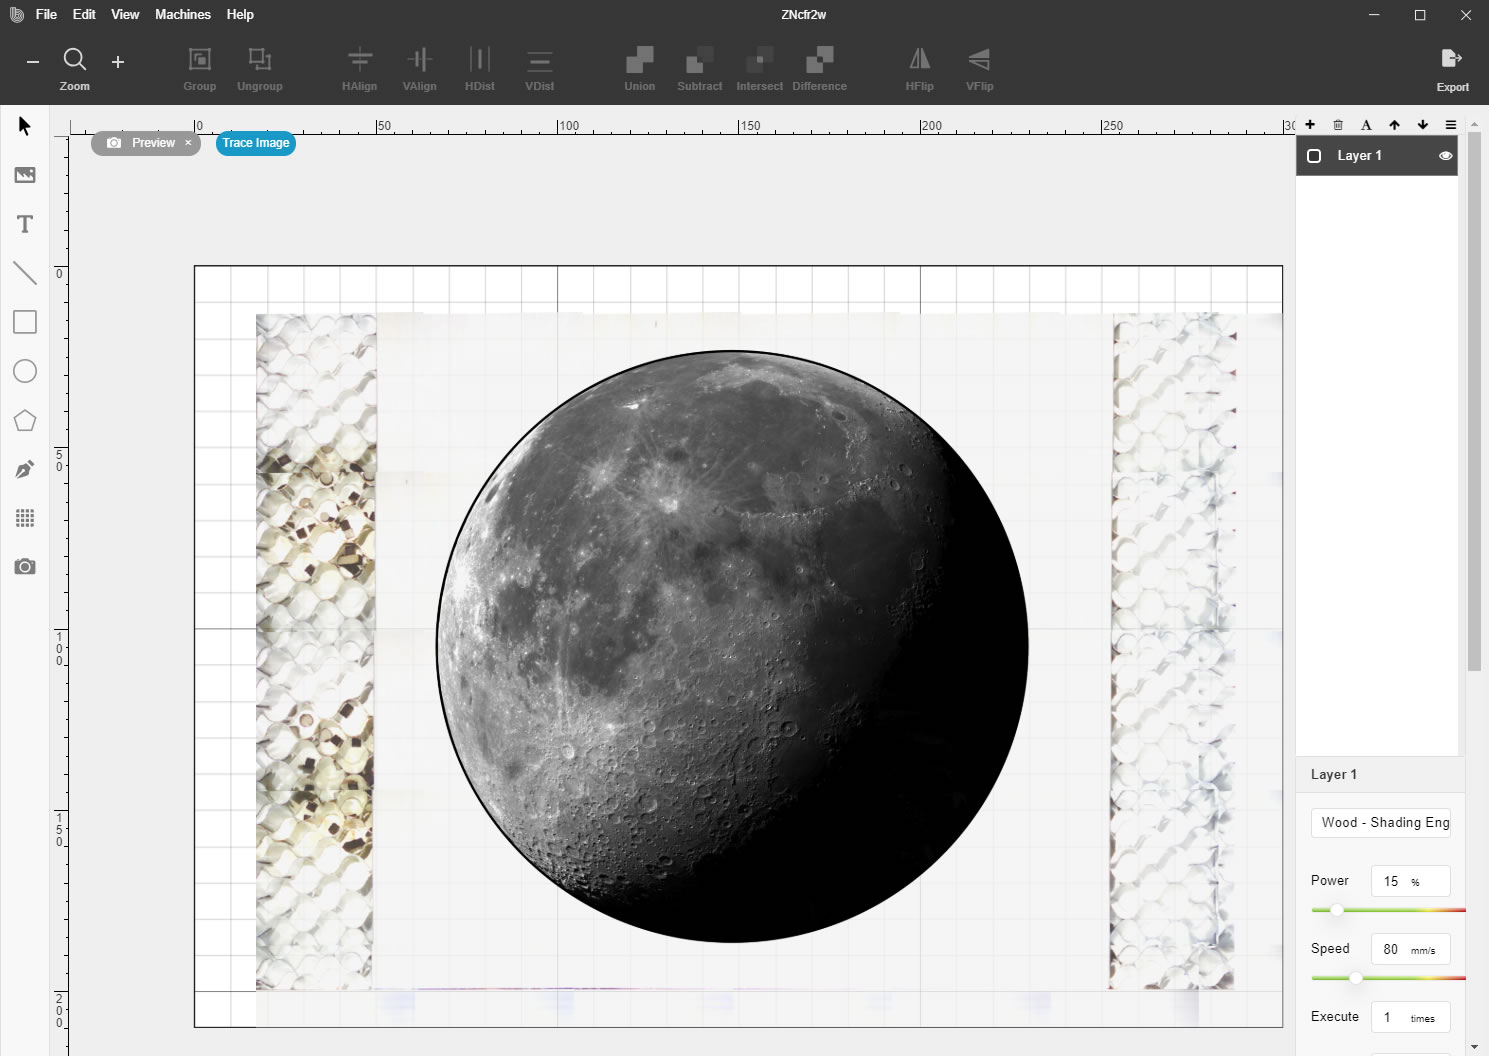
I did this cut at both the default 15% power level and then again at 25% power level to be able to get more detail. The images below are 20 megapixel! Click to zoom-in to see all the fine details!
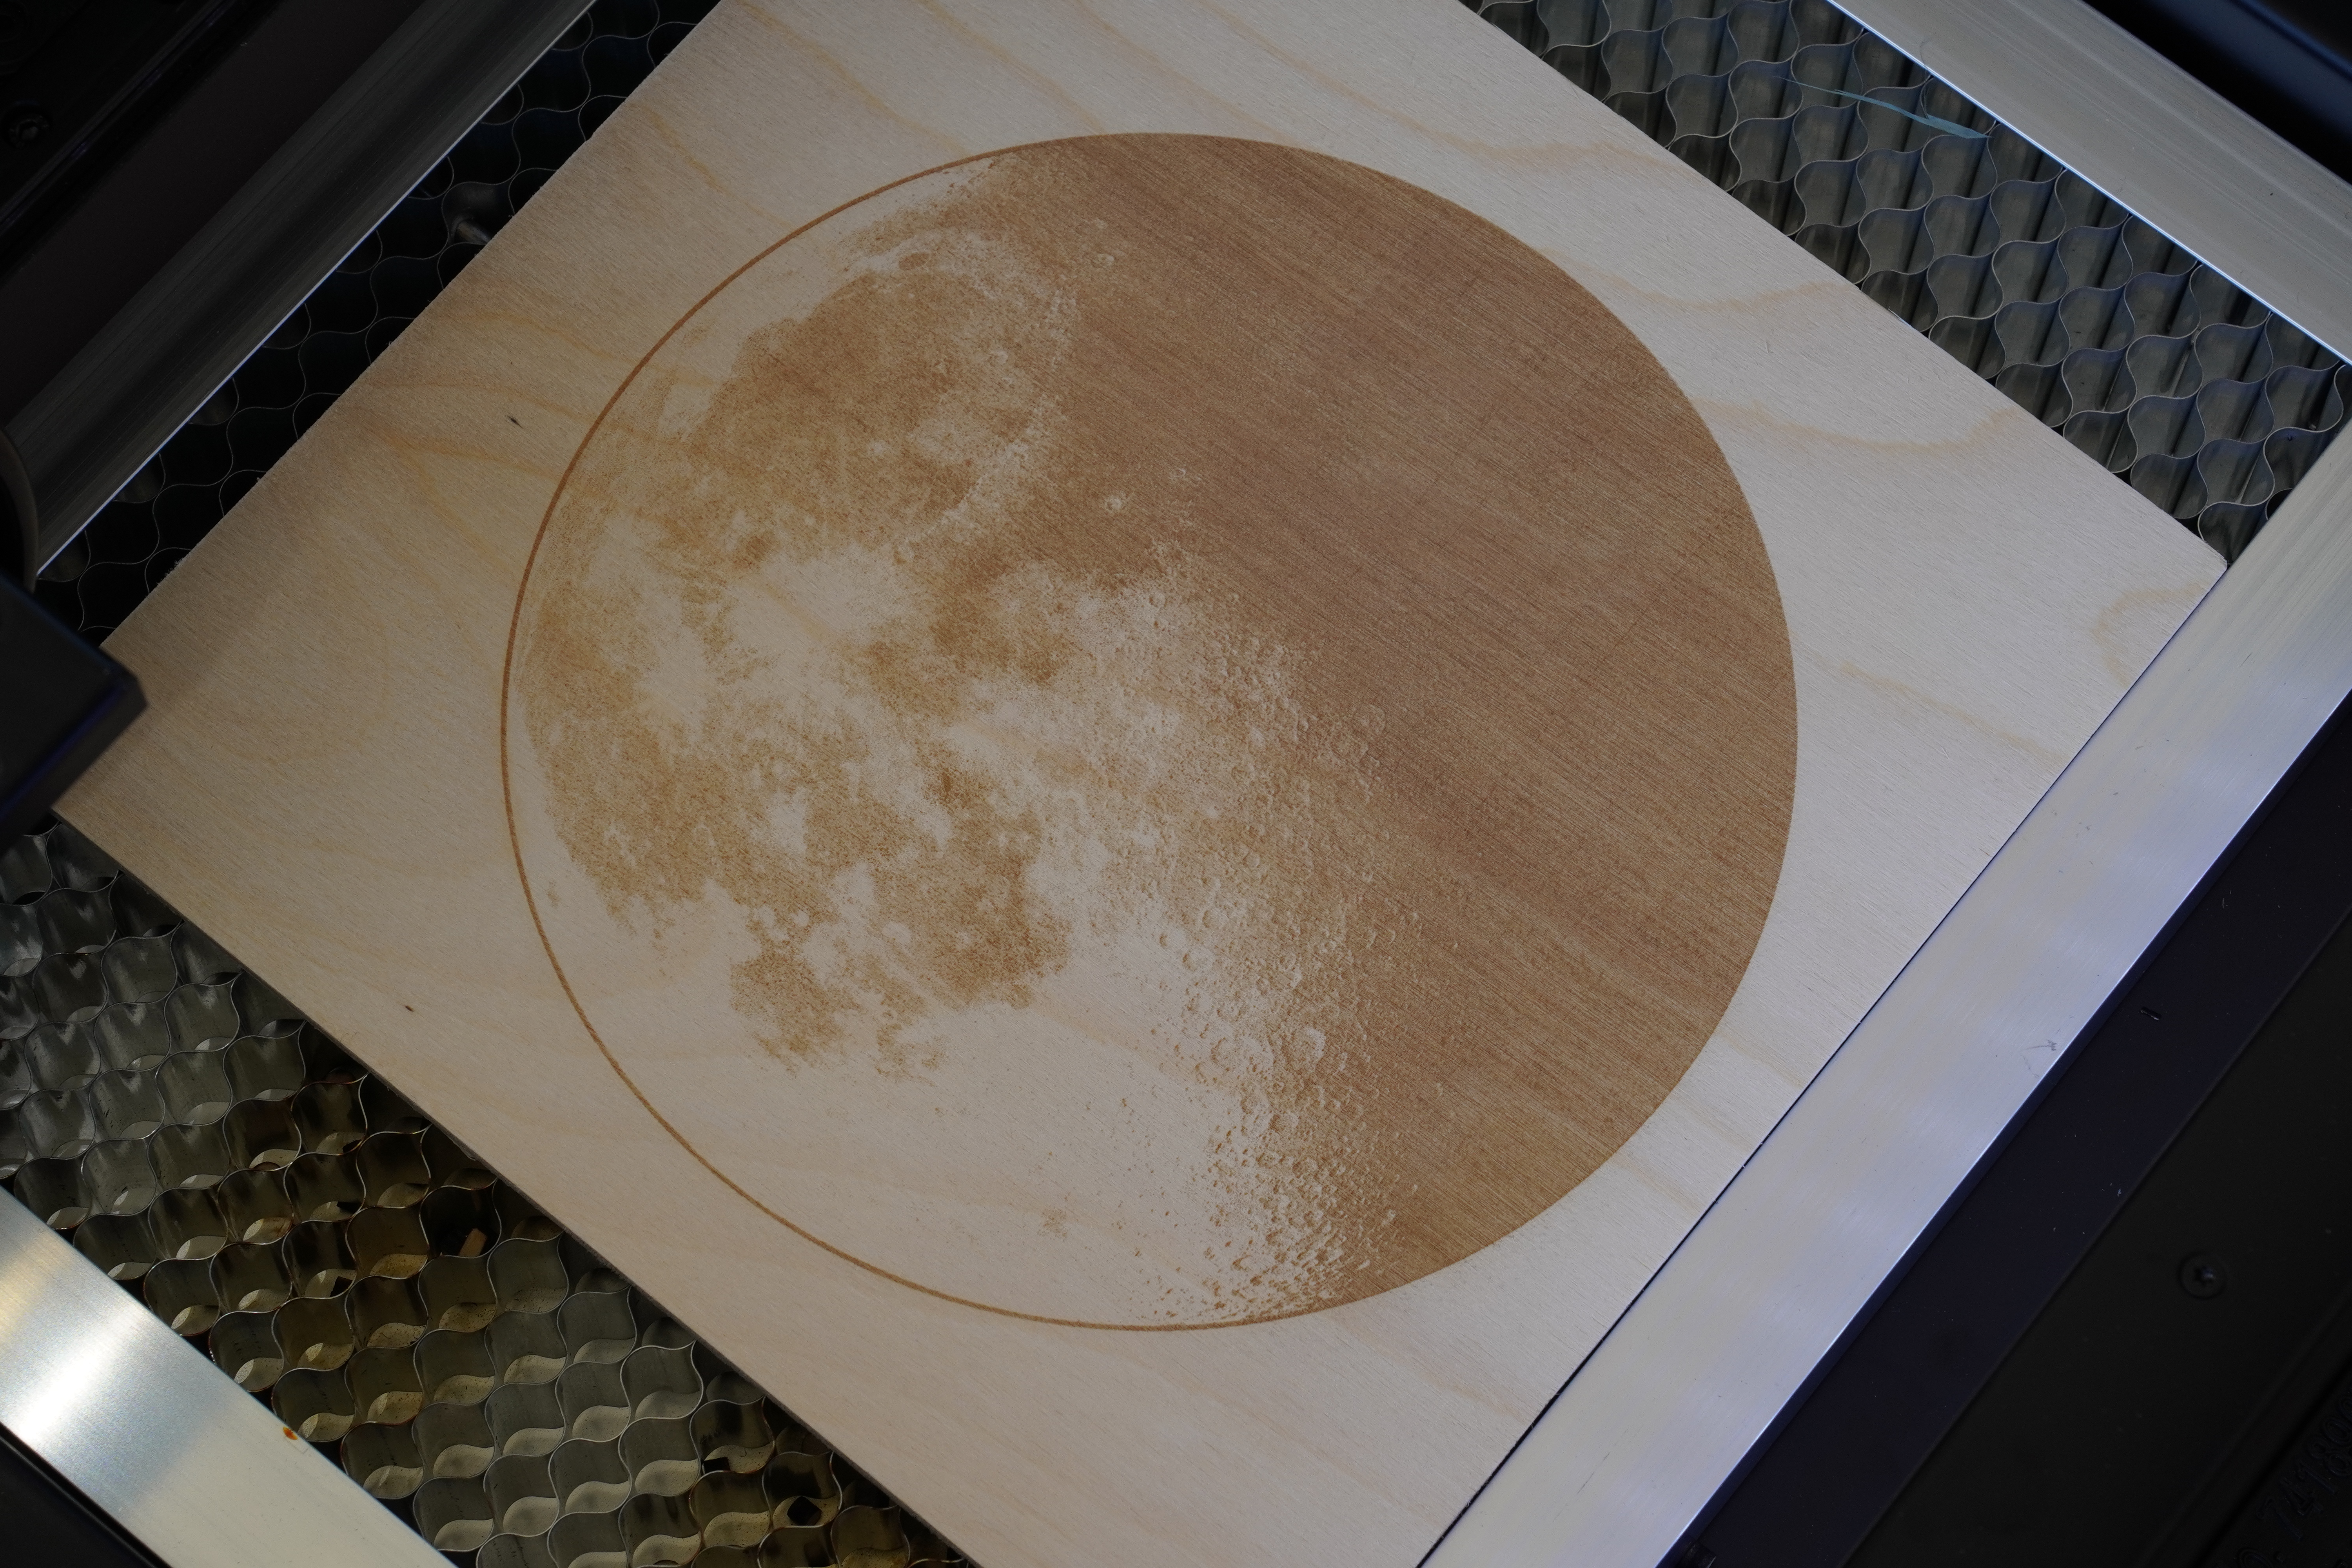
This shows that the 15% power level can achieve “ok” detail, and the laser power remains consistent. At 25% power level, you can achieve more detail but the laser power starts to fluctuate, some areas are darker than others.
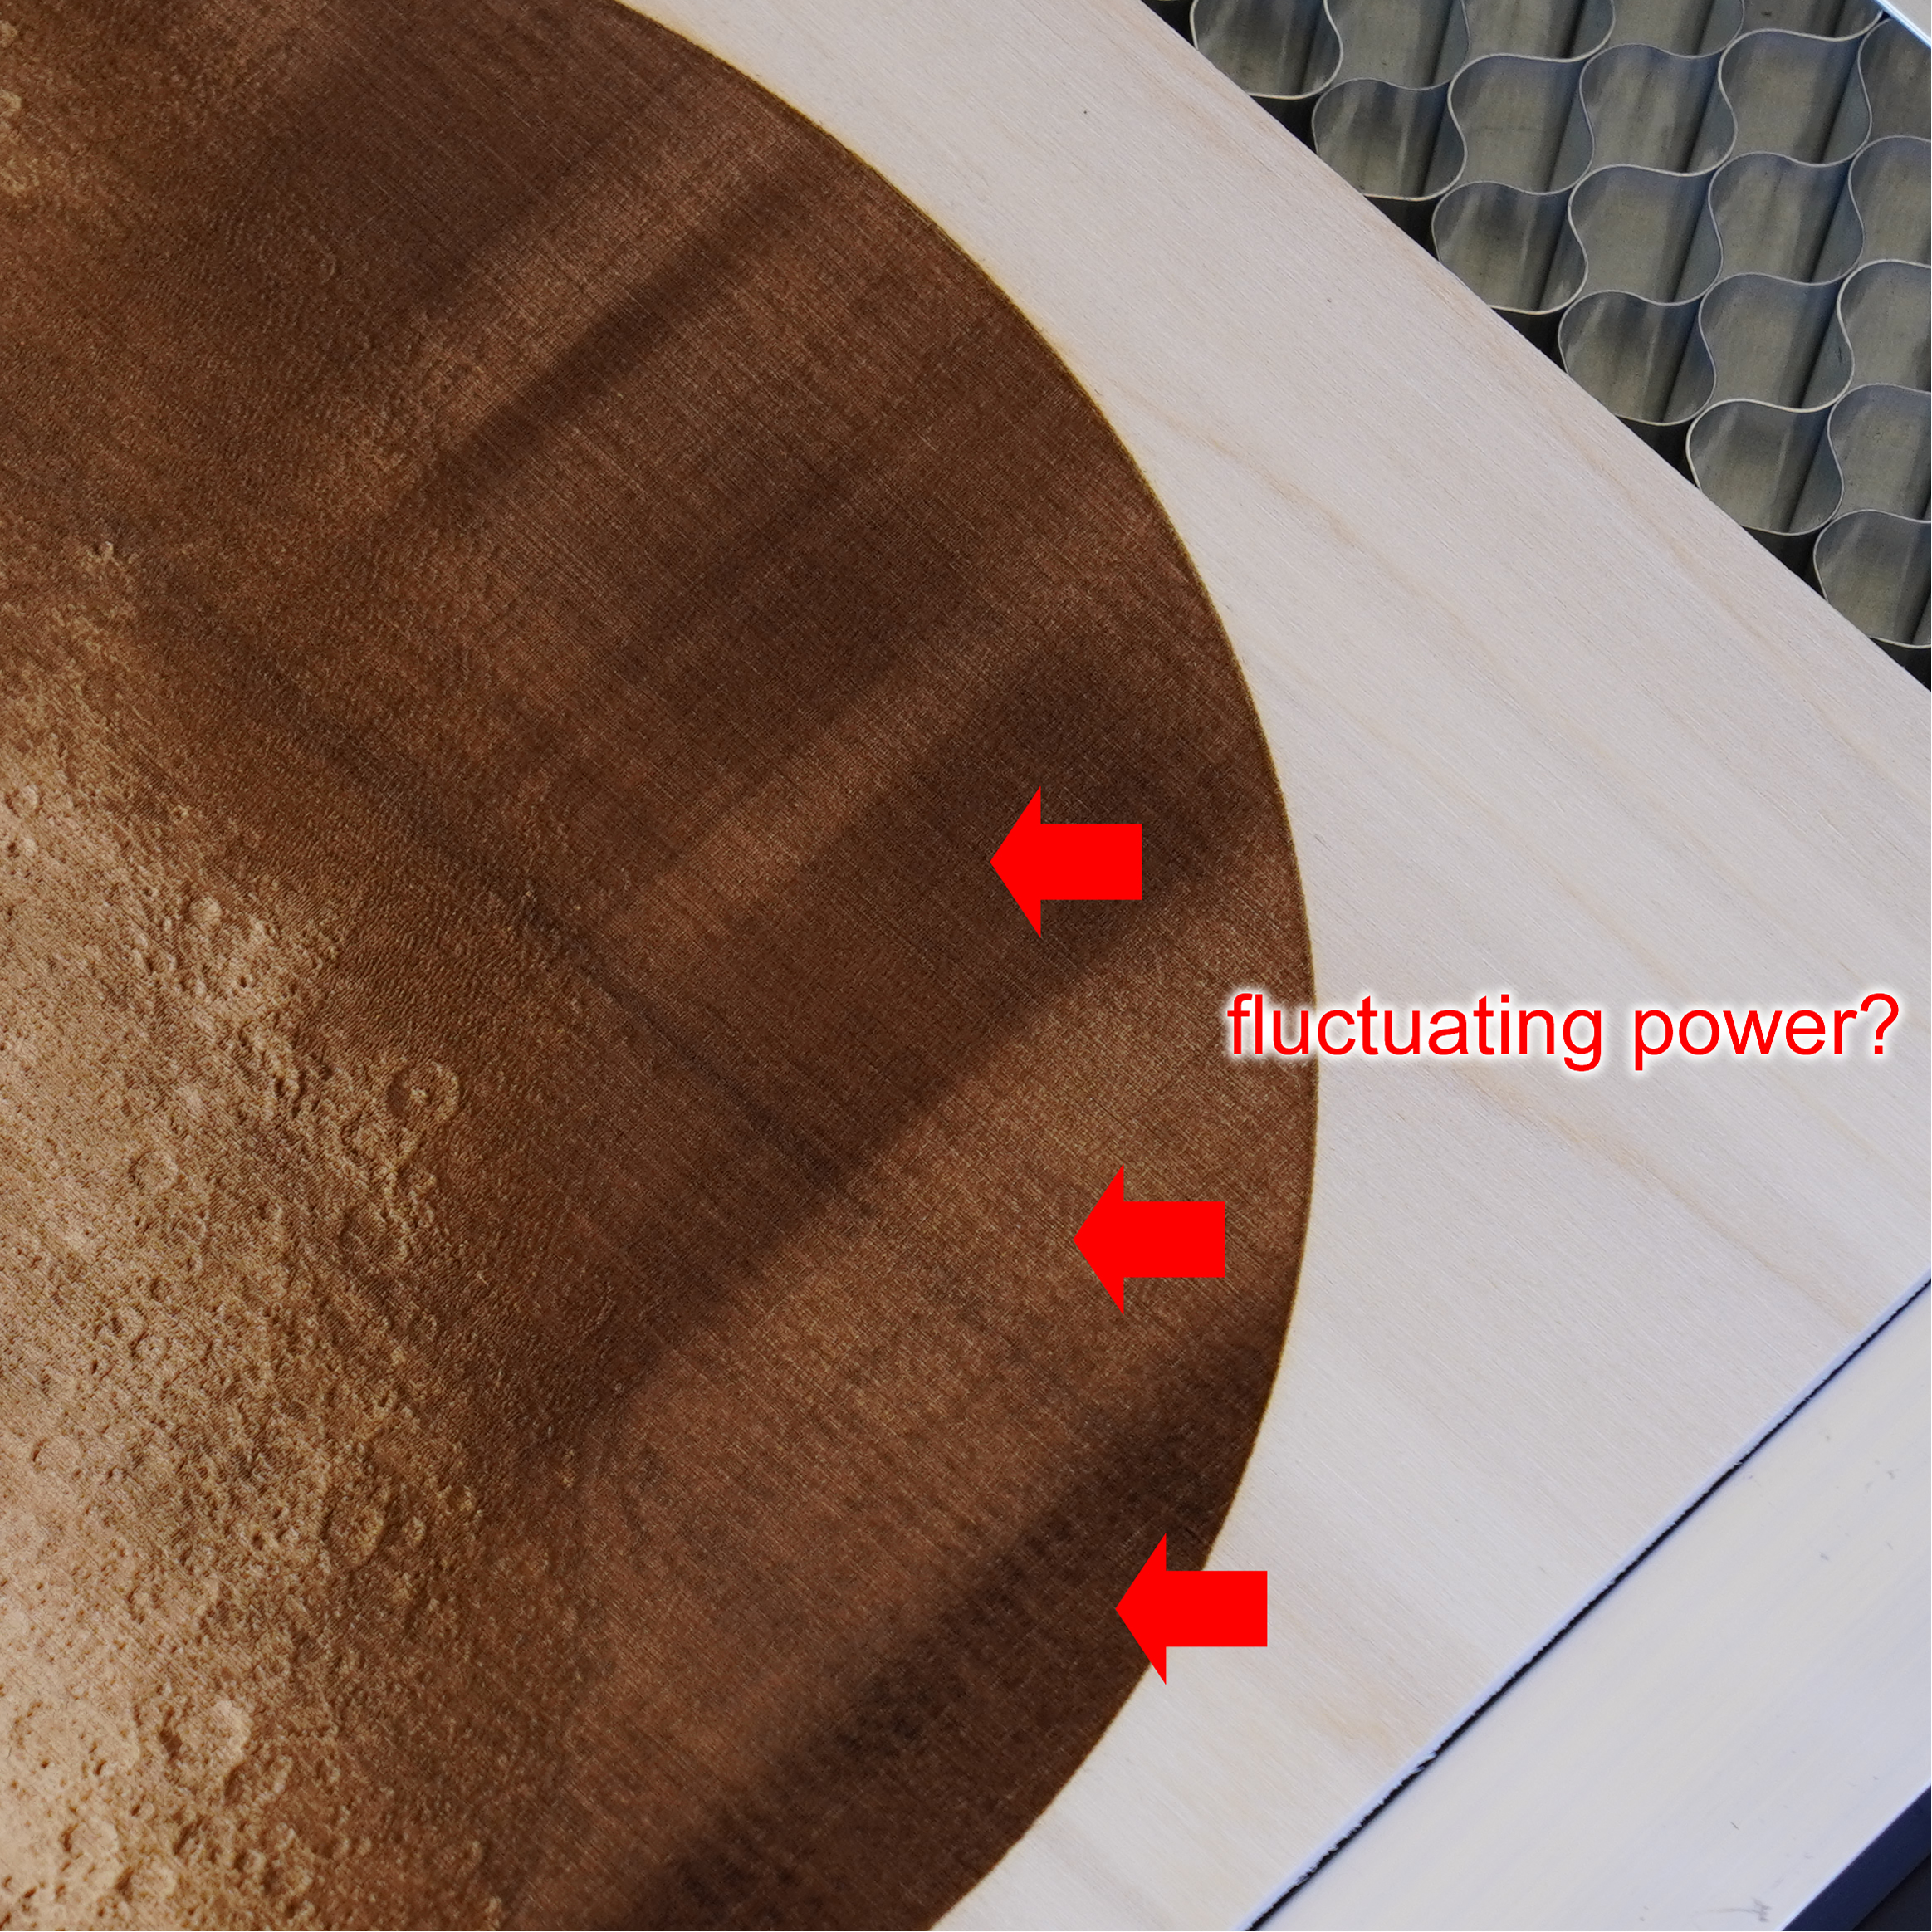
I suspect a smaller, less intense job would keep the power supply much more happy.
There are some very faint and regular horizontal lines that shows up, I am guessing this is an artifact due to the microstepping ability of the Y axis stepper motors, combined with some unfortunate floating point numbers in the tool-path.
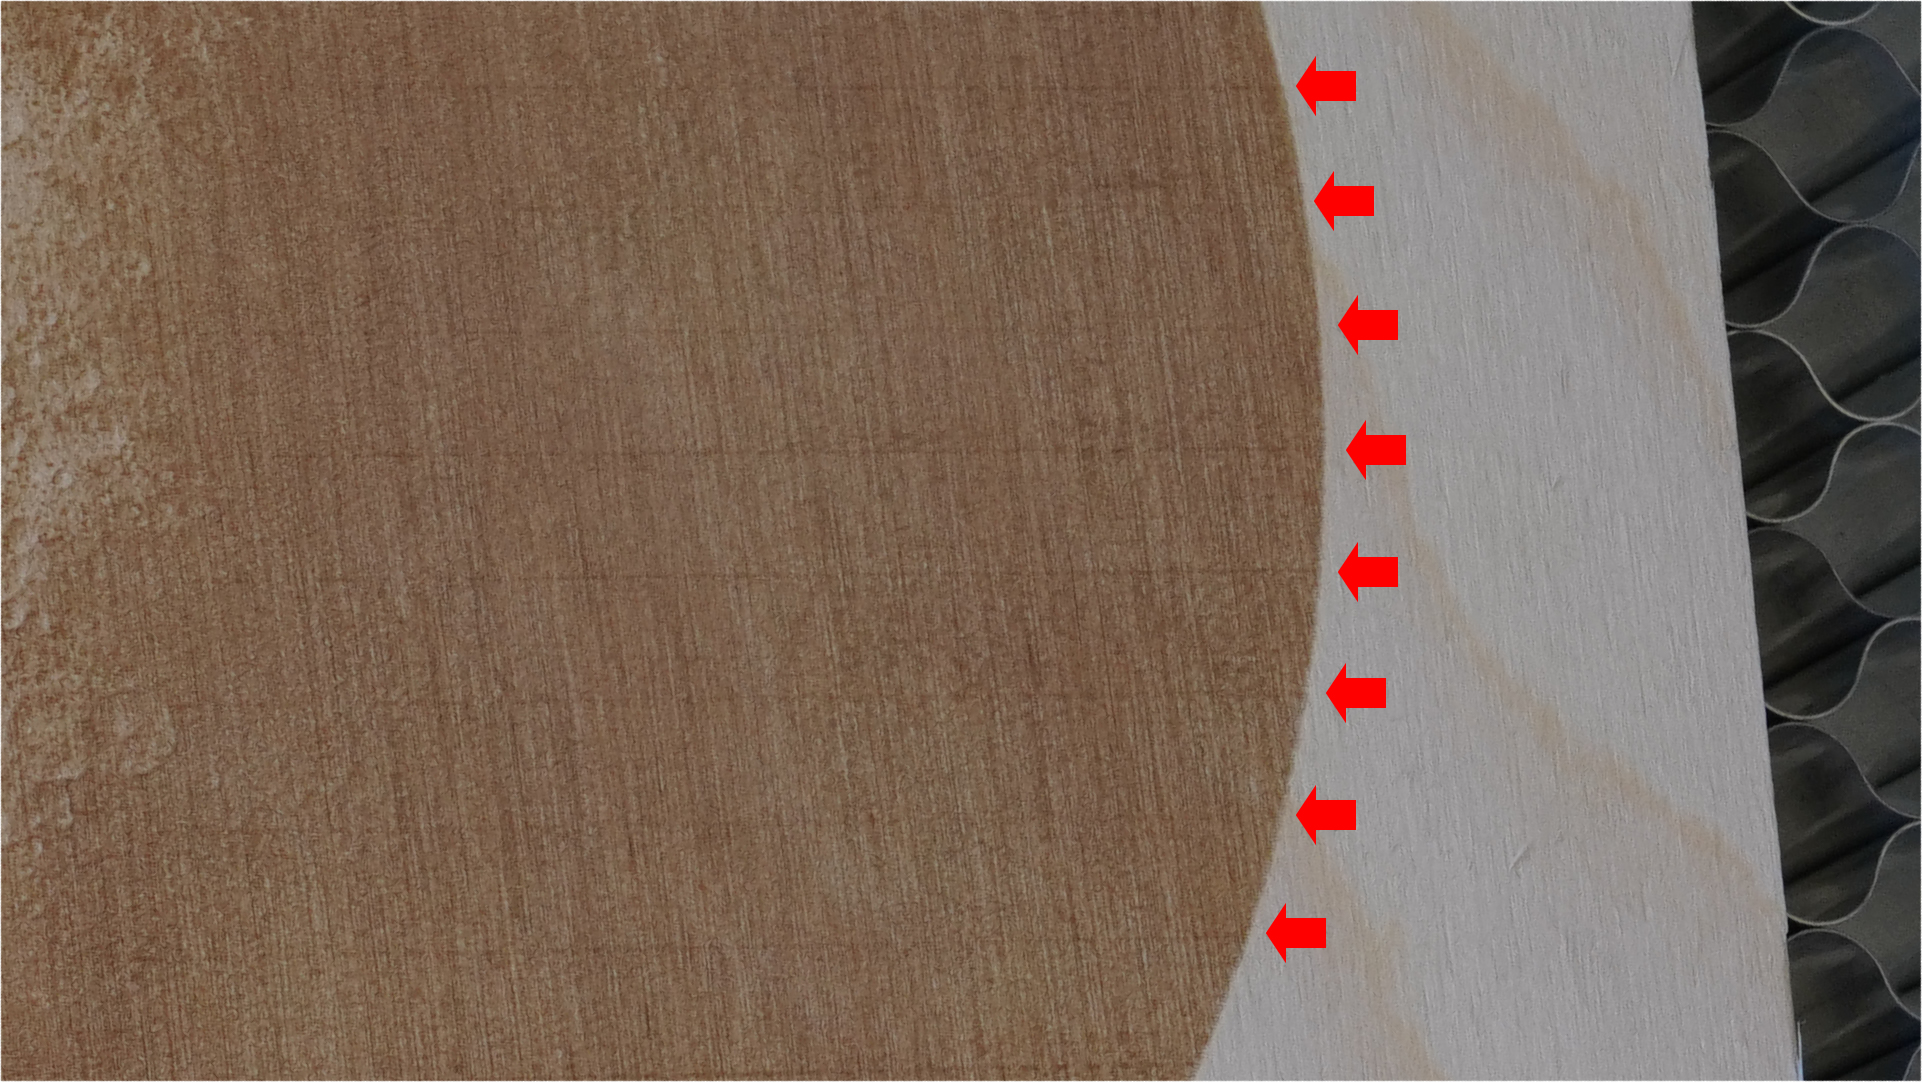
EDIT: I have contacted Beamo’s support staff. They offered to send me TMC2208 drivers that will fix the banding problem! This is excellent, Trinamic TMC drivers are the gold standard in stepper motor drivers right now. TMC carrier boards, SilentStepSticks, are a direct replacement to the Pololu boards that are installed in the Beamo. This should be an easy fix! Their tone suggests that it’s an improvement that’s under test and may end up being shipped by default.
Straight Cuts and Fit Check
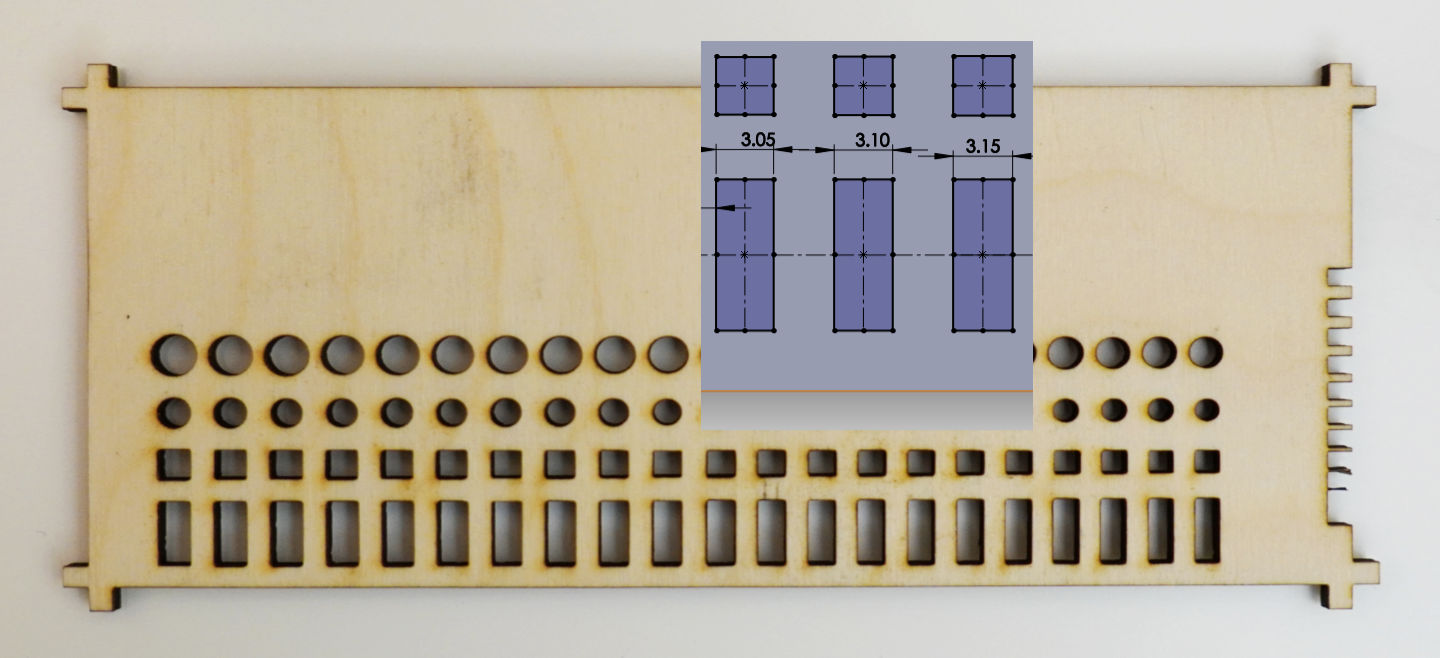
This is a cut done on 3mm thick plywood using the default preset settings. The series of slots, squares, and circles, all have size increasing by 0.05mm. This card is used by me to check which size to design with when I need parts that slot together.
No problems here, the edges look great, the corners look great. Also, I have not experienced any flare ups (fire) with both etching and cutting.
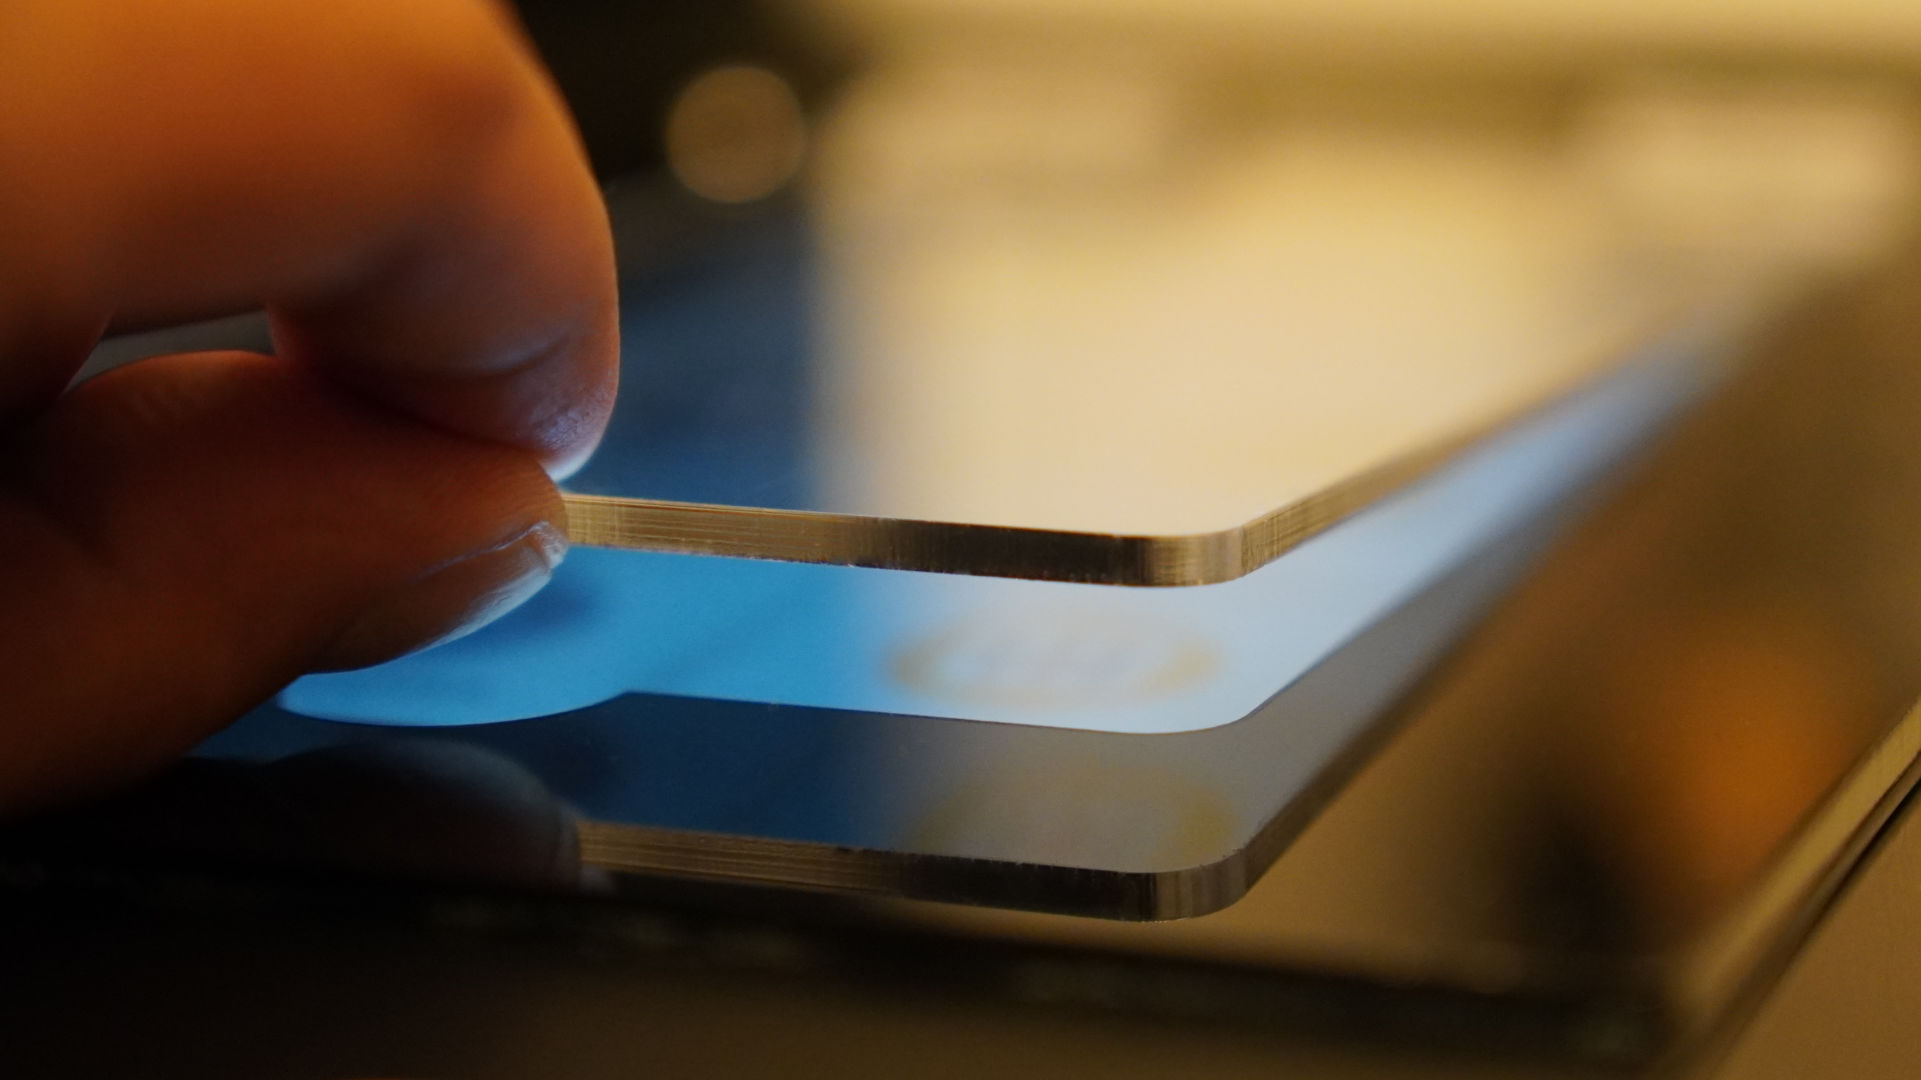
Straight cuts and some curves on 3mm thick acrylic shown below. It’s a screen protector I made for the Beamo!
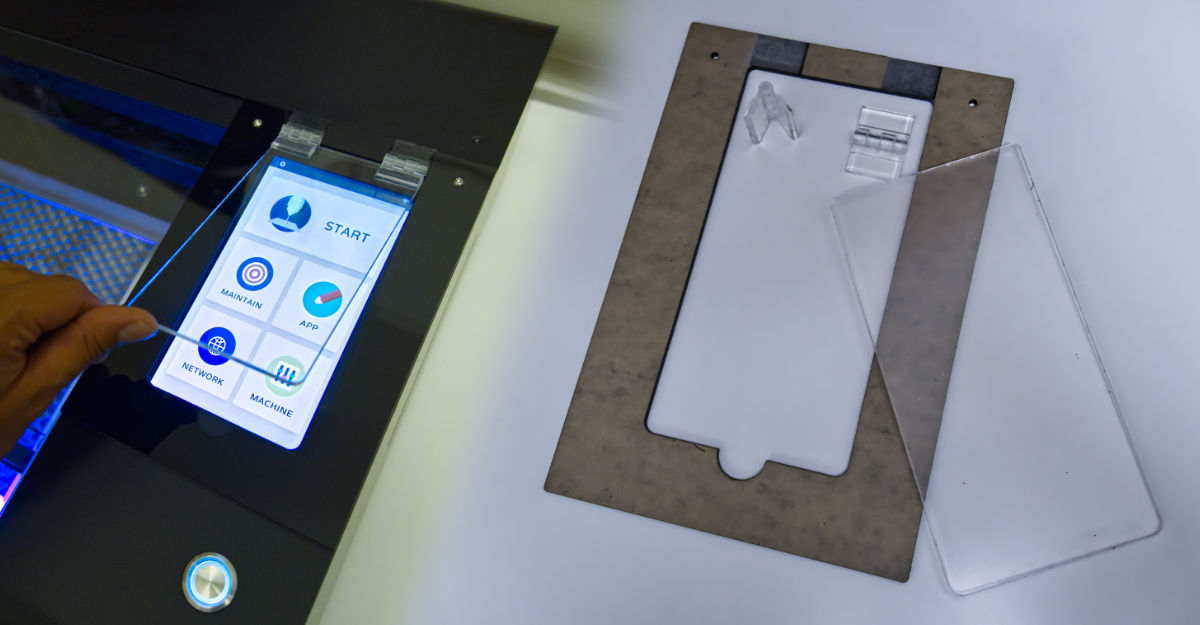
The edge of the clear acrylic looked absolutely beautiful.
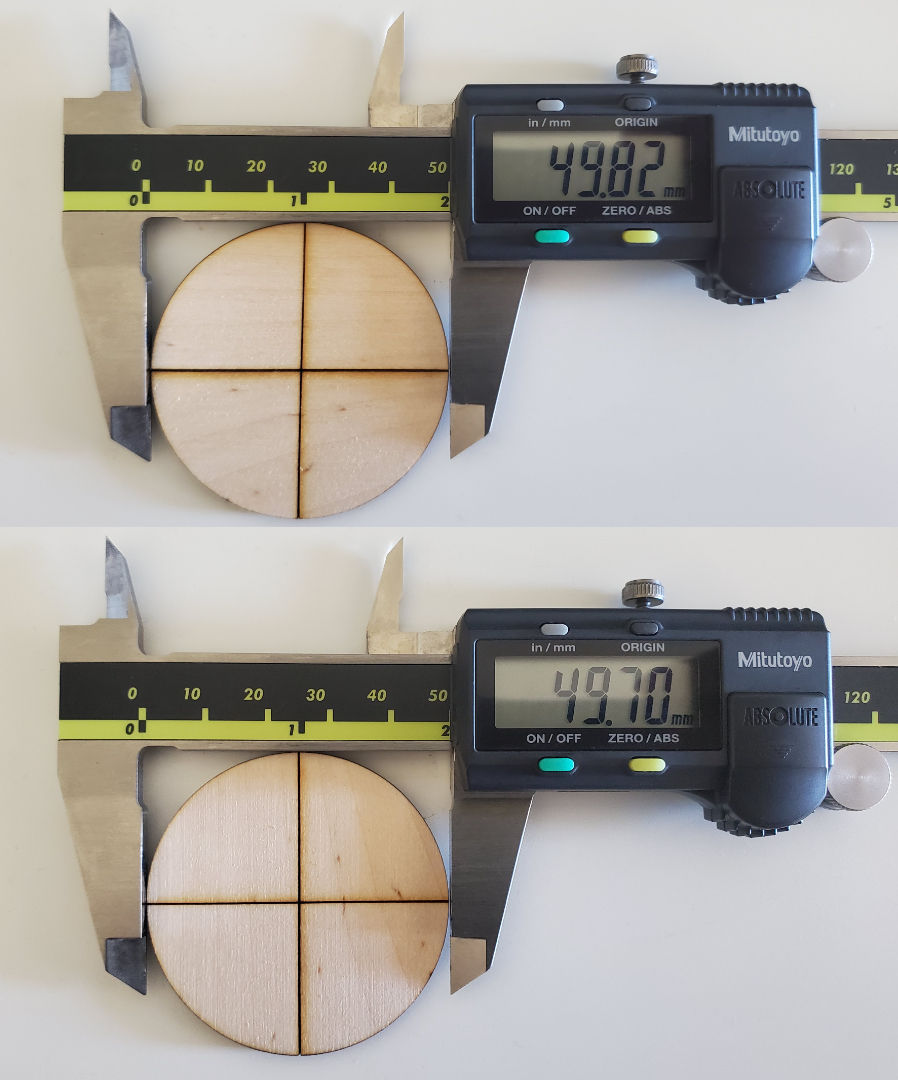
Dimensional Accuracy
This is a circle that’s supposed to be 50mm in diameter. Remember to account for the laser beam width! This is a very good result in my opinion.
Monochrome High Detailed Engrave
These are small Zodiac symbols with some very fine detailing and sharp lines. All the art was imported as vector, so the resolution performance is pushed to the limit. Cutting power was set at 18% (default is 15%). The image below is 20 megapixel, click to zoom in.
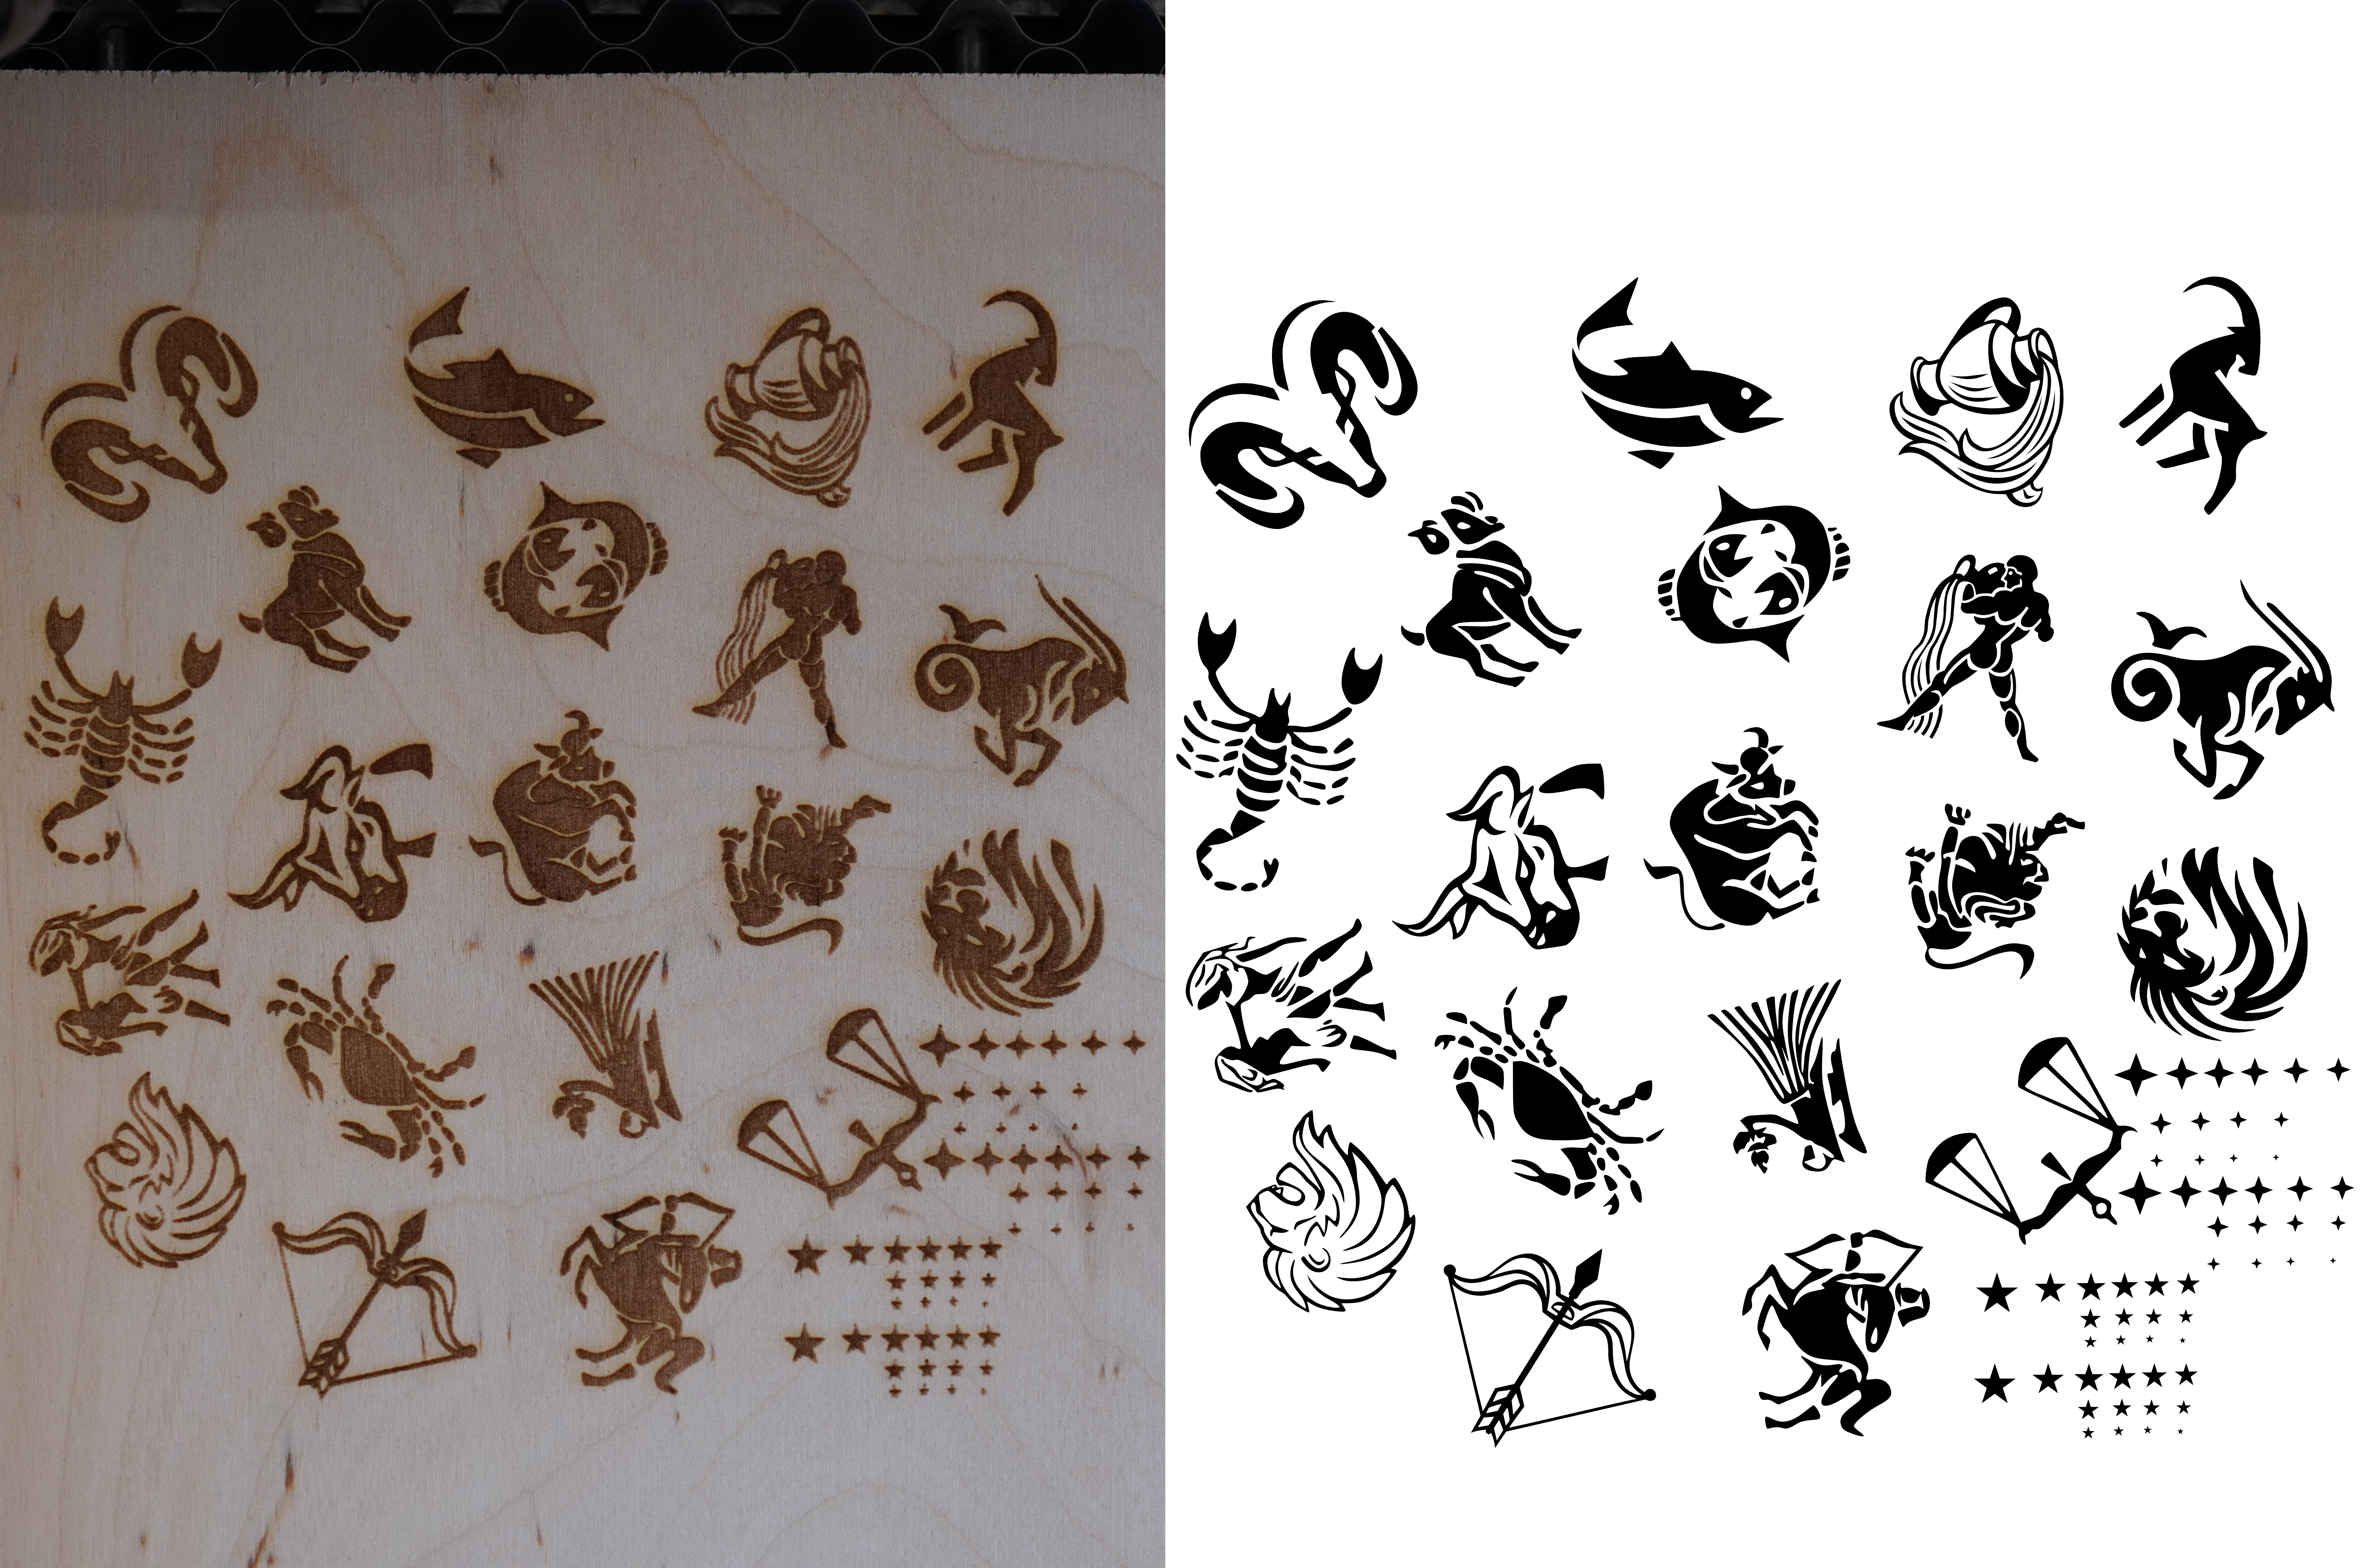
The width of the beam causes some thin white areas to be lost. This can be compensated for by editing the artwork beforehand.
High Powered Cutting on Thick Clear Acrylic
The ability to cut clear acrylic is one of the reasons why I chose a CO2 laser instead of a diode laser. I tested how much power is required, and the quality of the edge left behind. The tests are done on a piece of 6mm thick clear acrylic. View the images to see the result.

The preset for cutting 5mm thick acrylic works for 6mm thick acrylic as well, which is 2 passes at 55% power level and 5mm/s speed. Interestingly, bumping the power up to 100% does not make any difference in the depth of each cut, so don’t try it. (image shows also incomplete cuts, see the depth of single passes)
To see the quality of the mechanical motion system, I did a circular cut to see how smooth the edges are.
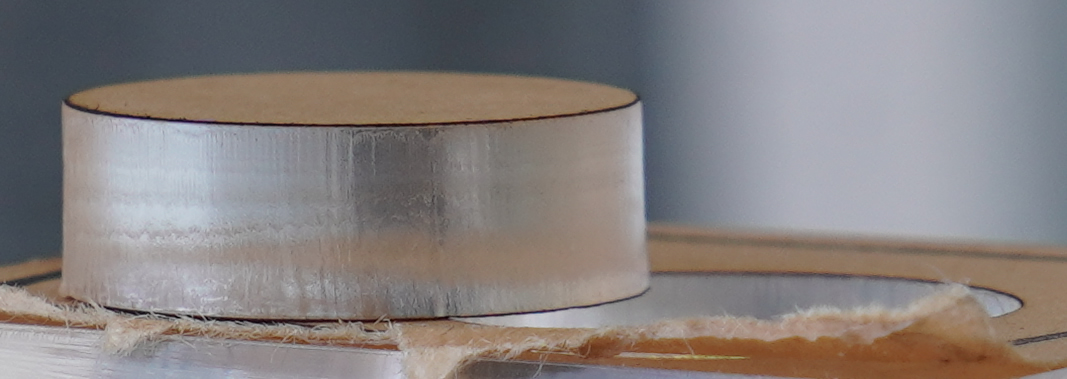
I think with some buffing and heat treatment, it will become crystal clear. Cutting a straight line on 3mm thick acrylic leaves an absolutely crystal clear edge.
By the way, when using 55% laser power, the power actually consumed from the 120VAC source is about 230 watts.
Glass Etching
I tested the ability to etch glass.
It works, using the default presets for glass. To get shading, I would need to pre-process the image to use dithering (a good tips video, click here). I have seen some amazing glass artwork posted to the Beamo’s community so far. The rotary upgrade is also very popular.
Dithered Etching
As mentioned above, to get shading effect on materials that do not respond well to modulated laser power, dithering can be used. Shown below
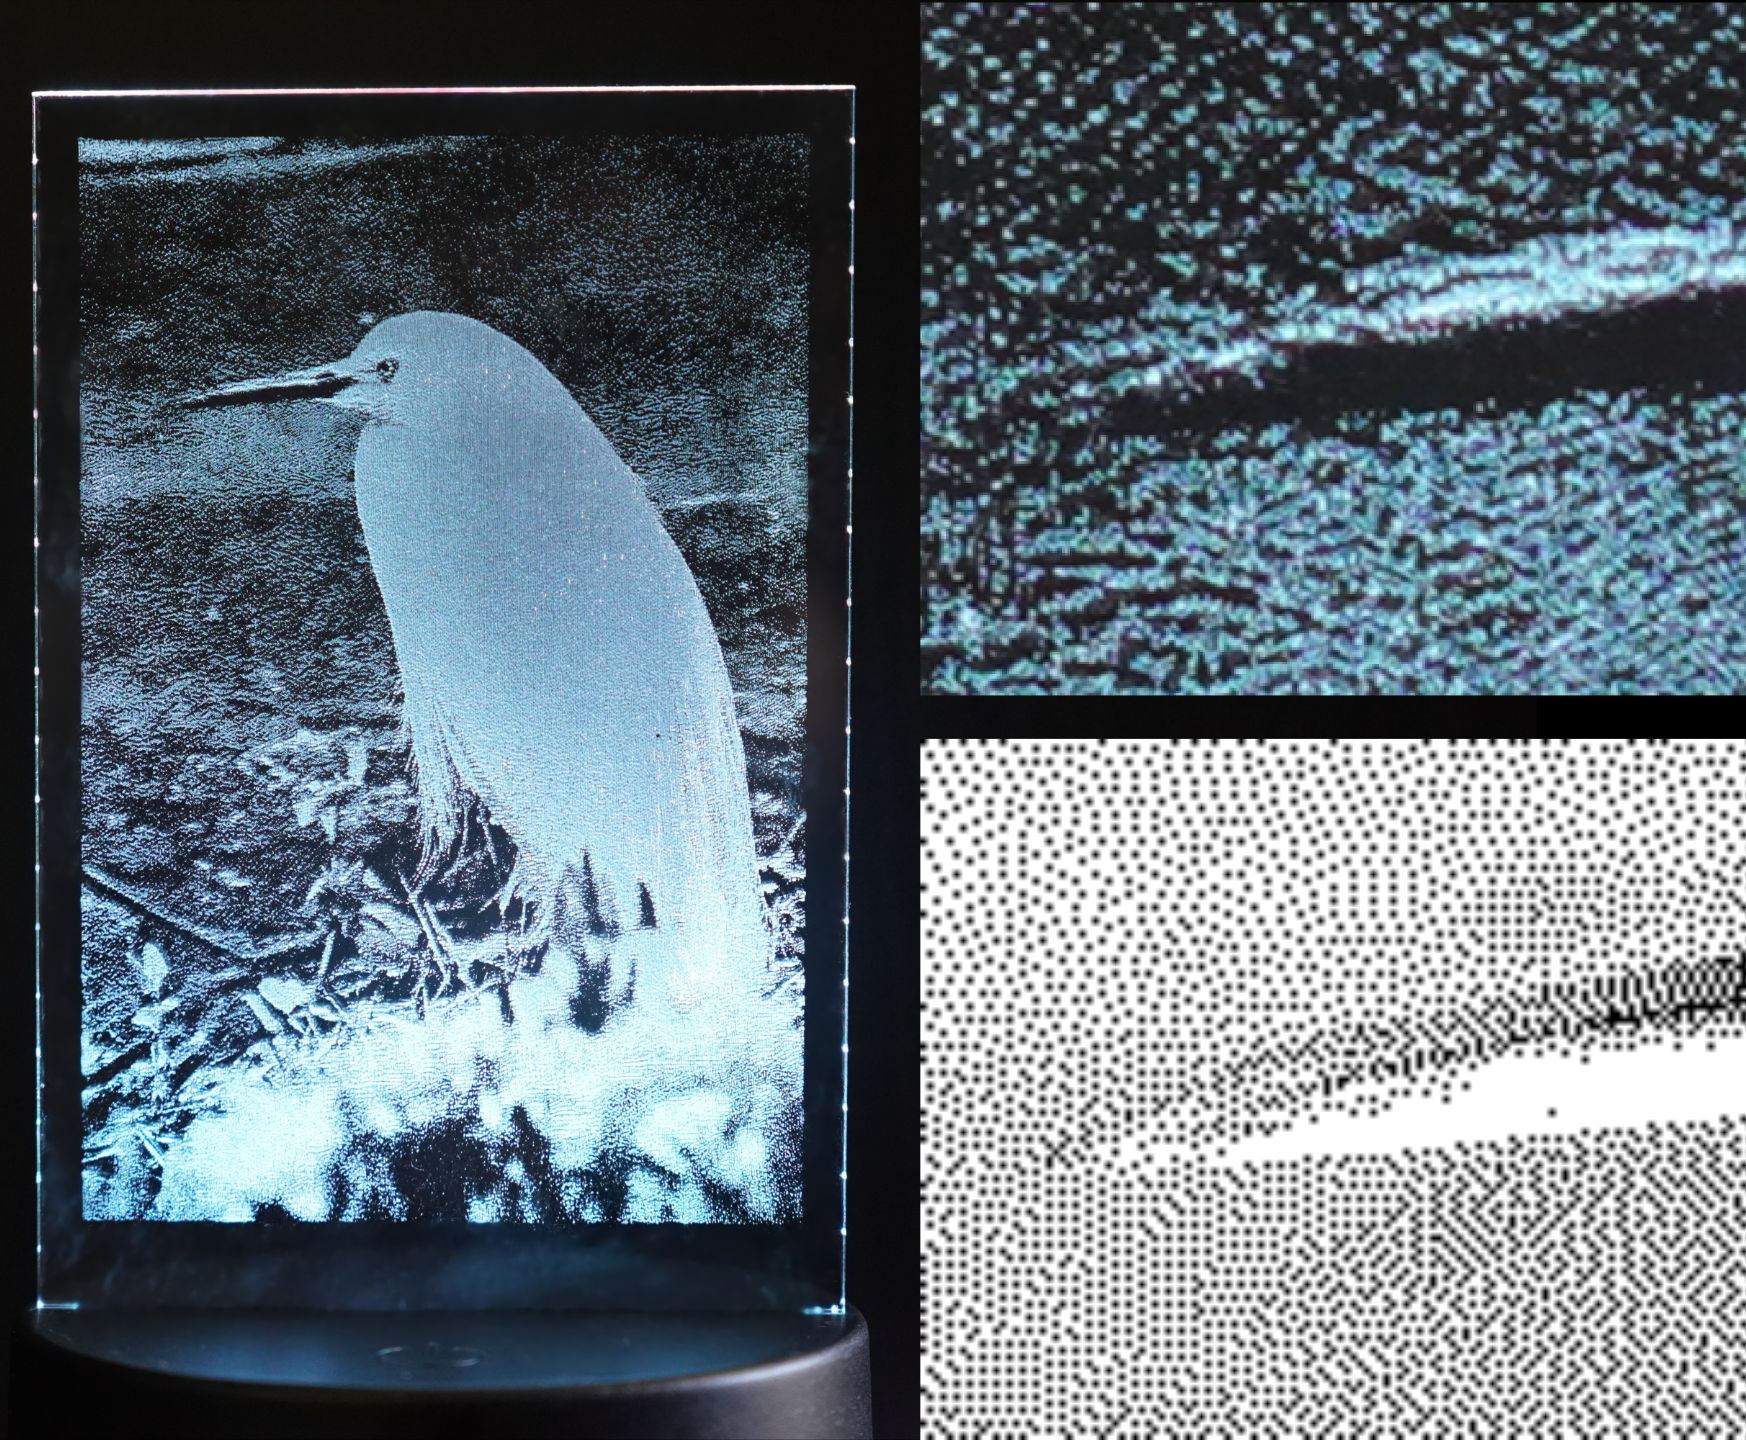
Note: most of the work here is done with other software, it’s not a part of Beam Studio as of right now. I have confirmed that dithering is done internally by Beam Studio.
Review and Tear-Down
Below is my review and tear-down of the Beamo. I have examined the machine in detail. Since there’s a lot for you to read, here’s a table of contents:
- TL;DR
- Mechanical
- Software
- Major Software Issues!
- Camera Preview
- Cooling and Fume Extraction
- Electrical
- Maintenance
- Other
- Autofocus
- Comparisons
TL;DR
It’s a nice machine and I am happy with it. There are flaws, but nothing that’s a show-stopper. Mechanically it is solid. The fume extraction and cooling is impressive for such a small machine. Camera preview works but calibration can be improved. Software and firmware are intuitive and practical, but not flawless. The software is currently in beta with more than 1 update per week. It is a very repairable machine, especially if Flux stays in business to provide parts. There is even some room for hacking.
The customer support is prompt! The software is evolving rapidly. Their engineers have offered me upgraded stepper motor drivers. I’ve seen their engineers offer other people customized firmware to solve their issues.
Mechanical
My first impression was “oh my god this is heavy, how am I going to haul it up to the 3rd floor?”
This machine is all metal. The build quality looks great yet it’s skeletal. You can see the screws, you can see they’ve put plenty of loctite on the screws so it remains optically aligned even after shipping. But, it’s not like a Glowforge or Ultimaker where they put plastic to hide that kind of detail from you.
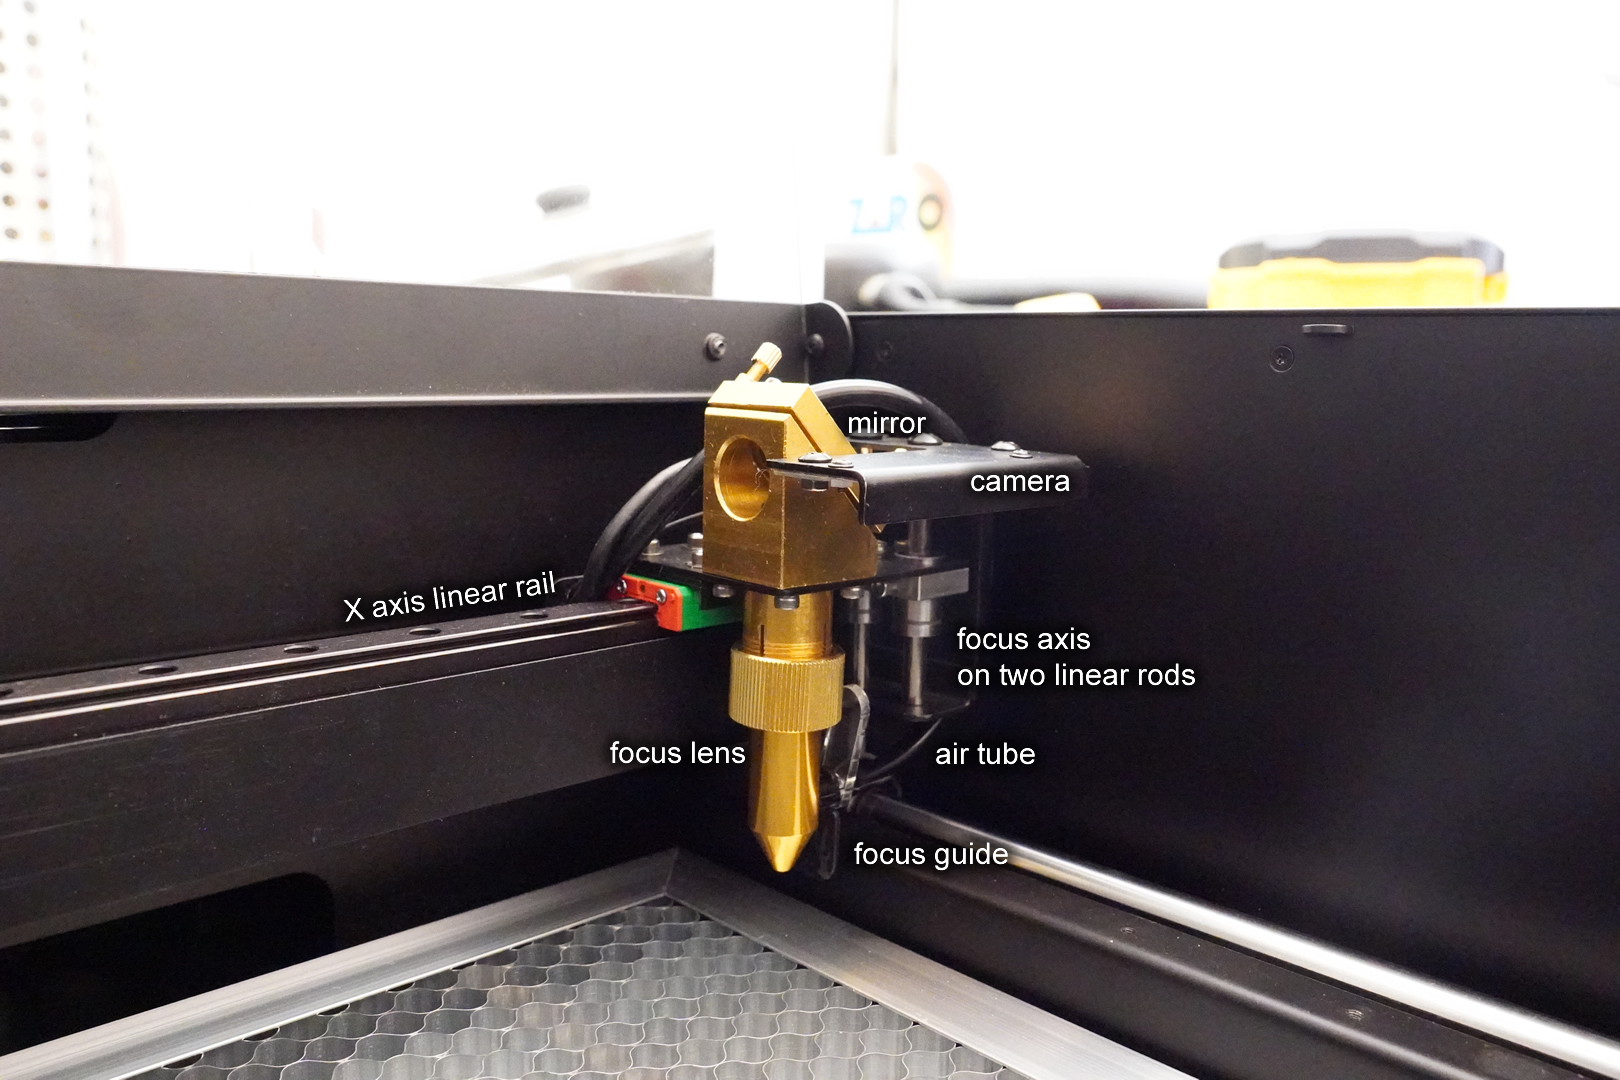
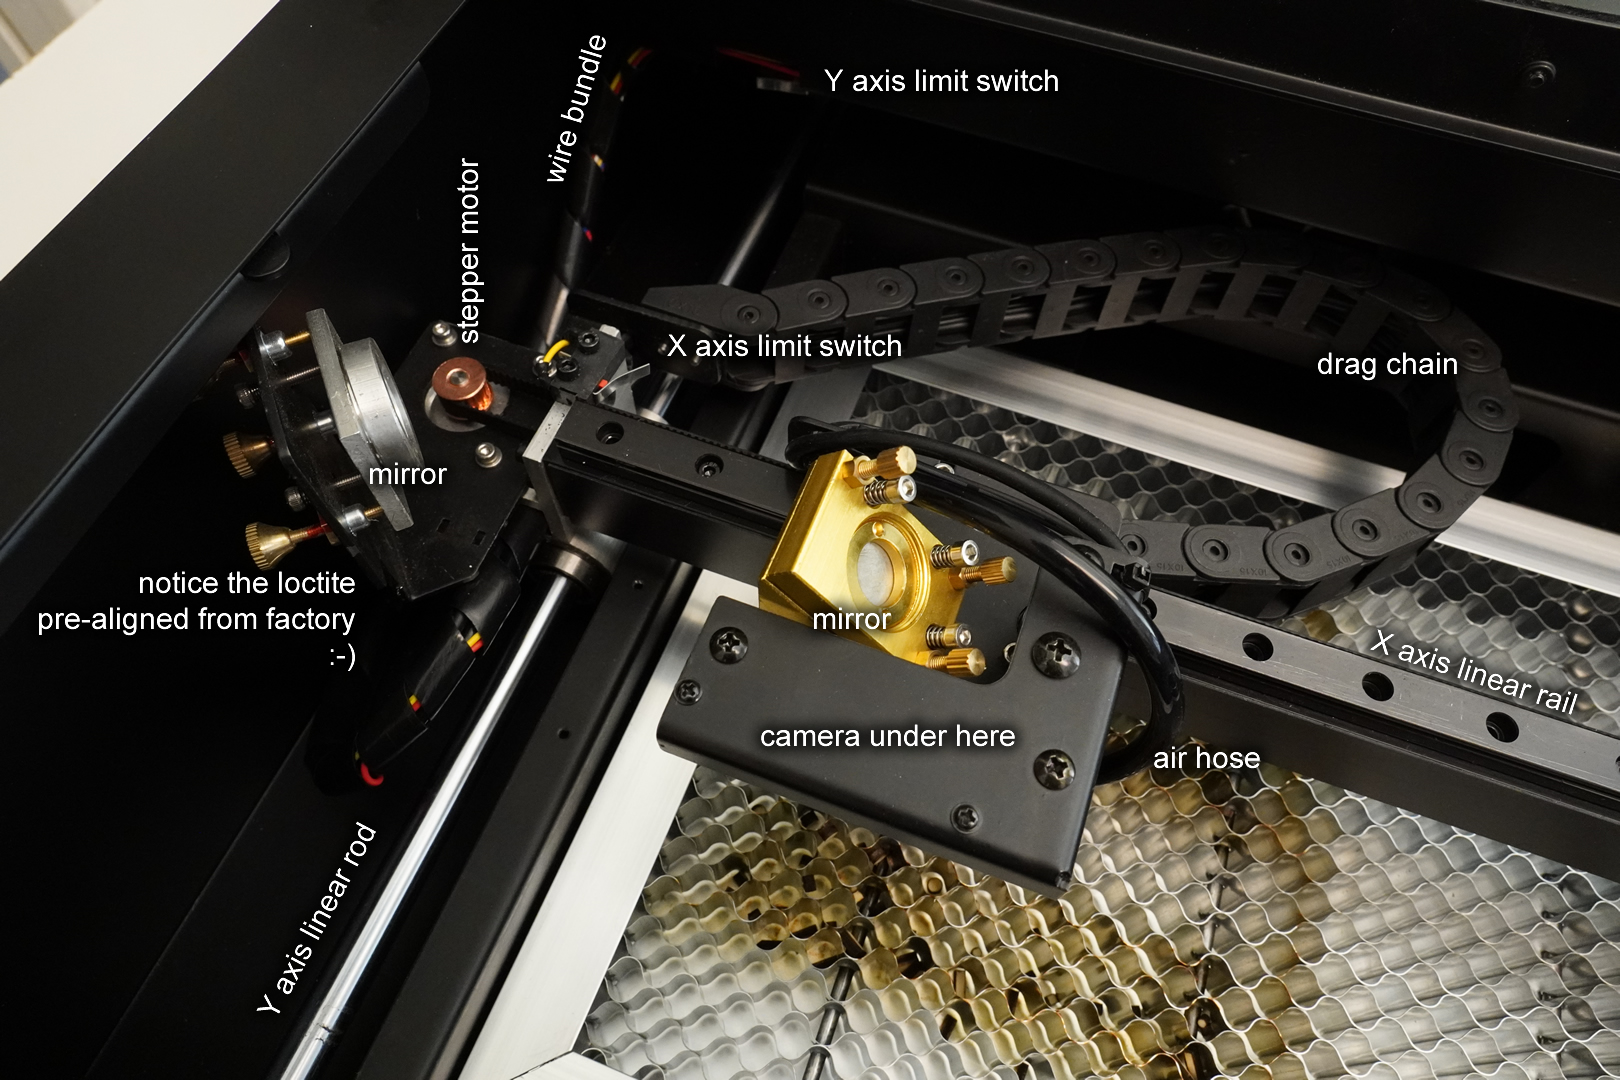
The Y axis rides on two linear rods, looks about 12 mm or 0.5 inch diameter rods. It uses linear ball bearings, one on each side. The Y axis is driven by two timing belts, one on each side, but I think only one stepper motor drives both pulleys. The X axis uses a linear rail and linear rail ball bearings, and one timing belt. All the belts have easily accessible tension screws.
The Y axis could benefit from a rubber bumper at the limit, because the mounting for the side mirror is banging against the chassis if I am moving the whole machine from one table to another. I run the machine outside on my balcony, so I am lifting and moving it frequently. This wouldn’t be a problem if I just leave the machine on a table.
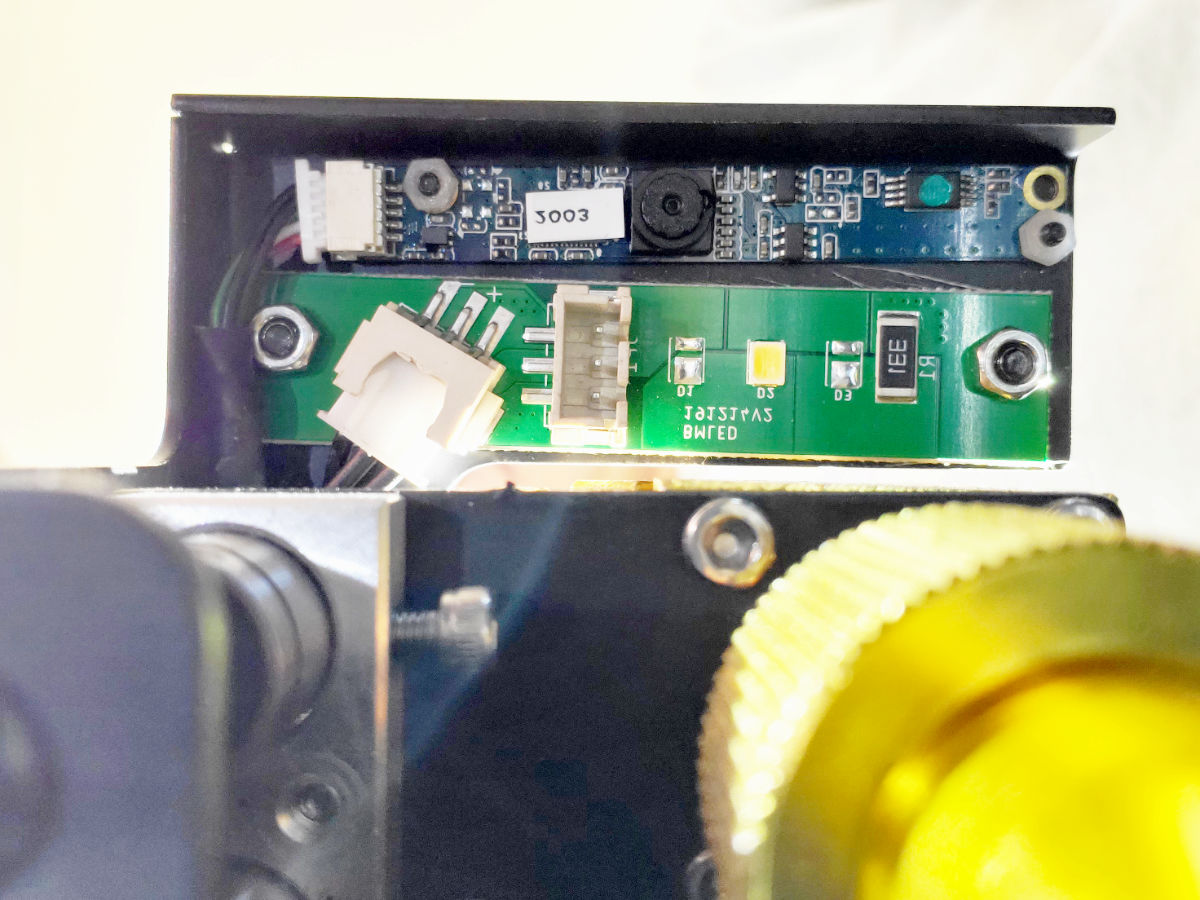
The focusing mechanism uses actual linear rods! This is an excellent design decision. The way the head assembly is designed is very clever, integrating the camera in a way so that adjusting focus does not mess up the camera alignment. You don’t even need a focus distance measurement tool, it’s already attached to the head. Below photo shows the camera and the illumination LED.
Electrical
The master power switch is at the top, a glowing metal button that’s very satisfying to press. It’s a push-ON-push-OFF type of switch, and it is a total power kill switch. The laser-shielding lid also has a magnetic switch for safety reasons.
There is a white LED strip that lights up the work area. The laser head also has a downward facing white light, which helps with the preview camera too. I appreciate the lighting very much, as an owner of an Ultimaker 2, it’s a lovely detail.
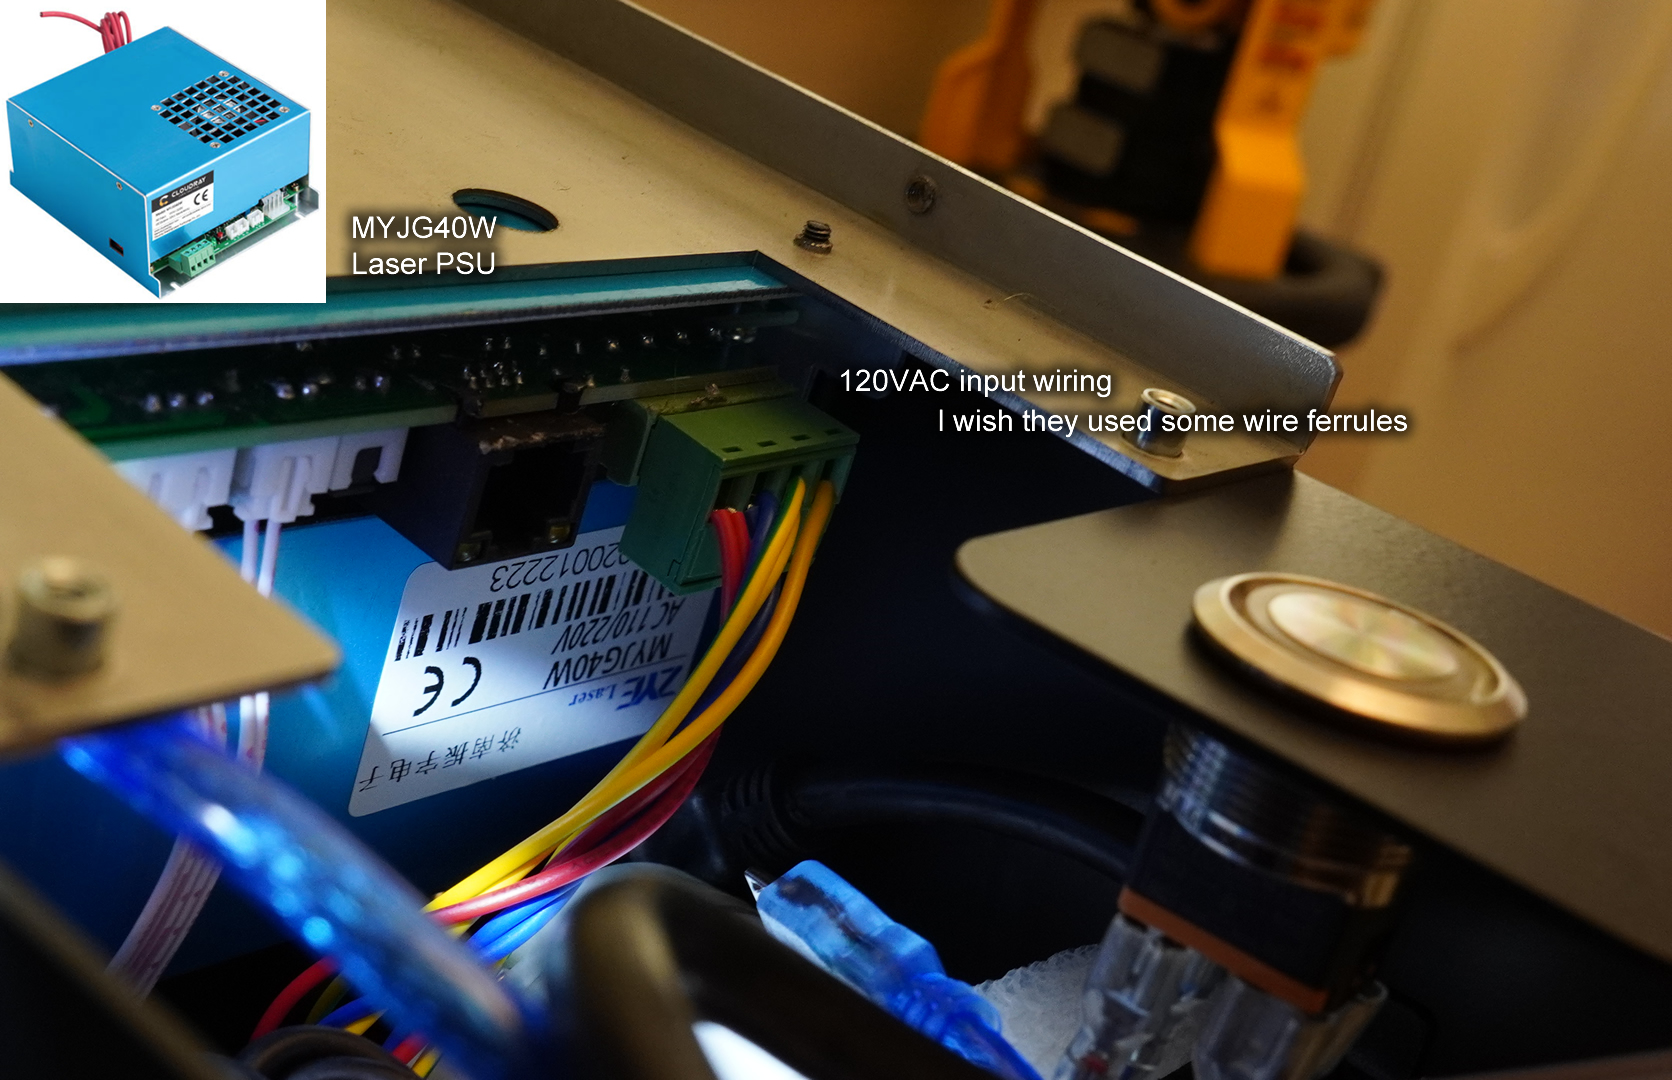
All the wires are protected by either a drag chain or spiral wrap. There’s even an air pump and air tube going right to the laser lens to keep it clear of smoke while cutting. Behind the covers, the connectors look properly crimped, except for one terminal block that didn’t use wire ferrules (on the 120V AC input wires… I’m upset).
The brains of the machine is a Raspberry Pi (model 3 B), connected to a daughter board that hosts a microcontroller (STM32F103C8T6), some stepper motor drivers (Pololu A4988 carrier), and the drivers for the various pumps and fans. This makes sense, the microcontroller probably handles G-code sent by the Raspberry Pi, as the microcontroller is better at real-time tasks. WiFi is provided by an external USB dongle (internal WiFi signal probably sucks). The screen is an HDMI 1024×600 display with a touch interface connected by USB. The camera used for the preview function is also just a USB webcam mounted next to the laser lens.
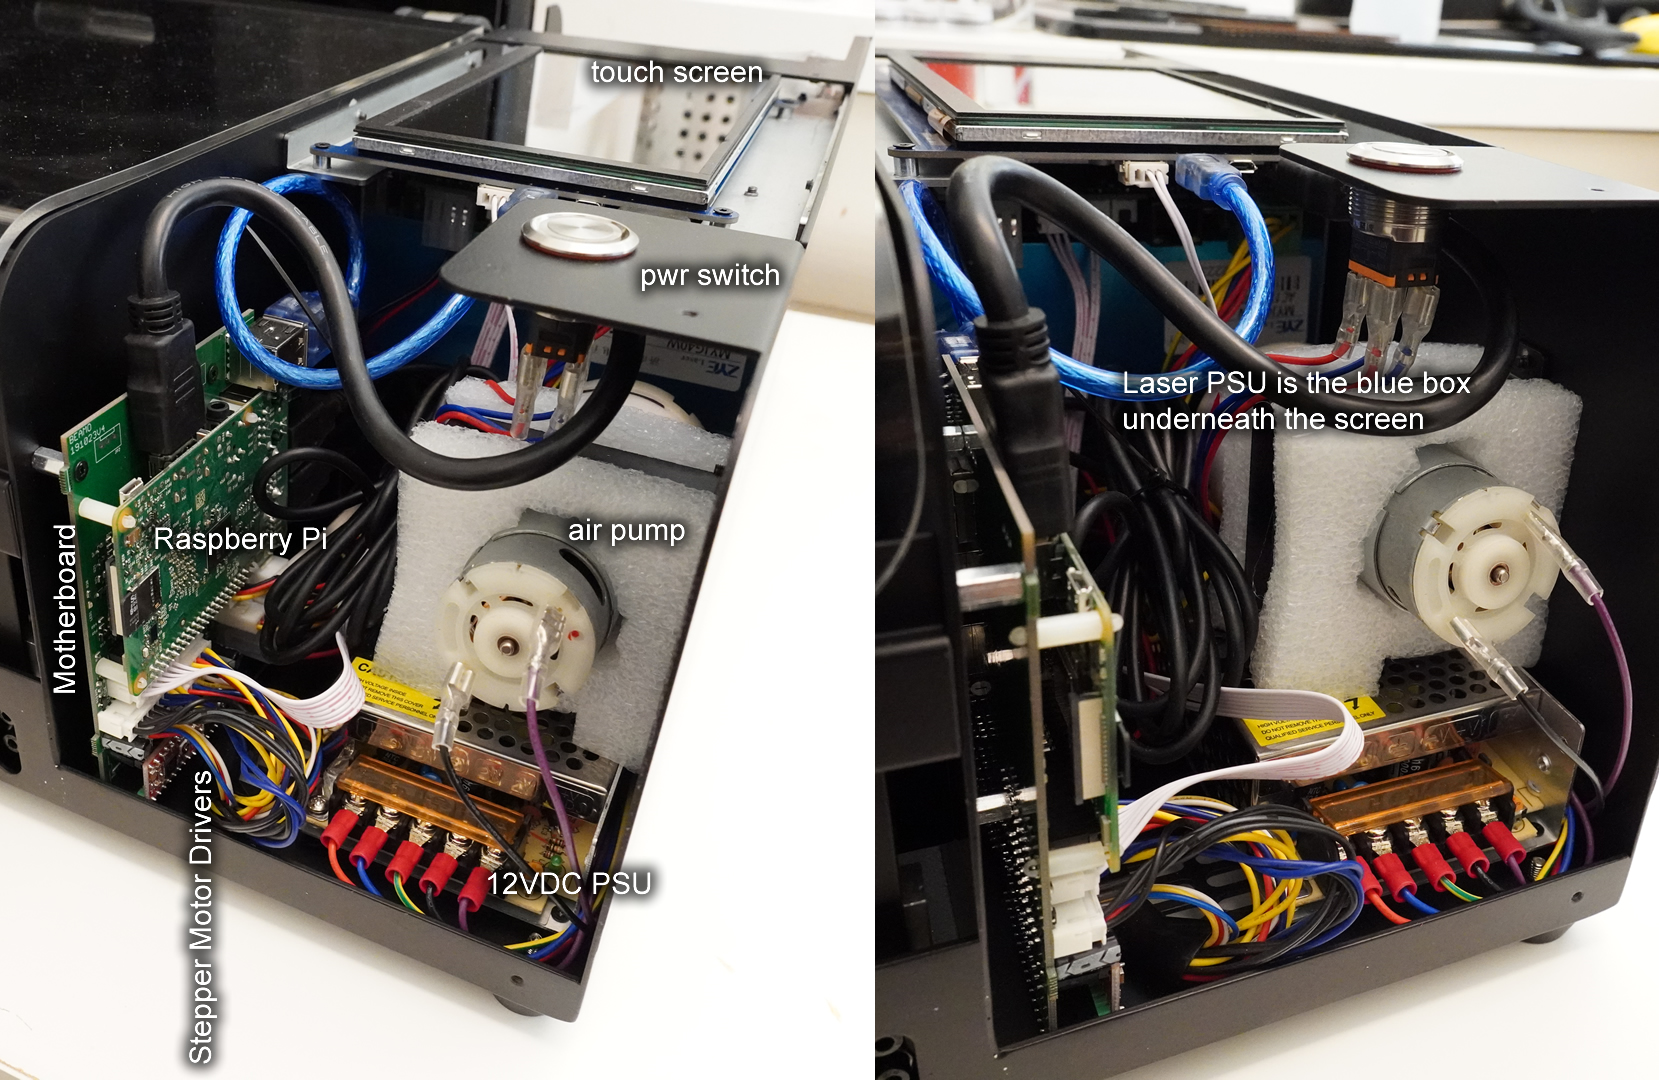
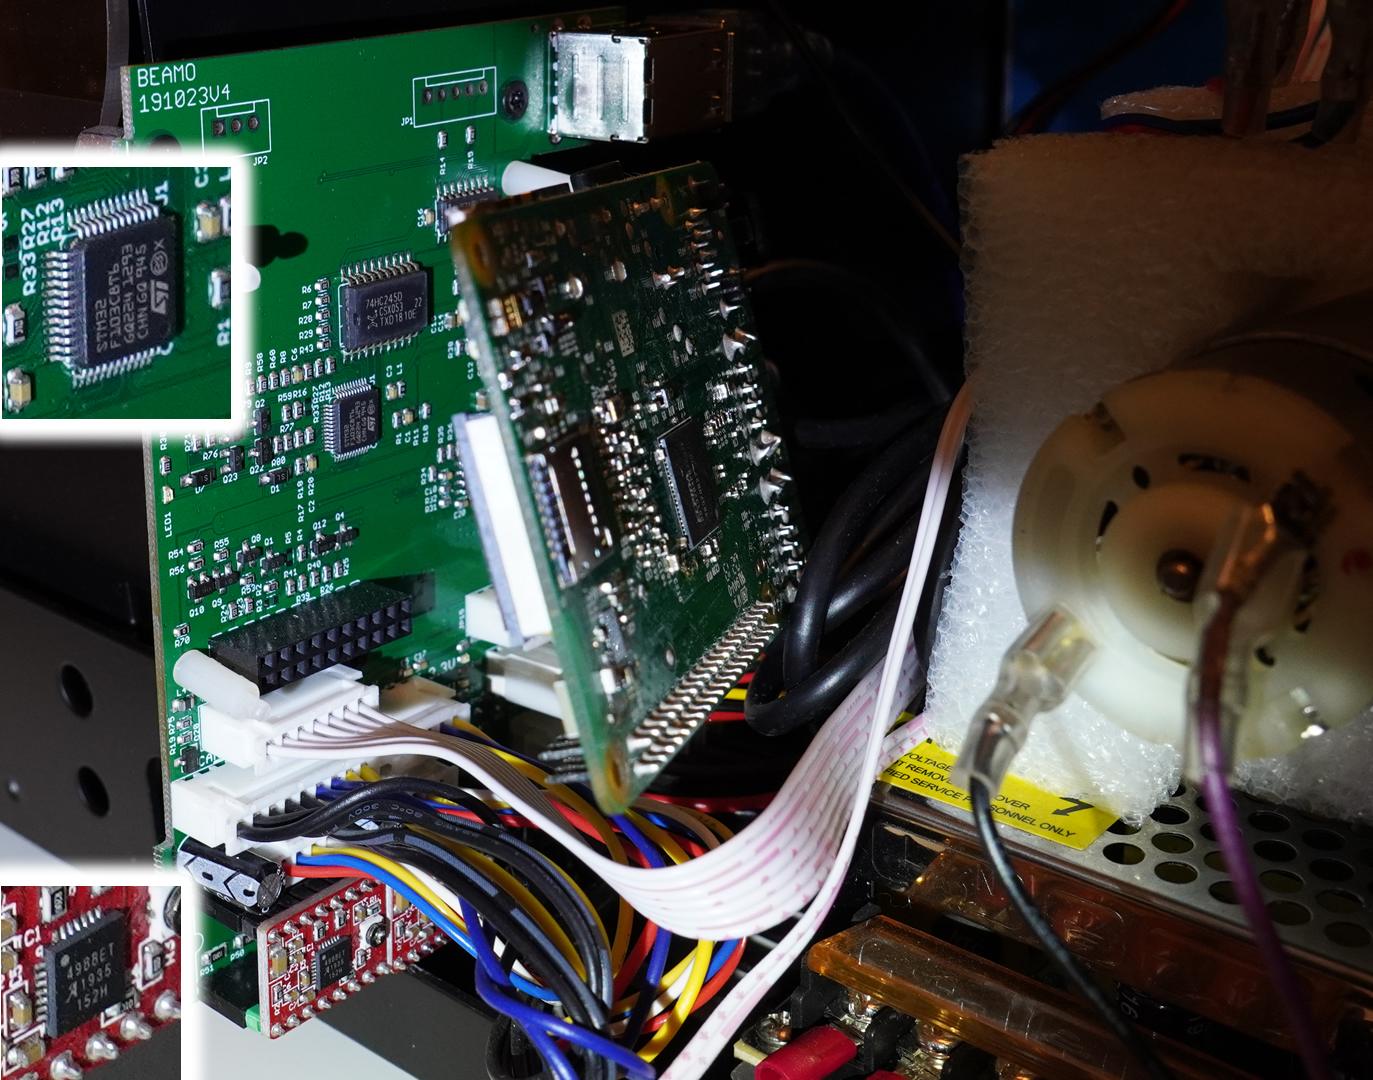
The power supply looks like a standard CO2 laser power supply. It generates a few thousand volts, and the power level is controlled by a PWM signal. Label says it’s a MYJG40W model. There is also a small 12V power supply in the mix of electronics. I also want to point out the block of foam around that air pump motor, that’s to suppress vibration noise from the air pump. A good bit of detail.
Cooling and Fume Extraction
The fume extractor fan is no joke. When the machine boots, it runs at a low speed, so I thought it was just a computer cooling fan… NOPE, start running the laser and it becomes a jet engine. It’s a 12V 4.8A brushless motor! It’s incredibly effective, and loud. I’m very happy about how clear it keeps the chamber while cutting.
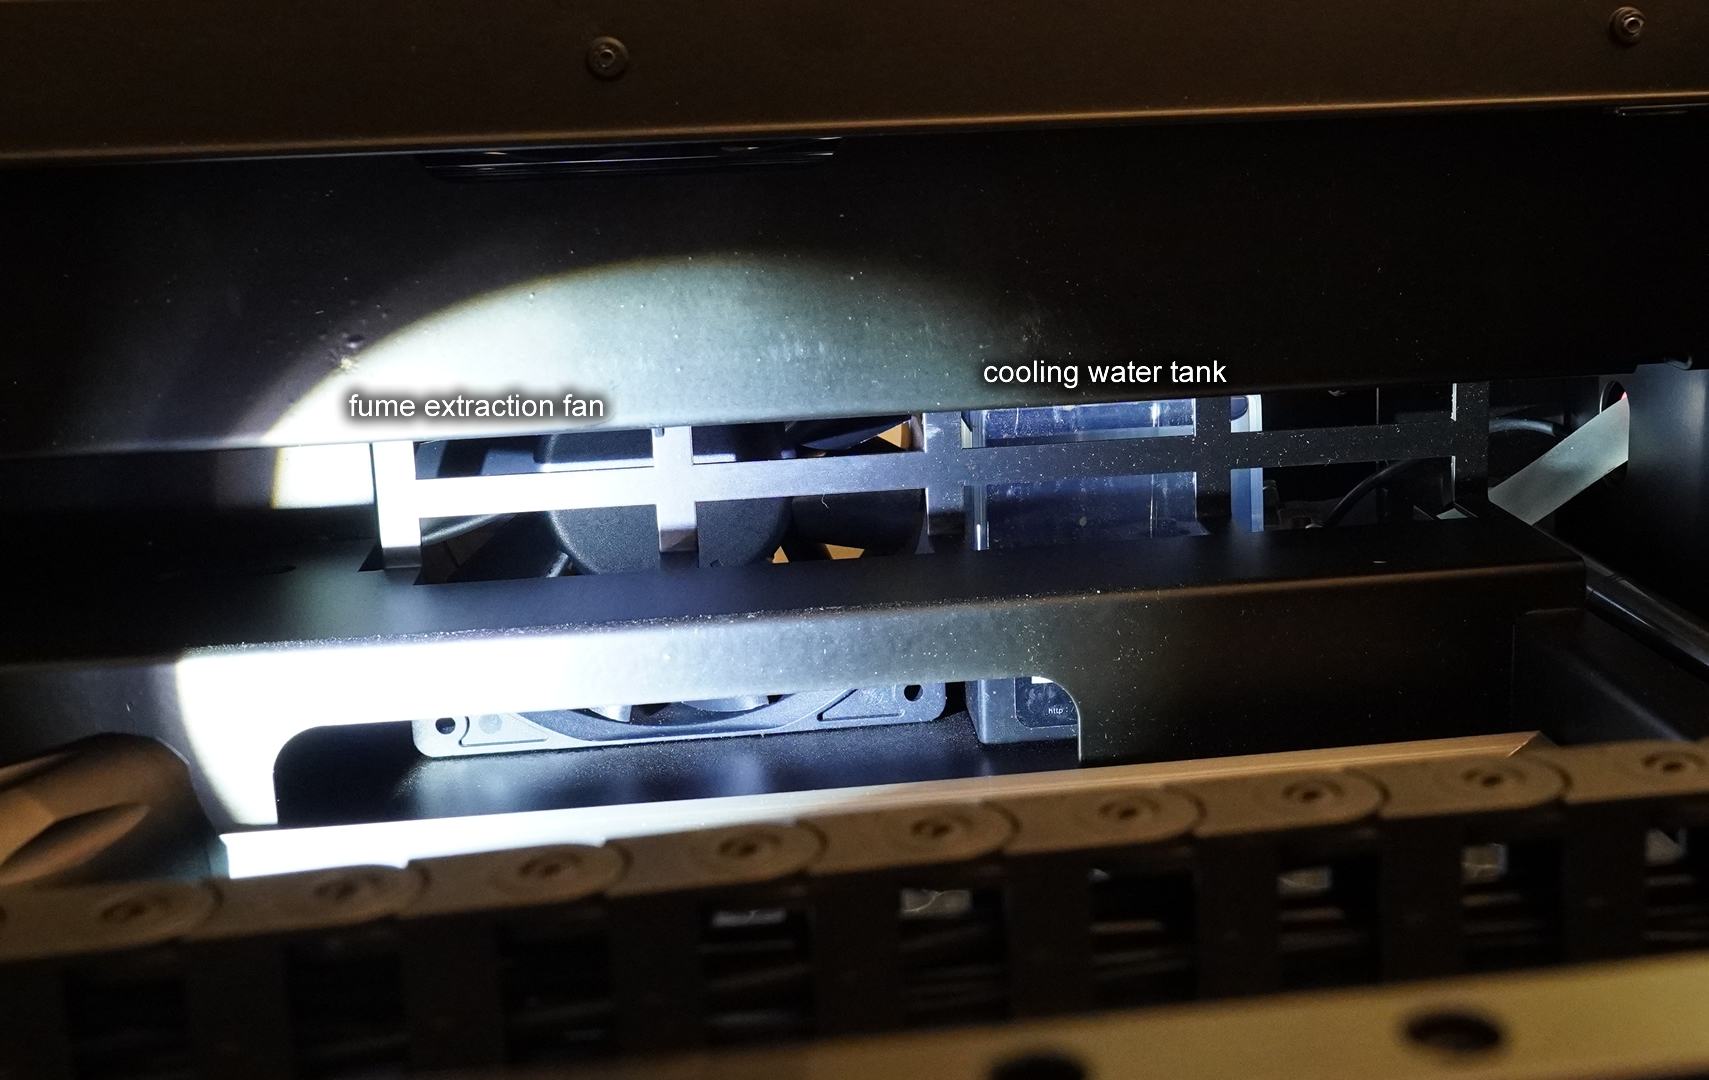
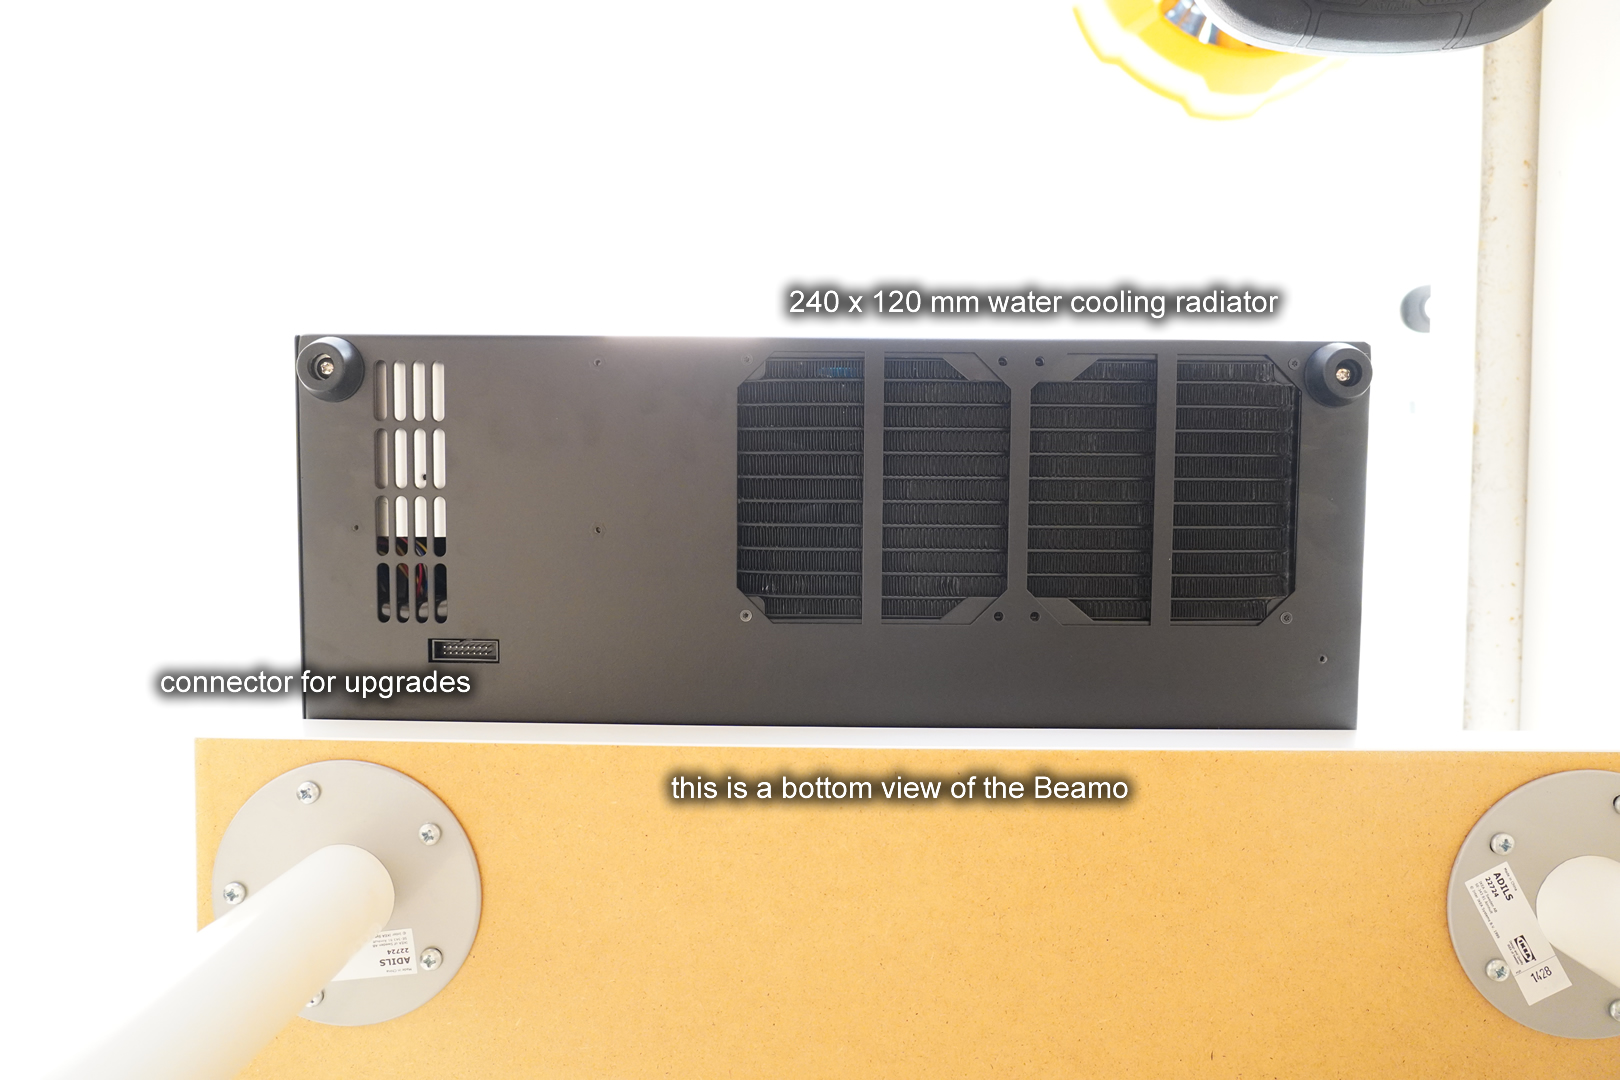
The integrated water cooling loop uses a 240 by 120 mm radiator, the kind found in custom computer cooling loops. The radiator has a vent on the bottom of the machine. This means I can’t use it on my carpeted floor, I need to use it on a table, or else the airflow is blocked. It also means you need to be careful while lifting the machine from the bottom, you don’t want to damage the radiator.
There is a temperature sensor, and you can check it during maintenance mode. I think there’s a water level sensor as well. The temperature data is not displayed during normal usage, which is a shame. There’s no readout for the laser tube electrical current either.
There is an air assist system that blows air at the focus lens. This keeps the area clear from fumes and also lowers the chances of any fires starting.
Software
Boot up time is about 1 minute exactly. There’s no fancy loading screen, but there’s at least a spinning circle against a black screen. WiFi works instantly after boot. Tool-path generation and file transfer over WiFi is much faster than my Duet WiFi (my 3D printer), so fast that I didn’t bother measuring the time.
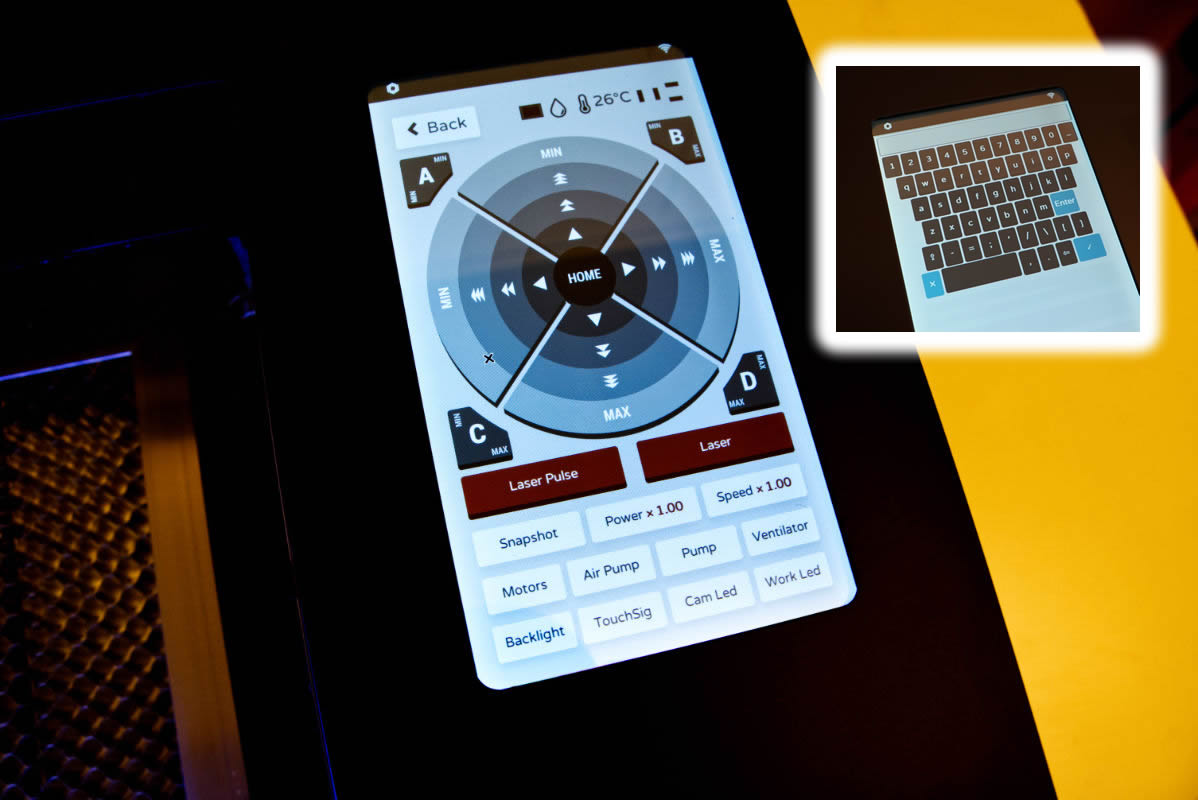
The user interface is very nice looking and intuitive, jogging the machine is easy, setting up WiFi is easy. But, running tests is super annoying, for example, if I press the button to turn on the water pump, the only way to know that the pump is actually ON is to listen, the button doesn’t change colour. (this is a minor detail that have no impact on actual usage)
It did freeze on me twice, once right after connecting to WiFi, and once after testing the camera. Rebooting the whole machine solved these issues.
The software, Beam Studio, is nice looking, written in Electron.js so it looks modern, it’s not perfect but intuitive enough for me to do a project without reading any help. The settings available are power, speed, and repetition. There are material presets, just the perfect amount, covers most usage cases while not being overwhelming. Multiple layers can be defined, which allows for cutting and etching to happen in one job. The software seems to be able to parse files in a way that can divide an image into layers based on colour, which is awesome (you can say “cut red lines but engrave anything green”). It can also separate layers by object groups if you are using SVG. When you import a raster image, the default setting would make it use threshold mode, which doesn’t do shading, shading mode has to be selected by the user, I find this annoying.
This software design is excellent because a well structured SVG file can be used to define both cuts and engraves. It’ll be easy to achieve a very good workflow. But, speaking of 1000 DPI, if you actually imported a SVG with 1000 DPI, it would screw up the scaling of everything else, because the software works at 72 DPI by default.
The software seems to expect the user to have multiple Flux branded machines, because every action you do, such as obtaining a camera preview, forces you to select a machine, even though you only have one. I really wish that it could automatically just choose the machine if I only have one machine.
Major Software Issues!
The import mode that divides the layer by colour seems to also rasterize vector lines! I highly suggest not using this feature, instead, pre-group your objects in the SVG instead.Nevermind, it appears that this mode will group vectors, and all grouped vectors appear as raster, but the trick is to un-group, you’ll get your vectors back.You can’t simultaneously move objects on multiple layers. This is stupid, since it’s a common to want to move vector cuts along with raster engraves together precisely. Current work-around is to have bounding boxes on a project that can be used for alignment.My mistake, SHIFT key doesn’t do multi-select, drag-boxing does multi-select. This is still bad, drag-box-select is way less flexible than shift-select. Also, CTRL-A doesn’t work, and there’s not even a “clear all” or “new file” button.- Starting and ending points for vector cuts are not joined, so jobs take longer and there’s a possibility of slight discontinuities. I found a good work around, an Inkscape plugin here: Chain Paths. EDIT: apparently only really expensive software offer this kind of optimization…
- DXF import will group vectors, and treat it as a raster (same problem mentioned above). I found this out because I tried to do a DXF of a rounded rectangle, and the laser only cut the corners and ignored the straight lines. The work-around solution is to un-group it after import and the vectors will be treated properly.
EDIT: It’s been a few days, and I’ve developed my own very robust workflow that avoids most of the annoying quirks of Beam Studio. Putting the effort into organizing an SVG file’s layers is the key. You don’t want to divide your file by colour, dividing the file by layers is much much much better. Once the SVG is imported, I just go through all the layers and un-group everything so the vectors stay as vectors.
EDIT: OK, the groups becoming rasters is definitely a bug. Even when grouped, Beam Studio is supposed to still retain the vector information, but… sometimes it doesn’t. I’m still seeing some bug reports of people complaining about missed lines, which I encountered myself.
Camera Preview

Using the camera to align my vector art onto my Kindle Voyage leather cover.

This is the feature I am most excited about. Without it, lining up artwork with a physical object is a b****. On the Cubiio, you have the option of running the laser in preview power. But on a CO2 laser, that’s not really possible because the laser is too powerful and also it is infrared (ie, invisible). You can add a laser pointer to something like the K40 but those are inaccurate as the IR laser and red laser beams are not truly aligned. Using a beam combiner is prohibitively expensive. A camera is a great way to bring the target object into the computer digitally instead, so a preview can be overlaid on the screen as a preview. The way the Beamo does this is to have the camera, mounted next to the laser lens, scan over your object. When done correctly, this will minimize parallax and distortion issues. It’s a good design in theory.
The camera preview feature requires a calibration routine. The calibration involves cutting a # shape onto paper, and calibrate to the 4 corners of the center square.
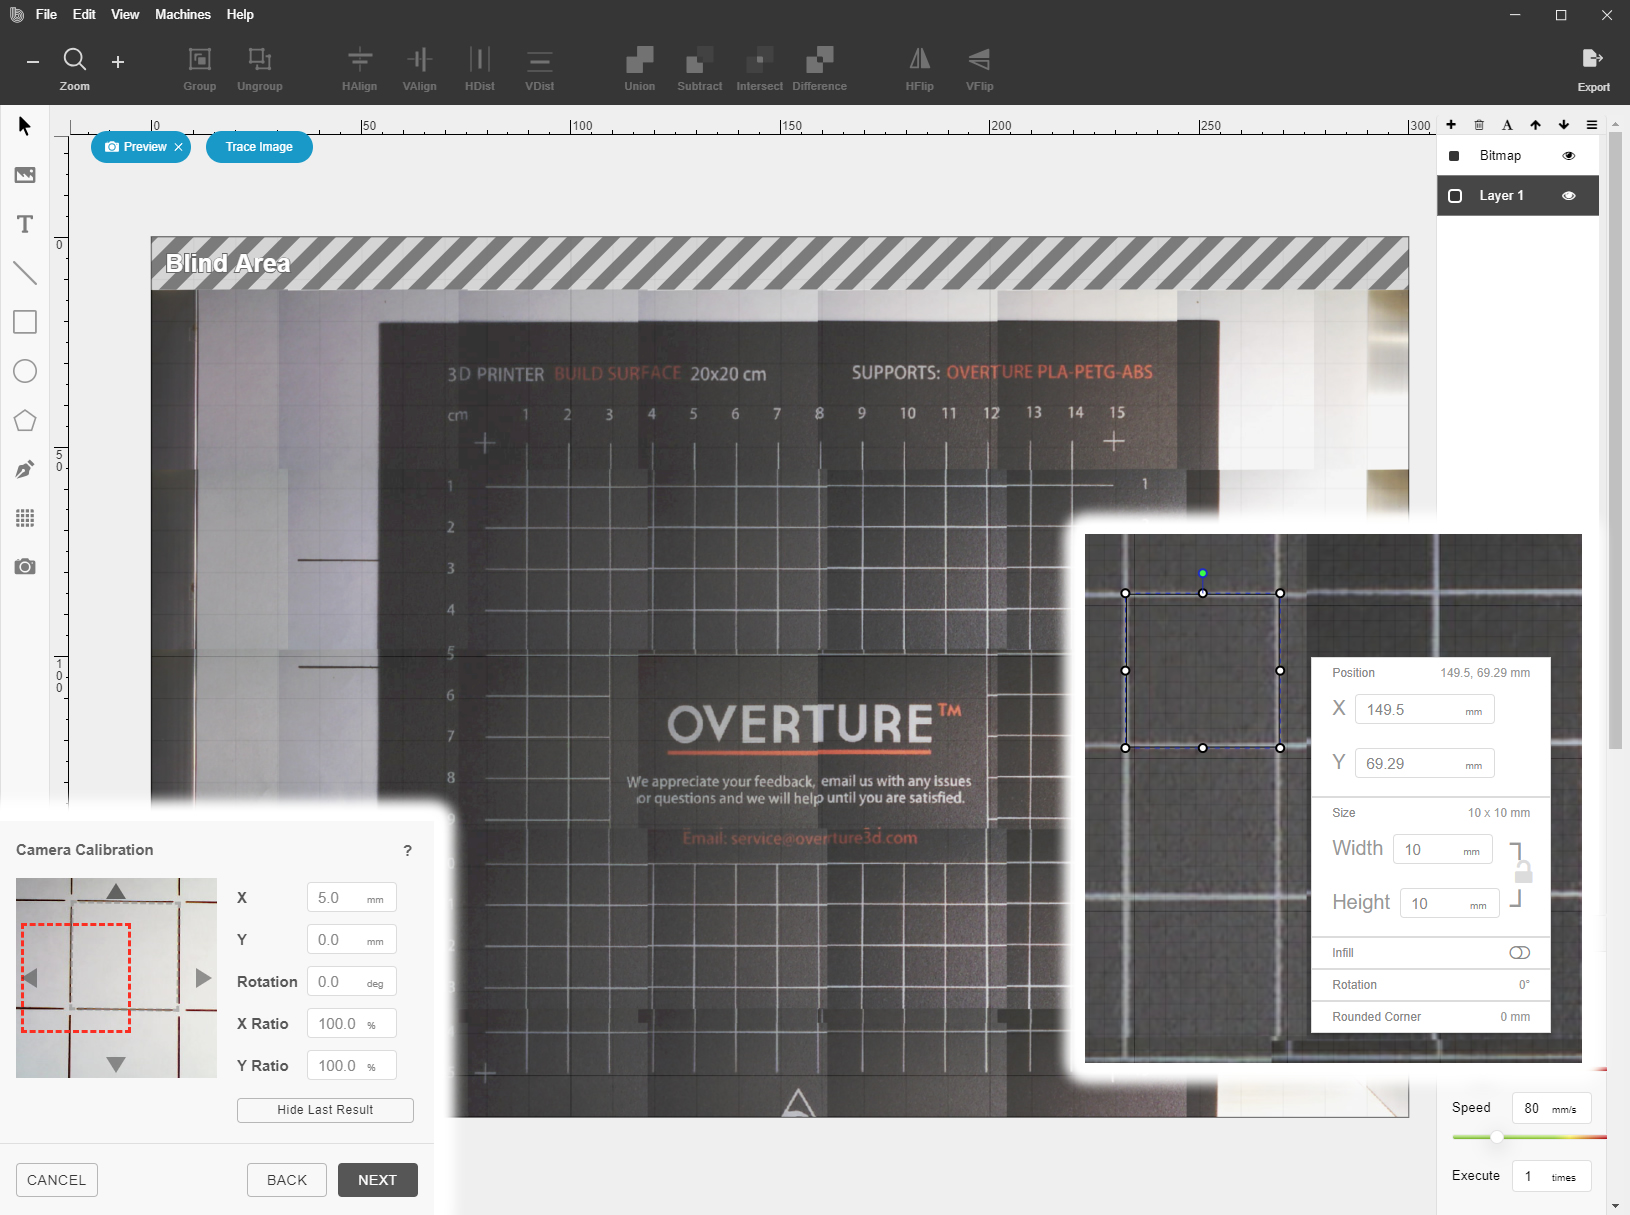
It works, from the image above, you can see how accurate you can expect it to be.
You might noticed that there’s still small misalignments, but let me tell you: the calibration only allows for changes in steps of 0.5mm. If you typed in a number like 1.2mm, it would turn it into 1.0mm, which is very annoying. This could probably be solved easily by the developers, if enough people complained.
Here’s a picture of the webcam and the illumination LED, which is mounted next to the laser focus lens.
EDIT: Ha, I complained to customer support about how the webcam was too overexposed, they offered to send me a replacement LED circuit that’s darker! That’s so cute! Meanwhile, I simply covered the lid so less light got in. After thinking about it, I think I know why correct exposure is difficult. They can’t just let the webcam use its own auto-exposure because the end result will look inconsistent across the many stitched images. It’s also difficult to lock in just one exposure because they won’t know if that one exposure works for the entire work area. So, technically getting the perfect exposure might require two whole scans of the work area, which would be slow and annoying. If I were the developer, I would just set the exposure for the center of the area, and offer a retry button if the user isn’t happy.
Maintenance
I investigated into the maintenance of the Beamo. The first major concern is replacing the laser tube. It seems to be a 540mm long tube, and with an advertised 30W optical output power. This spec is something I had trouble finding, as usually a 30W tube is 600mm long, and a 20W tube is usually 450mm long. If Flux goes out of business and stops selling replacement laser tubes, then I would need to modify the case of the laser to fit in a 600mm long tube, or maybe downgrade to a 20W tube (power supply might need to change to accomplish this).
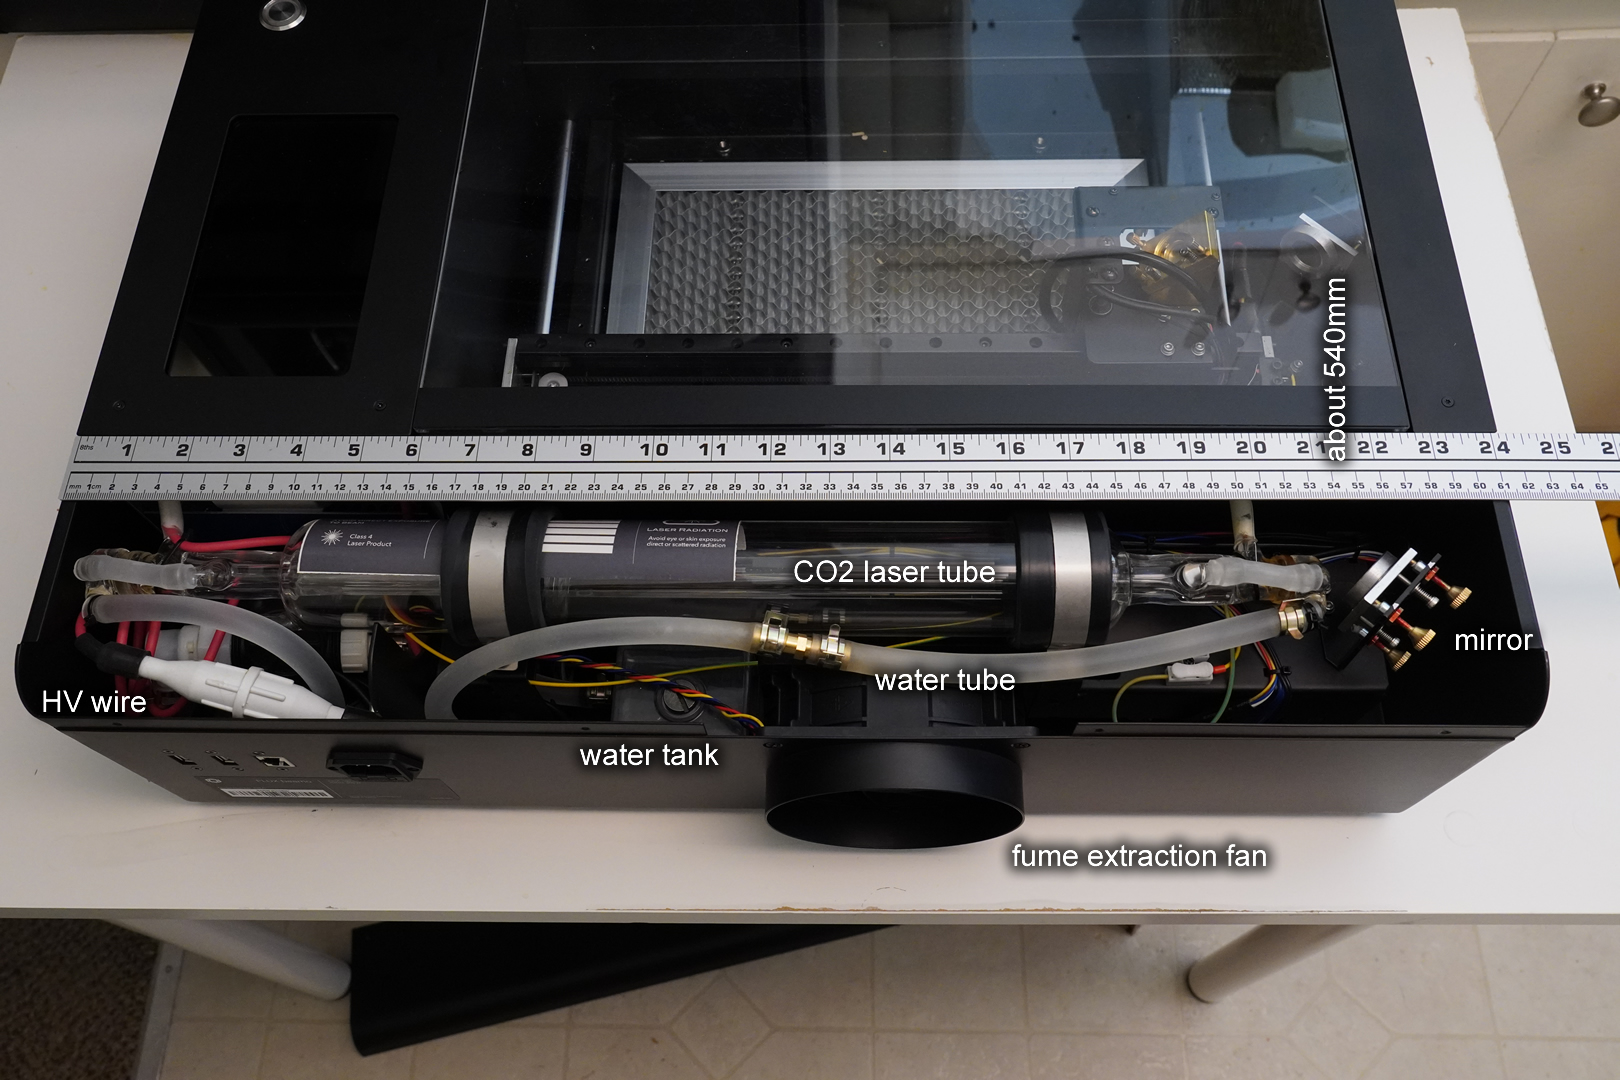
The next concern is the optical components like mirrors and lenses. All the mirrors and lenses are simply circular disks, so nothing proprietary (unlike Glowforge). This means the optics are easily obtainable and easily replaceable. The optical alignment process looks straight forward, every component have three adjustment screws, I shouldn’t have any problems.
As I mentioned above, the power supply looks like a standard CO2 laser power supply. The MYJG40W model seems common but some of them have different connectors.
The electronics might be a bit harder to replace. The stepper motor drivers are on standardized daughter boards so they are easily replaceable. The microcontroller is on a custom PCB though. It might be a GRBL32 based circuit and firmware, since the microcontroller is a STM32F103C8T6. If all else fails, I’ll just slap a Duet WiFi on it.
The touch screen looks like it should be easy to replace, if not, I bet any other HDMI screen, plus a mouse, would work. The preview camera might be found if you look hard enough on AliExpress, I found one result that might fit.

The pumps should be easily replaced, they seem to be just DC motors and standard pumping mechanisms. A aquarium pump could even be substituted for the air pump.
The rest of the parts are very jelly-bean (easily obtained), like limit switches and stepper motors. The lid’s safety switch is a magnetic one, probably just a reed switch, not a hall-effect switch.
Almost all of the screws are torx, and all the screws meet some form of metal thread. This is great for repeated maintenance. The body is constructed with a few panels, in a very sensible and practical arrangement. One panel for the laser tube replacement and water refill, one panel for electronics, and the bottom panel for opening up the bottom (so you can fit a larger object or add in the rotary upgrade).
Other
Email support is prompt and friendly! I even asked to pass messages to their engineers and got responses back that sounded like engineers talking back to me!
There’s no G-code control possible, according to them… Their file format doesn’t look like G-code either. But… I am wondering if it actually is a GRBL32 board inside.
EDIT: I’ve reverse engineered their file structure enough that I am able to convert their file format (called F-code) to G-code, and some G-code back into F-code! I’ve built tools with JavaScript to do these conversions: https://github.com/frank26080115/flux-fcode-tools. I have been able to run jobs generated by 3rd party software but performance isn’t as good as the native Beam Studio. It’s definitely a GRBL board inside but with custom additions that makes it engrave better with the proprietary bitmap data format in the F-code.
They also wouldn’t tell me the SSH login credentials… blah, why not… I have cloned the microSD card already, so it wouldn’t be hard for me to reset the root password anyways.
EDIT: as a comment below pointed out, the UI is just a web page. I accessed it and used Chrome’s dev tools to see how it works. There are some wrapped Javascript functions for everything using WebSocket. Using these wrapped functions, I can even send it basic G-code commands.
EDIT: I got SSH access! I did it by
- Run a Ubuntu computer, plug in the microSD card from the Beamo
- Mount the microSD card partition somewhere
- Use “chroot” to run as root in the Beamo’s file-system
- Use “passwd pi” to set a new password
- Unmount and eject the microSD card, plug it back into the Beamo
- Enjoy SSH access with the new login
I discovered that it’s running kweb with a bunch of Python scripts, also the HTML and Javascript. The firmware files are also available for the STM32 and AVR microcontrollers. Happy hacking everyone! Remember to make a clone of your microSD card first!
Edit: Ha, that messed up Beam Studio, now it’s stuck on “authenticating”. I guess the best thing to do is to add a new user instead of changing the old user password.
Edit: It looks like the source code that shows up on the card is firmware version 2.5.1 even though I’ve updated to firmware version 3.2.1. This means that they’ve changed their update mechanism at some point in time to avoid delivering source code. Now I can only edit JS and HTML, but not the Python or C parts. It looks like without changes to the Python back-end, I cannot get a temperature sensor reading to the front-end 🙁 Edit: it looks like they did update the back-end to include hw_laser_temp to the status JSON object being sent over! I added a temperature display!
Autofocus
The “autofocus” upgrade adds a Z axis motor to the focusing lens. The best use of this upgrade is to be able to cut thicker parts, as you can automatically change the focusing point to be deeper on repeated cutting passes.
This Z axis stepper motor is controlled through USB. Remember how the preview camera is just a USB webcam? Adding this autofocus upgrade is technically adding a USB hub, along with a microcontroller that controls the Z axis. It’s a clever way to offer an upgrade. But the disadvantage is that the Z axis isn’t controlled in real-time, so it will be difficult for the software to follow a curvature. Even if I hack the GRBL32, Z axis move commands wouldn’t even work.
However, a known shape can be sliced into layers, so at least you can use this upgrade to work on complex 3D shapes, just not as quick as other methods. Doing this will involve some 3D modeling and processing of the 3D model outside of the Beam Studio software.
I plan on getting this upgrade ASAP but nobody has it in stock yet. (above analysis is totally based on images in the installation guide, the images were high enough resolution for me to ID the chips used on the circuits)
Comparisons
I made this purchase after some research and comparisons against other options. My old Cubiio is simply inadequate, and can’t even make straight lines (see my previous review). My 3D printer make artwork involving transparent or wooden materials. Upgrading to a Cubiio 2 would cost the same as a Beamo, but only give me 5W of power, cannot cut clear acrylic (power too low, and wrong laser wavelength). Getting a $300 K40 laser might’ve made sense except I really didn’t like how the cooling system is a garden fountain pump and a bucket of water. People in hot weather have claimed to put this water bucket in a mini fridge just to prevent overheating. Maintenance and usage of a K40 laser simply sounded like a pain.
On the higher end, a Glowforge might’ve made sense except it’s “cloud only”, **** THAT. Dremel, FSL, ULS, Epilog, etc (the good brands), are all offering modern home-use CO2 lasers, but Beamo is still the only small and relatively inexpensive option that doesn’t involve external pumps or filters.
Came here from reddit as I am researching CO2 Lasers atm.
Great review but from others I have read I am still conflicted.
Thanks mate
The touch panel is actually displaying a web interface and if you go to ip.address:8000 it will be accessible there too, in case your screen dies on you.
That means I could in theory turn on Chrome’s developer console, reverse engineer the async requests, and write my own interface! Maybe get a temperature readout somewhere!
Yep, it’s all websockets, with some wrappers. I can issue G-code commands now!
Nice! 👍
No temperature readout or shutdown is a real shame and puts many $300 “k40” style lasers ahead of it in lifespan I’d imagine.
I’m also not understanding why they decided against using the relatively standard 40W 700mm tube in the Glowforge, Dremel, and Chinese 3020. Those tubes have gotten quite cheap in recent years and even available on Amazon Prime. They could still rate the 40W tube at 30W and let the lower power make up for the lack of cooling.
It has the temperature sensor, so it probably shuts down automatically. I wouldn’t worry about it.
If they made the machine bigger, I wouldn’t have purchased it, so I think they made the right choice.
Since its using RPi, are there any issues when there is a sudden power outage?
Also does beamo have a shutdown function from the software or the LCD?
Heard improper shutdown leads to SD card corruption!
It does not have an option to shutdown.
Even with power removed, the 5V DC supply still has enough juice to keep the system on for a few extra seconds. I am wondering if it’s got power-fail-detection, just like some 3D printers. I don’t know the answer.
I have not had a card go corrupt due to improper shutdown. That is highly unlikely, and the EXT4 filesystem is pretty robust. I wouldn’t worry.
The Pi is configured for kiosk mode too, I’m not sure if that prevents any unnecessary disk writes.
Thanks for writing an intensive review. This seems to be quite a ‘beta’ product, and hopefully they’ll clean up the rough edges and annoyances. The ‘cloud’ based software is a real problem, what to do if the company shuts down or otherwise eliminates/changes the cloud portion and renders my laser cutter unusable? Even if this was fixed, this is just not enough machine for the money in my mind and wallet. I’ll be building something much more powerful and with a larger cutting area.
Just to be clear, Beamo does not cloud software. It uses WiFi but it also has USB ports, and the electronics use open source parts.
The Glowforge is one that uses cloud software. I would avoid it.
Great write-up. I’ve been tinkering with a K40, but the more effort I put into it the more attractive something like this looks.
How have the trinamic drivers been working out?
Also, I wasn’t sure from your comment if they sent SilentStepSticks, or if that would be an option you could use to upgrade down the road.
FLUX shipped one to me via DHL.
The problem is that installing it flipped the motor direction. Their GRBL firmware refuses to flip the direction. FLUX support offered to remotely access my laser to help me… and instead of letting some guy in Taiwan operate a god damn laser in my own home over the internet, I decided to just flip all the stepper motor wires.
It did solve the banding problem!
Haha, what could go wrong with someone halfway around the world blasting lasers around your living room? Anyway, glad to hear it worked. Sad I missed the kickstarter on this one.
Thanks so much for this! I ordered mine yesterday and my main hesitation was the power. Didn’t know how long the laser was or if It would ‘actually’ put out 30W. Do you think upgrading power is a viable option?? Is it just the power supply and space that determines how much power you can add? I mean (hypothetically speaking) could you modify the casing to add Space for a 700mm laser to this with the appropriate power supply and be good to go with more power? Or would it cause other probs? Maybe also have to enhance the cooling system then?
Also, wish you had a post on how to add the temp readout 🙂
I am not seeing any boost in power between 55% and 100%. It doesn’t seem to cut any faster. So you’ll definitely not be using the full 30W at all times.
If you do decide to upgrade then yes you will have to upgrade the PSU and the cooling.
I really don’t think it’s worth the effort of cutting the chassis. I would personally just build a bigger box but put in the Beamo electronics.
AWESOME write-up. I’ve been trying to decide on a laser engraver for the past 2 weeks and you’ve sold me on the Beamo!
I’m wondering if there is any way to upgrade the laser at all? Additionally, are there any modifications that can be done for improvements? Finally, are there any user groups you’ve found? I would love to join a user forum!
Thanks so much!
The chassis is short, if you want a more powerful laser tube, you will need to cut a hole in the chassis.
The cooling system is good enough for non-mass-production work but if you really want to extend the life of the laser tube, you could run the water hoses outside the chassis and use ice or refrigeration to chill the water.
The community for the Beamo/Beambox is on their Facebook group. You can see some interesting stuff being made. The rotary add-on is really popular, I see a lot of people engraving on bottles and glassware.
The community on Reddit for lasercutting is very technical and professional but not focused on the Beamo or Beambox.
Thanks for the reply!
I was thinking of purchasing the Beamo to start a small side business. I probably wont be doing anything mass scale though. I figure if things go well enough, I’ll start looking at the Beambox pro!
I’ll continue to visit to check out any new updates!
Have we heard anything about the ‘hybrid’ laser upgrade?
I see it offered on their EU site but not in NA…
Can you take the bottom off and engrave your desk, or maybe a large piece of wood?
The bottom can be removed but I don’t think it can focus that far down. You can try buying a lens with a different focal length. I wouldn’t recommend it for that job.
They told me I could put a magnet on the sensor to engrave large object, but where is the sensor please?
Thanks so much for this!
The X/Y stepper motors on the flux website are quite expensive.
Do somebody have the specs for me, so that I search for a much cheaper price?
Thanks.
Just got a used Beamo – It has the old A4988 drivers in it and is having the same issue you had when doing raster drawings – I picked up some MKS 2208 drivers from amazon and installed them and reversed the wiring to correct direction – The odd issue i am having is that the Steps per mm for the X direction are off ( Y is fine ) and i only get movement to about half way on the x rail !
How did you access the GRBL commands to be able to edit the settings for the Steps per mm ?