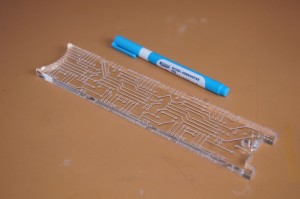
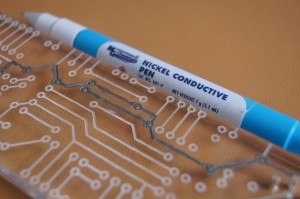
I wanted to make a transparent circuit, made with clear acrylic plastic, and the circuit pattern is etched onto the plastic using a laser cutter. The etching forms a groove that is about 0.1mm deep and 0.8mm wide, this groove is filled with conductive ink to form a circuit.
I attempted this experiment, but was met with…
…several difficulties. These problems are bad enough for me to not suggest this method.
My conductive ink is made with nickel, which is much cheaper than conductive ink made with silver. I could not find any documentation on the conductivity specification of either of these inks. But I drew a track anyways, and the resistance was several hundred ohms only after a few inches. My circuit is supposed to carry somewhere around 300mA and cannot suffer more than 0.3V of voltage drop, even one ohm is unacceptable.
Without any sort of documentation, I cannot compare nickel ink with silver ink, although I can guess silver ink is probably better. I do not want to waste any more money to try, due to the next reason.
The conductive ink also has an ingredient that melts acrylic plastic. Drawing into the groove without overflowing the groove is very difficult (the etched groove is rough because the laser has to use a back-and-forth motion to do the etching, making the pen’s spring-loaded tip very difficult to control). Any attempt to wipe up the overflowing ink will ruin the plastic as the acrylic is in a melted state. You can wait until the ink has dried, but then you risk chipping away large sections of dried ink, or scratching the plastic.
So kids, don’t try this at home. It’s totally safe, but it’s a waste of time, money, and effort. (I am hoping this makes it onto Hack a Day Fail) (edit: yay it made it http://hackaday.com/2014/10/09/fail-of-the-week-transparent-circuit-design-is-clearly-a-challenge/ , hi everyone, this project evolved into this project)
My next attempt will involve using wider tracks and copper foil.
I am also aware of how to make glass circuits.
EDIT: You all have great ideas, but keep in mind that I do not have my own laser cutter. What I’ve attempted here was done through Ponoko. So I can’t simply ask them to do super special things like coating the plastic with copper before etching.


Why didn’t you try conductive paint rather than the pen ink?
I grabbed whatever I could at the local store. Perhaps I’ll try again later.
Man, I love your idea! This is such a cool idea! Why not try again but use transparent polycarbonate (Lexan), instead of acrylic. I have had polycarbonate etched by laser – works just as well as acrylic.
Have a look at this video. This guy is making a pcb of glass. Maybe it works for you.
maibe you can coppercoat the nickel with electrolicis https://www.youtube.com/watch?v=aoCyRQsDNco
takes a bit of time as you have to power up every single track while it being submerged but touching it with a testpin should do it
then fill the grooves with solder redril the holes and install the components , the resistance should drop dramaticly
Like the idea!!!
Might want to add a film on the plexi while cutting it.
If the groove are deep enougth, you could apply paint all over and pull flm off and be left with clean lines.
Hope you are going to do another shot at this!!!
Alex
Wow I can’t believe I didn’t think of this. When the plastic was shipped, it was covered exactly like you described. And the covering was etched away where the plastic was etched. But I was so excited to see what it looked like first so I removed the covering first! Thanks for the reminder.
I wonder if the melting acrylic is mixing with the ink and changing the resistance. I would try a similar length of ink on glass and see if the resistance is the same. You might be able to check with MG Chem and see if they can suggest another product that doesn’t harm acrylic. Nice write-up!
There is s form of flexography that people have started using on a small scale for fingernail polish, something like that could be adopted to apply a thin film of some sort of paint/goo..
I know its not exactly what you were going for but i tried (somewhat unsuccessfully) to laser a grove in the acrylic and embedding actual high gauge wire into the channels. I didnt end up lasering quite deep enough but its possible, i tried to do a vector cut but maybe something more along the line of a deep raster would work.
My final solution was to etch the groove and put copper tape inside the groove.
Why don’t you try using a glass plate coated with a transparent conductive oxide, like indium tin oxide (ITO). Then you could etch the oxide chemically or with a laser (might obscure the glass a bit) to form your tracks, similar to a conventional copper PCB. You could also get a glass plate coated with copper and then make a PCB like that.
You can get ITO-glass from here:
https://www.adafruit.com/products/1310
I thought about this before. But first I can’t etch away the ITO, my image would become a “negative”, which might still look cool (so “solder mask” will appear cloudy, and “traces” will be transparent). Second, I don’t have my own laser cutter, getting a custom shape piece of glass cut will be difficult for me. Also I need to recalculate the conductivity of ITO again.
And yes I am already aware of how to make glass circuits using copper foil coated glass. If Ponoko offered custom cut glass shapes, I would’ve probably started off that way in the first place.
Stick a adhesive foil to the acrylic plastic before laser cutting and stick off the foil after painting with conductive ink.
I need to check if etchant will damage acrylic or polycarbonate, if not, I might try this.