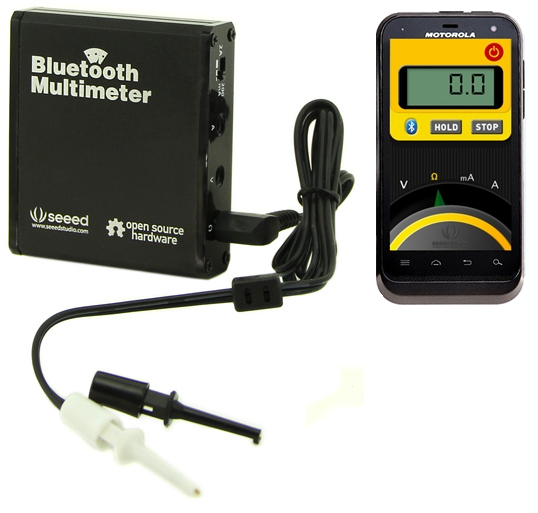
I just received my SeeedStudio Bluetooth Multimeter.
I’m not going to talk about the measurement specifications and capabilities, because they are clearly stated, and you should decide for yourself if the specifications and capabilities meet your needs. This review will be more focused on the usability.
The enclosure is made with split extruded aluminum and plastic end-plates (probably because metal end-plates would block the wireless signal too much). The PCB is only held by Inside is a Li-poly cell, the same as the one they sell in their store. The slide switches they’ve used are acceptable. Nothing is loose, it seems like it can handle normal use. But I did already strip one thread during reassembly, so it’s not A+ material.
It’s great that they’ve exposed the “programming port”. The firmware is written as an Arduino sketch. I just wish they put the source code on github or something instead of as a ZIP package. Not the end of the world.
The indicator LEDs are not labelled, I have no idea what LED means what at first glance. After using it for a bit, it all became very clear.
The probes are ordinary spring loaded hooks with some ordinary wire going to a 3.5mm plug. Nothing exotic or expensive. I wouldn’t shoot 2A through these wires. This device is obviously designed to be placed in remote locations so hooks make more sense than traditional probes, while alligator clips might have been too big. 3.5mm plugs are common so it should be very easy to make your own probes.
It just uses the serial port profile (I’m not surprised, they used one of those dirt cheap Bluetooth serial port modules inside). This means it works on Android, not iOS yet (suck it iPhone), and anybody can also just send commands over serial port. Automation and logging should be easy, although according to the source code, they didn’t use printable commands so it might be a bit annoying.
The Android GUI is horrible, it’s simple but it is really annoying (it’s full screen for no good reason… why are you hiding my notification bar? also they didn’t even bother giving the app an icon so it’s extremely annoying to find), also there are some useless buttons (the power button just makes the number blank, the “stop” button doesn’t do anything, the “settings” button doesn’t do anything) that will confuse you. Right now, the unit of measurements have a bug where it flashes between mV and V repeatedly. The decimal doesn’t stay in one place making it extremely hard to read anything when the numbers change rapidly. Also infinite resistance reads as 0, which is wrong. When disconnected, the current measurement will read some ridiculous large value and exhibit the same unit flashing bug. And sometimes it freezes, which is a tip-off that good Android programming practices are not being followed (probably blocking IO calls in the UI thread). All in all, the GUI is basically useless…
I love you SeeedStudio but your English still sucks… Your wiki page have some sentences that barely make any sense at all.
Right now, I do not recommend you buy one of these UNLESS you explicitly need something to remotely datalog voltages, and you are willing to program something yourself to do so.
I learned a cool PCB construction technique while disassembling this thing. The PCB sticks out into the end-plate of the enclosure, and this area have no solder stop mask or copper to allow light to enter the FR-4 material (slightly translucent greenish yellow), and side view LEDs are mounted near this area. This allows the indicator LEDs to have a better viewing angle (avoids having a light pipe), the light is less piercing on the eyes (although you can also just use a bigger resistor), and I think it also stops debris from entering the holes cut into the end-plate. It also aligns the PCB with the enclosure better. A disadvantage is that the PCB must be thick, and must be milled, not V-scored or sheared.
Click here to see 5 photos I took of the internals, you can see what I mean about the LEDs.
