

Arduino Programming
This class will cover how to use Arduino, and then how to program the Arduino Nano on your robot.

If you are using the library's computer, then do not worry about installing the Arduino IDE or device drivers, because the library's computers already has them installed.
You do need to bring a USB drive to download the sketches and save your sketches, if you are using the library's computers.
If you don't understand anything here, please try to use the internet to answer your question (I cover how to participate in online communities at the end of this lesson!), or come to the library to ask me directly (bring your computer if you have one!)
Installing Arduino IDE
Remember: If you are using the library's computer, then you don't need to do any installation! Skip this step if you are using the library's computer.
IDE means Integrated Development Environment, in this case, it means a piece of software that includes a text editor designed for coding, a compiler that can translate code into instructions, and a way to write (upload) those instructions into your microcontroller. There are other IDEs out there for different programming languages and with different features. The Arduino IDE is only designed for different types of Arduinos.
The Arduino IDE can be downloaded from here. Simply download the latest version of the IDE, and then install it to your computer. During the installation, follow the instructions provided in the installation, and use the default options.
Installing Device Drivers
Remember: If you are using the library's computer, then you don't need to do any installation! Skip this step if you are using the library's computer.
Preparing the Sketchbook
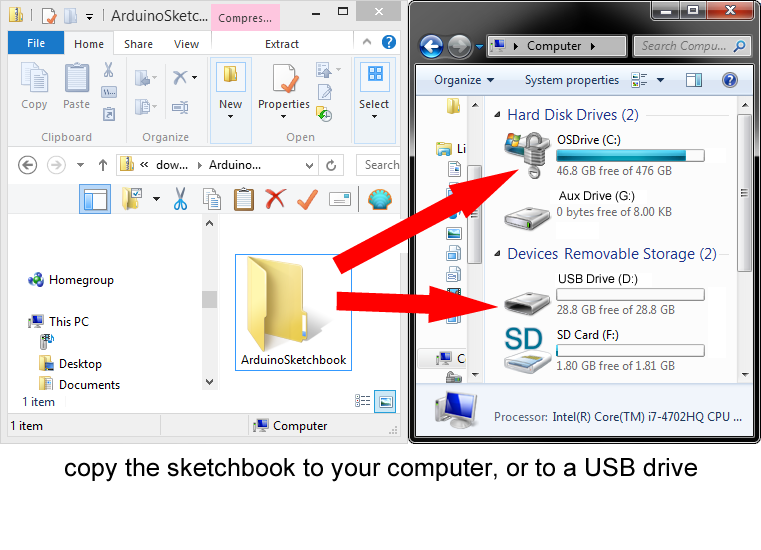
Arduino likes to call projects as sketches and saves them in a sketchbook. This is because Arduino was originally derived from software designed for artists. If you are on a library computer, we need to put the sketchbook on your USB drive. If you are on your own computer, then you can put the sketchbook wherever you want (or leave it in the default location).
Sketchbooks also contains libraries. In computer programming, a library is basically some code that you can reuse. If you have five different robot projects that all use servos, you can use just one servo library, instead of writing the servo code five times. Usually, the user of the library does not ever edit the library, but with Arduino libraries, you can look at library code and even edit it.
I have prepared a sketchbook for you already, it contains pieces of code and also the libraries you need.
Click here to download the sketchbook
Either save this to your own computer or save it to the USB drive. It is a ZIP file, so you need to extract (aka unzip) the folder from inside the ZIP file to somewhere on your own computer or to your USB drive. It's almost the same as copying the folder.
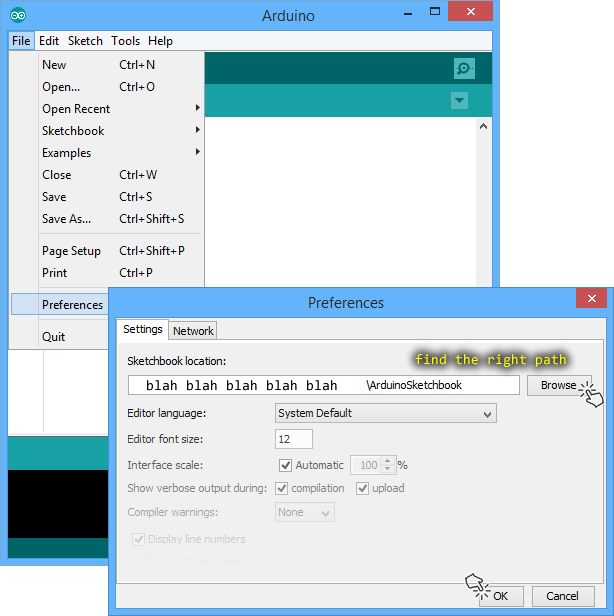
You need to tell the Arduino IDE where the sketchbook is (where you copied/extracted it to). Run the Arduino IDE and use the "preferences" dialog to change the sketchbook location. See screenshot below
Running Code
Put all 4 AA batteries into your robot first.
Start the Arduino IDE if you don't already have it open. Then you need to make sure that you've selected Arduino Nano as your board, and selected the correct port.
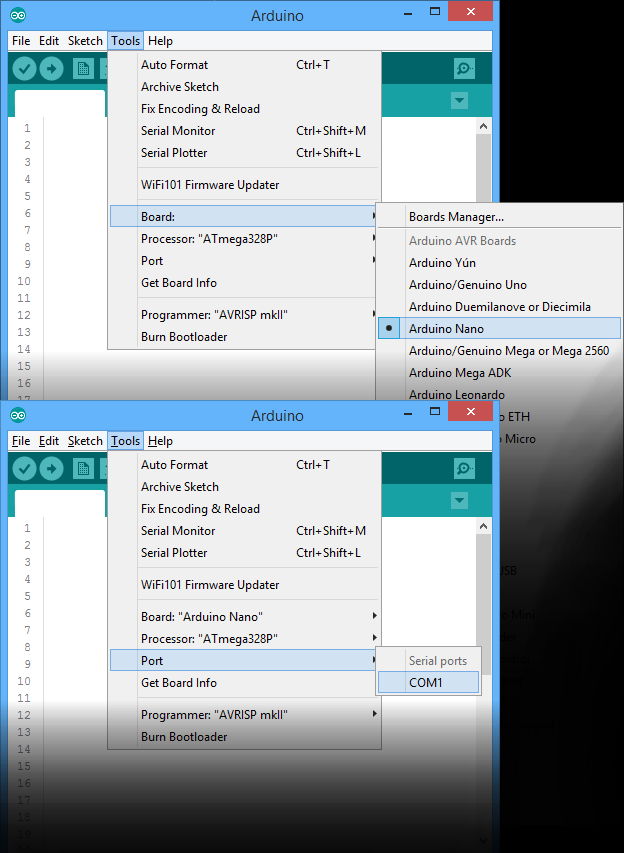
(the port number might be different, that's OK, the number could be different on a different computer, or the computer might have more than one port, if you pick wrong, just guess again later)
(on a Mac or Linux computer, the port names might not be numbers, they may look like "/dev/xxxxxxx")
Inside the Arduino IDE, open the "HardwareTestLEDsBlink" sketch (github link)...
Once the sketch is open, simply press the upload button...
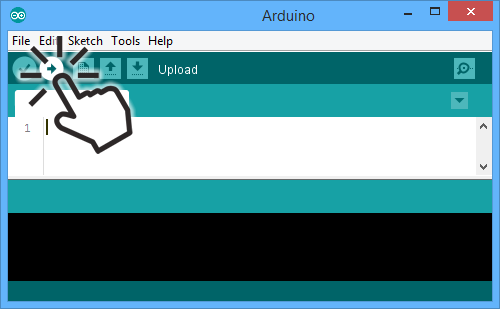
The compilation process will start first, and then the upload process will start. Wait for both to finish.
The LEDs on your robot should start to blink!
(NOTE: If you click verify instead of upload, the compiler will check if your code is understandable first, making sure it has no obvious mistakes, but it will not actually upload it. Uploading will automatically do the verification first.)
Debugging
When computers were first invented, there was actually a insect that crawled into the computer that caused problems, so removing the bug fixed it. And that's how the term debug came to be. Now in the modern world, debugging means more than just getting getting rid of bugs. Debugging is a term that sort of means "finding out what your code is doing", and then it also sometimes mean "getting rid of bugs".
Debugging typically involves a combination of gathering information and performing experiments (so you can gather more information). With Arduino, we can "gather information" through its pins (for example, turning on the LED if something happens), or through its communication port (we can make the Arduino write information onto a computer screen). By "performing experiments", I mean on Arduino, we can either give it different input signals, or we can change the code it runs slightly, and see what the result is through "gathering information". With more experiments, we get more clues as to what is wrong.
Some bugs happen too fast, so using the pins and LEDs wouldn't work because the LED blink would be too fast to see, so people generally prefer to write information to a computer screen instead. To make Arduino write stuff onto a computer screen, we use the Arduino Nano's serial port, which writes information that we can view with Arduino IDE's serial monitor.
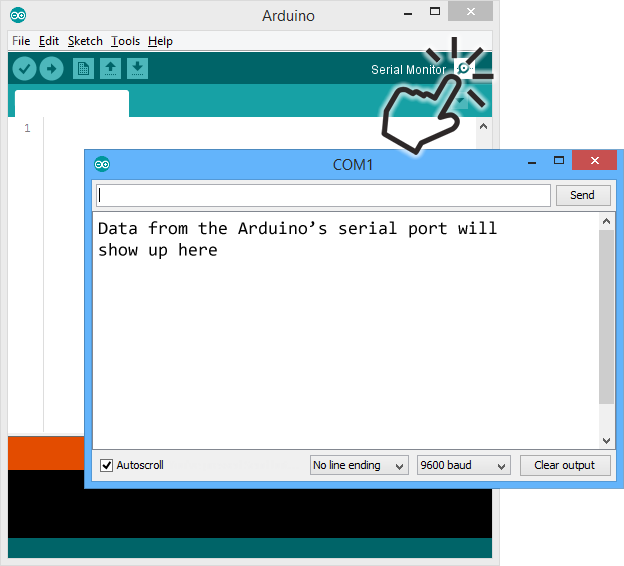
Try uploading the sketch named "SerialPortDemo" (github link). It will count a number through the serial terminal.
Troubleshooting Errors
If the Arduino IDE says there is an error, what should you do?
There should be a message saying what the error is, you can search up the error on a search engine for help.
Sometimes the error says that there's a problem with a particular line of code. You should then go read that line of code, and see if you made any mistakes.
Sometimes the error says that something is missing (like a missing variable, missing function, or a missing file). Then obviously you should check if it is actually missing, or maybe you misspelt a word. If you are sure that the thing is actually there, then ask "why can't the computer find it?" and think of the possibilities.
Most of the errors you get are probably just typos, spelling mistakes, or missing punctuation in the code.
If you get errors during upload, it might be because you have the wrong board or wrong port selected, and you can also try unplugging your USB cable, and then plugging it back in again.
Code Comments
Sometimes we want to write something in our code to explain something or to just make a note, but since programming languages have strict rules, normal English will confuse it. A code comment is a section of code that the computer ignores completely, so within a code comment, you can write whatever you want, in any language you want. Sometimes we even draw crude pictures using code comments.
In the Arduino programming language (which is also the same as C++), a code comment can be started with /* and ended with */, or if your comment is just one line, you can start it with // and it will automatically end at the end of the line.
/*
This is a big
multiple line
code comment
*/

// this is a small single line code comment

thisIsNotCodeComment(); // this is a code comment
Testing the Robot
We need to run more code to make sure all of our circuit works correctly, that all the components are not broken and all your soldering joints are done right. I have written a few sketches for you to run:
In each sketch, you should read the code, and read the code comments within the code to understand the code better.
The "BookWorm" Library
As I mentioned before, the sketchbook you've downloaded contains some code libraries. One of them is called "BookWorm", and you see code such as #include <BookWorm.h> and BookWorm.someWords(); a lot.
#include <BookWorm.h> is how we tell the compiler and IDE to include the "BookWorm" library.
The BookWorm library (github link) is here to make the code easier to understand, and easier to write. It also prevents the robot from doing sometime really stupid during one of the homework exercises.
For example, when you want to read the left side floor sensors, without the library, you need to write x = analogRead(A3);. But using the library, you can write x = BookWorm.readSensorLeftFloor(); instead.
How do you know what the library contains?
Continue Learning and Writing Code
The best way to learn how to write code is to first read code, run the code, and then make changes to the code. When you read code, you will see patterns, you will see the same words or symbols being used over and over again, your brain should be able to eventually work out how to repeat these patterns to write code. Sometimes you will see a number in the code, maybe it's a delay for the LED blinking? Change it and run the code and see if the LED blinks faster or slower. Maybe it's how fast the motor spins? Change it and see if the motor spins faster or slower. Play around, do not be afraid to make mistakes, mistakes can be undone or fixed and the robot is never going to break because of bad code.
Programming and computer science are huge subjects, I can't possibly write about all of them without literally quitting my job and becoming a full time author. But the beauty of Arduino is that it is open source and there is an enormous helpful online community around it and around electronics in general. It is very easy to find information and help, and there are plenty of websites with tutorials and guides for you to read.
But before I show you where to learn more, I need to make sure you can make the mental connection between what you read and our robot. Remember that our robot uses an Arduino Nano, and most websites will be writing about ordinary Arduinos (Uno, or Diecimila, or Duemilanove). All Arduinos have at least one LED, and one reset button. I will show you with a picture, so that when you read other tutorials and it talks about a LED or the reset button, you know where to look on the robot.
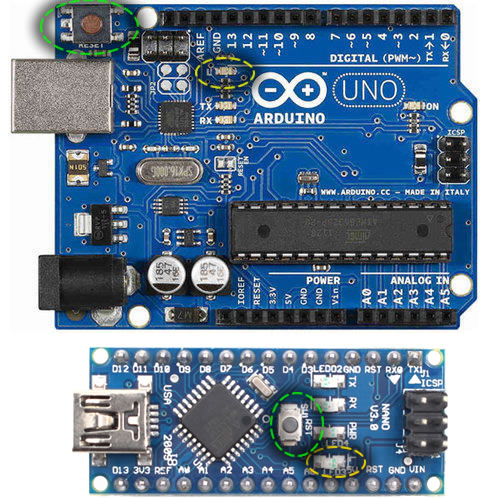
Our Arduino Nano has the same pins as an ordinary Arduino, but most of them are already connected to things on our robot, such as sensors. If you want to follow a tutorial and need to connect to a pin that is already used, then you can very simply unplug the Arduino Nano from the robot. Then you are able to just plug wires into the pins or plug the whole Arduino Nano into a breadboard, before following the tutorial you want to follow.
You do need to select "Arduino Nano" in the "board" menu, even if you are following tutorials for ordinary Arduinos.
Remember that all tutorials on the internet will not know about the BookWorm library.
If you run out of things to try and tutorials to read, you should try doing an entire project that's completely your own. But what should you build? To answer that question, think about what else you find fun and what part of your life could be improved with electronics. I like video games so I've built plenty of different video game controllers. I like Geocaching so I've built my own GPS locator. It doesn't have to be a robot, remember you can take the Arduino Nano off the robot, or just buy another Arduino.
And go join a team, maybe a robotics team, maybe a rocketry club, participate in competitions and hackathons. I've met the greatest people, made many friends, even found love, by looking for other people who love to do what I love to do.
Homework
I have a few exercises for you to try programming into your robot for practice. Then, the library will hold a robotics competition, and so the final homework will be for you to be ready for the competition.
Asking Questions, and participating in online communities
If you have a question, I am not the only person who can help. There's an entire internet full of people who can help you. But people on the internet get really annoyed if you ask a question in a wrong way, or worse, when you shouldn't be asking that question. Also, some people on the internet might sound very mean but they are not actually being mean, I don't want you to get offended when you read any answers.
The correct time and correct way to ask a question on the internet is actually a very large, and funny topic. There's an actually very famous webpage about how to ask questions:
http://www.catb.org/~esr/faqs/smart-questions.html
"How To Ask Questions The Smart Way" by Eric Steven Raymond and Rick Moen
(Eric and Rick wrote that webpage, they don't know much about Arduino and robotics so please do not email them)
The internet is sometimes a dangerous place. Remember, the people of almost any hobbyist community are really nice people, but the internet is visible to all people. You should definitely avoid ever writing your real name, phone number, email address, or real address. Somebody might pretend to be you, or give you prank phone calls, spam emails, or send the police to your house.
For our robot and Arduino in general, the best website to ask questions on are:
- The official Arduino Forum
- /r/arduino , the subreddit of Arduino on Reddit
- Arduino Stack Exchange